Sending Transactions Using Web3
This is a beginner friendly guide to sending Ethereum transactions using Web3. There are three main steps in order to send a transaction to the Ethereum blockchain: create, sign, and broadcast. We’ll go through all three, hopefully answering any questions you might have! In this tutorial, we'll be using Alchemy to send our transactions to the Ethereum chain. You can create a free Alchemy account here.
NOTE: This guide is for signing your transactions on the backend for your app. If you want to integrate signing your transactions on the frontend, check out integrating Web3 with a browser provider.
The Basics
Like most blockchain developers when they first start, you might have done some research on how to send a transaction (something that should be pretty simple) and ran into a plethora of guides, each saying different things and leaving you a bit overwhelmed and confused. If you’re in that boat, don’t worry; we all were at some point! So, before we start, let’s get a few things straight:
1. Alchemy does not store your private keys
- This means that Alchemy cannot sign and send transactions on your behalf. The reason for this is security purposes. Alchemy will never ask you to share your private key, and you should never share your private key with a hosted node (or anyone for that matter).
- You can read from the blockchain using Alchemy’s core API, but to write to it you’ll need to use something else to sign your transactions before sending them through Alchemy (this is the same for any other node service).
2. What is a “signer”?
- Signers will sign transactions for you using your private key. In this tutorial we’ll be using Alchemy web3 to sign our transaction, but you could also use any other web3 library.
- On the frontend, a good example of a signer would be MetaMask, which will sign and send transactions on your behalf.
3. Why do I need to sign my transactions?
- Every user that wants to send a transaction on the Ethereum network must sign the transaction (using their private key), in order to validate that the origin of the transaction is who it claims to be.
- It is super important to protect this private key, since having access to it grants full control over your Ethereum account, allowing you (or anyone with access) to perform transactions on your behalf.
4. How do I protect my private key?
- There are many ways to protect your private key and to use it to send off transactions. In this tutorial we will be using a
.envfile. However, you could also use a separate provider that stores private keys, use a keystore file, or other options.
5. What is the difference between eth_sendTransaction and eth_sendRawTransaction?
eth_sendTransaction and eth_sendRawTransaction are both Ethereum API functions which broadcast a transaction to the Ethereum network so it will be added to a future block. They differ in how they handle signing of the transactions.
eth_sendTransactionis used for sending unsigned transactions, which means the node you are sending to must manage your private key so it can sign the transaction before broadcasting it to the chain. Since Alchemy doesn't hold user's private keys, they do not support this method.eth_sendRawTransactionis used to broadcast transactions that have already been signed. This means you first have to usesignTransaction(tx, private_key), then pass in the result intoeth_sendRawTransaction.
When using web3, eth_sendRawTransaction is accessed by calling the function web3.eth.sendSignedTransaction.
This is what we will be using in this tutorial.
6. What is the web3 library?
- Web3.js is a wrapper library around the standard JSON-RPC calls that is quite common to use in Ethereum development.
- There are many web3 libraries for different languages. In this tutorial we’ll be using Alchemy Web3 which is written in JavaScript. You can check out other options here like ethers.js.
Okay, now that we have a few of these questions out of the way, let’s move on to the tutorial. Feel free to ask questions anytime in the Alchemy discord!
7. How to send secure, gas-optimized, and private transactions?
- Alchemy has a suite of Transact APIs. You can use these to send reinforced transactions, simulate transactions before they happen, send private transactions, and send gas-optimized transactions
- You can also use the Notify API to be alerted when your transaction is pulled from the mempool and added to the chain
NOTE: This guide requires an Alchemy account, an Ethereum address or MetaMask wallet, NodeJs, and npm installed. If not, follow these steps:
- Create a free Alchemy account
- Create MetaMask account (or get an Ethereum address)
- Follow these steps to install NodeJs and NPM
Steps to Sending your Transaction
1. Create an Alchemy app on the Sepolia testnet
Navigate to your Alchemy Dashboard and create a new app, choosing Sepolia (or any other testnet) for your network.
2. Request ETH from the Sepolia faucet
Follow the instructions on the Alchemy Sepolia faucet to receive ETH. Make sure to include your Sepolia Ethereum address (from MetaMask) and not another network. After following the instructions, double-check that you’ve received the ETH in your wallet.
3. Create a new project directory and cd into it
Create a new project directory from the command line (terminal for macs) and navigate into it:
1mkdir sendtx-example2cd sendtx-example4. Install Alchemy Web3 (or any web3 library)
Run the following command in your project directory to install Alchemy Web3:
Note, if you'd like to use the ethers.js library, follow the instructions here.
1npm install @alch/alchemy-web35. Install dotenv
We’ll use a .env file to safely store our API key and private key.
1npm install dotenv --save6. Create the .env file
Create a .env file in your project directory and add the following (replacing “your-api-url" and "your-private-key")
- To find your Alchemy API URL, navigate to the app details page of the app you just created on your dashboard, click “View Key” in the top right corner, and grab the HTTP URL.
- To find your private key using MetaMask, check out this guide.
1API_URL = "your-api-url"2PRIVATE_KEY = "your-private-key".env! Please make sure never to share or expose your .env file with anyone, as you are compromising your secrets in doing so. If you are using version control, add your .env to a gitignore file.7. Create sendTx.js file
Great, now that we have our sensitive data protected in a .env file, let’s start coding. For our send transaction example, we’ll be sending ETH back to the Sepolia faucet.
Create a sendTx.js file, which is where we will configure and send our example transaction, and add the following lines of code to it:
1async function main() {2 require('dotenv').config();3 const { API_URL, PRIVATE_KEY } = process.env;4 const { createAlchemyWeb3 } = require("@alch/alchemy-web3");5 const web3 = createAlchemyWeb3(API_URL);6 const myAddress = '0x610Ae88399fc1687FA7530Aac28eC2539c7d6d63' //TODO: replace this address with your own public address78 const nonce = await web3.eth.getTransactionCount(myAddress, 'latest'); // nonce starts counting from 0910 const transaction = {11 'to': '0x31B98D14007bDEe637298086988A0bBd31184523', // faucet address to return eth12 'value': 1000000000000000000, // 1 ETH13 'gas': 30000,14 'nonce': nonce,15 // optional data field to send message or execute smart contract16 };1718 const signedTx = await web3.eth.accounts.signTransaction(transaction, PRIVATE_KEY);1920 web3.eth.sendSignedTransaction(signedTx.rawTransaction, function(error, hash) {21 if (!error) {22 console.log("🎉 The hash of your transaction is: ", hash, "\n Check Alchemy's Mempool to view the status of your transaction!");23 } else {24 console.log("❗Something went wrong while submitting your transaction:", error)25 }26 });27}2829main();HammasiBe sure to replace the address on line 6 with your own public address.
Now, before we jump into running this code, let's talk about some of the components here.
nonce: The nonce specification is used to keep track of the number of transactions sent from your address. We need this for security purposes and to prevent replay attacks. To get the number of transactions sent from your address we use getTransactionCount.transaction: The transaction object has a few aspects we need to specifyto: This is the address we want to send ETH to. In this case, we are sending ETH back to the Sepolia faucet we initially requested from.value: This is the amount we wish to send, specified in Wei where 10^18 Wei = 1 ETHgas: There are many ways to determine the right amount of gas to include with your transaction. Alchemy even has a gas price webhook to notify you when the gas price falls within a certain threshold. For Mainnet transactions, it's good practice to check a gas estimator like ETH Gas Station to determine the right amount of gas to include. 21000 is the minimum amount of gas an operation on Ethereum will use, so to ensure our transaction will be executed we put 30000 here.nonce: see above nonce definition. Nonce starts counting from zero.- [OPTIONAL] data: Used for sending additional information with your transfer, or calling a smart contract, not required for balance transfers, check out the note below.
signedTx: To sign our transaction object we will use thesignTransactionmethod with ourPRIVATE_KEYsendSignedTransaction: Once we have a signed transaction, we can send it off to be included in a subsequent block by usingsendSignedTransaction
A Note on data There are a two main types of transactions that can be sent in Ethereum.
- Balance transfer: Send ETH from one address to another. No data field required, however, if you'd like to send additional information alongside your transaction, you can include that information in HEX format in this field.
- For example, let's say we wanted to write the hash of an IPFS document to the Ethereum chain in order to give it an immutable timestamp. Our data field should then look like data:
web3.utils.toHex(‘IPFS hash‘). And now anyone can query the chain and see when that document was added.
- For example, let's say we wanted to write the hash of an IPFS document to the Ethereum chain in order to give it an immutable timestamp. Our data field should then look like data:
- Smart contract transaction: Execute some smart contract code on the chain. In this case, the data field should contain the smart function you wish to execute, alongside any parameters.
- For a practical example, check out Step 8 in this Hello World Tutorial.
8. Run the code using node sendTx.js
Navigate back to your terminal or command line and run:
1node sendTx.js9. See your transaction in the Mempool
Open up the Mempool page in your Alchemy dashboard and filter by the app you created to find your transaction. This is where we can watch our transaction transition from pending state to mined state (if successful) or dropped state if unsuccessful. Make sure to keep it on “All” so that you capture “mined”, “pending”, and “dropped” transactions. You can also search for your transaction by looking for transactions sent to address 0x31b98d14007bdee637298086988a0bbd31184523 .
To view the details of your transaction once you’ve found it, select the tx hash, which should take you to a view that looks like this:
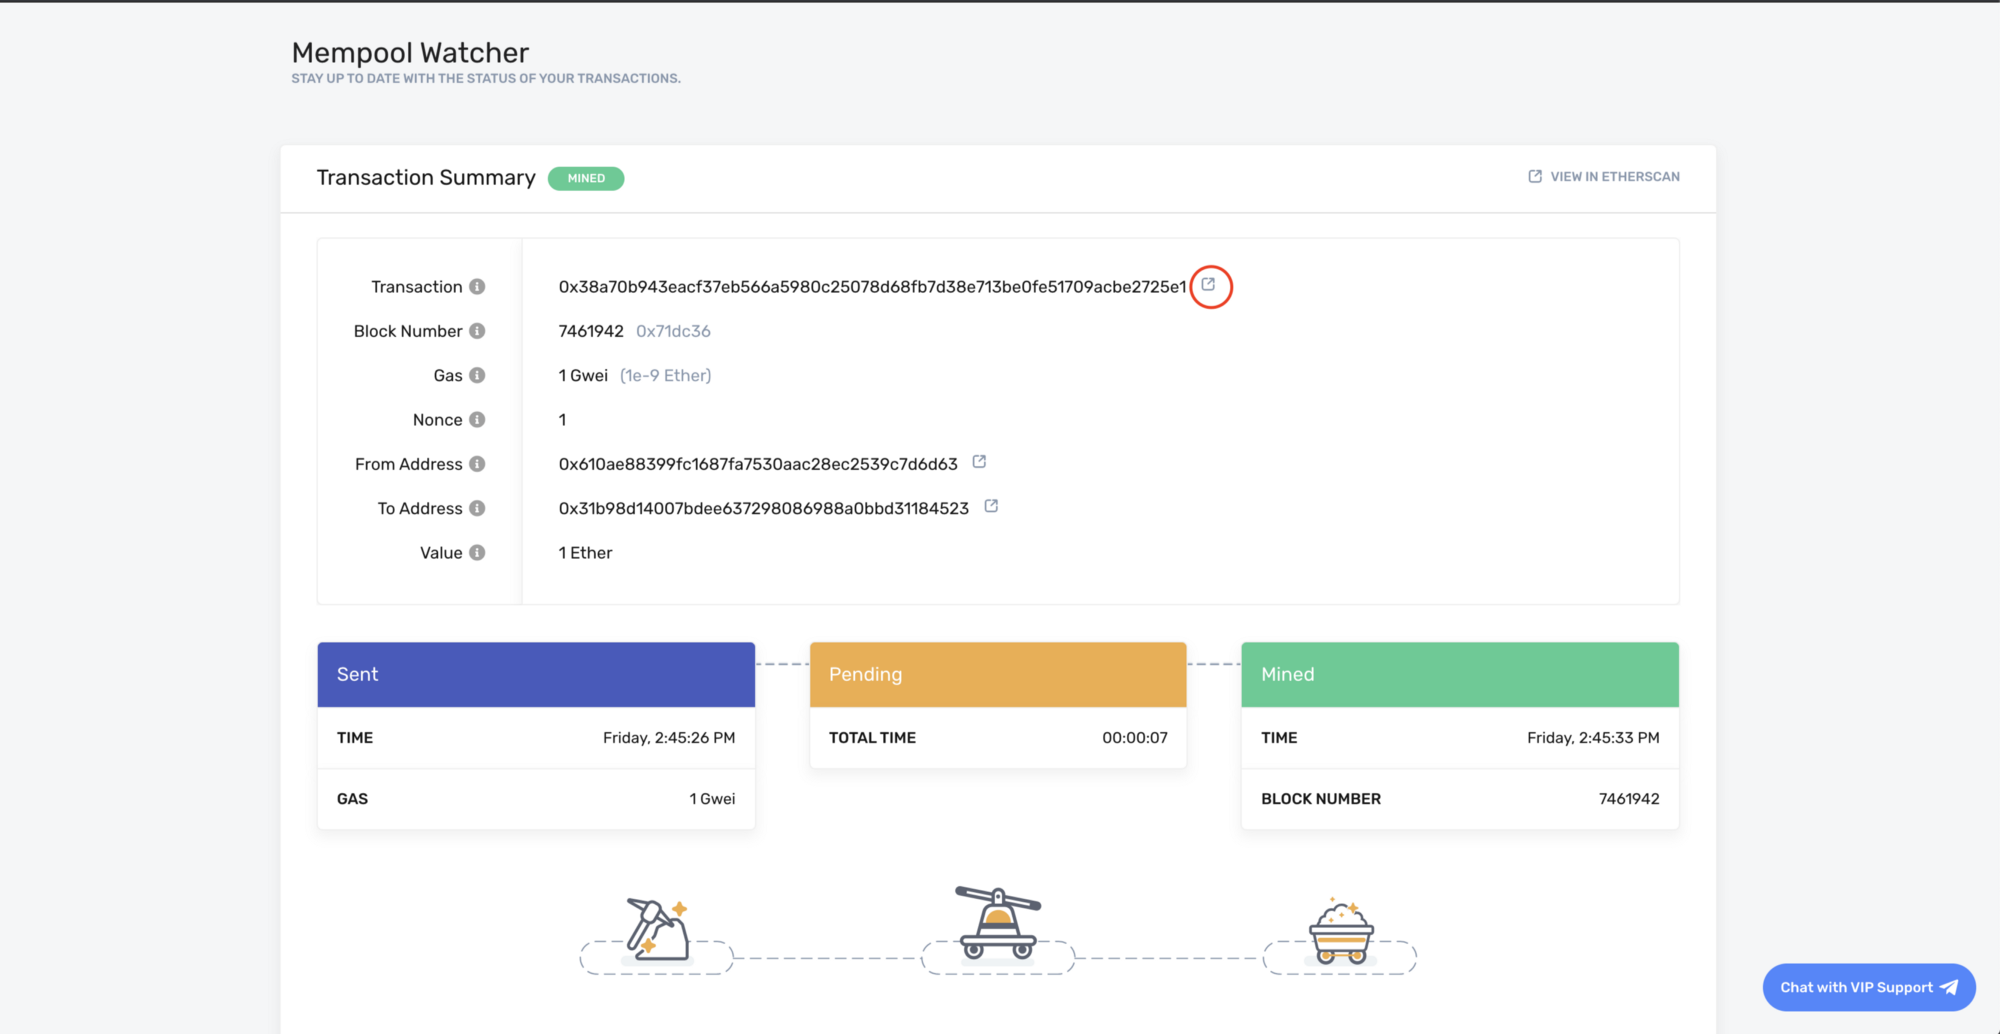
From there you can view your transaction on Etherscan by clicking on the icon circled in red!
Yippieeee! You just sent your first Ethereum transaction using Alchemy 🎉
For feedback and suggestions about this guide, please message Elan on Alchemy’s Discord!
Originally published at https://docs.alchemyapi.io/tutorials/sending-transactions-using-web3-and-alchemy