A Python developer's introduction to Ethereum, part 1
So, you’ve heard about this Ethereum thing and are ready to venture down the rabbit hole? This post will quickly cover some blockchain basics, then get you interacting with a simulated Ethereum node – reading block data, checking account balances, and sending transactions. Along the way, we’ll highlight the differences between traditional ways of building apps and this new decentralized paradigm.
(Soft) prerequisites
This post aspires to be accessible to a wide range of developers. Python tools will be involved, but they are just a vehicle for the ideas – no problem if you are not a Python developer. I will, however, be making just a few assumptions about what you already know, so we can quickly move on the Ethereum-specific bits.
Assumptions:
- You can get around in a terminal,
- You've written a few lines of Python code,
- Python version 3.6 or greater is installed on your machine (use of a virtual environment (opens in a new tab) is strongly encouraged), and
- you’ve used
pip, Python’s package installer. Again, if any of these are untrue, or you don’t plan to reproduce the code in this article, you can likely still follow along just fine.
Blockchains, briefly
There are many ways to describe Ethereum, but at its heart is a blockchain. Blockchains are made up of a series of blocks, so let’s start there. In the simplest terms, each block on the Ethereum blockchain is just some metadata and a list of transactions. In JSON format, that looks something like this:
{
   "number": 1234567,
   "hash": "0xabc123...",
   "parentHash": "0xdef456...",
   ...,
   "transactions": [...]
}
Each block has a reference to the block that came before it; the parentHash is simply the hash of the previous block.

A blockchain is essentially a linked list; each block has a reference to the previous block.
This data structure is nothing novel, but the rules (i.e., peer-to-peer protocols) that govern the network are. There’s no central authority; the network of peers must collaborate to sustain the network, and compete to decide which transactions to include in the next block. So, when you want to send some money to a friend, you’ll need to broadcast that transaction to the network, then wait for it to be included in an upcoming block.
The only way for the blockchain to verify that money was truly sent from one user to another is to use a currency native to (i.e., created and governed by) that blockchain. In Ethereum, this currency is called ether, and the Ethereum blockchain contains the only official record of account balances.
A new paradigm
This new decentralized tech stack has spawned new developer tools. Such tools exist in many programming languages, but we’ll be looking through the Python lens. To reiterate: even if Python isn’t your language of choice, it shouldn’t be much trouble to follow along.
Python developers that want to interact with Ethereum are likely to reach for Web3.py (opens in a new tab). Web3.py is a library that greatly simplifies the way you connect to an Ethereum node, then send and receive data from it.
Ethereum clients can be configured to be reachable by IPC (opens in a new tab), HTTP, or Websockets, so Web3.py will need to mirror this configuration. Web3.py refers to these connection options as providers. You’ll want to choose one of the three providers to link the Web3.py instance with your node.
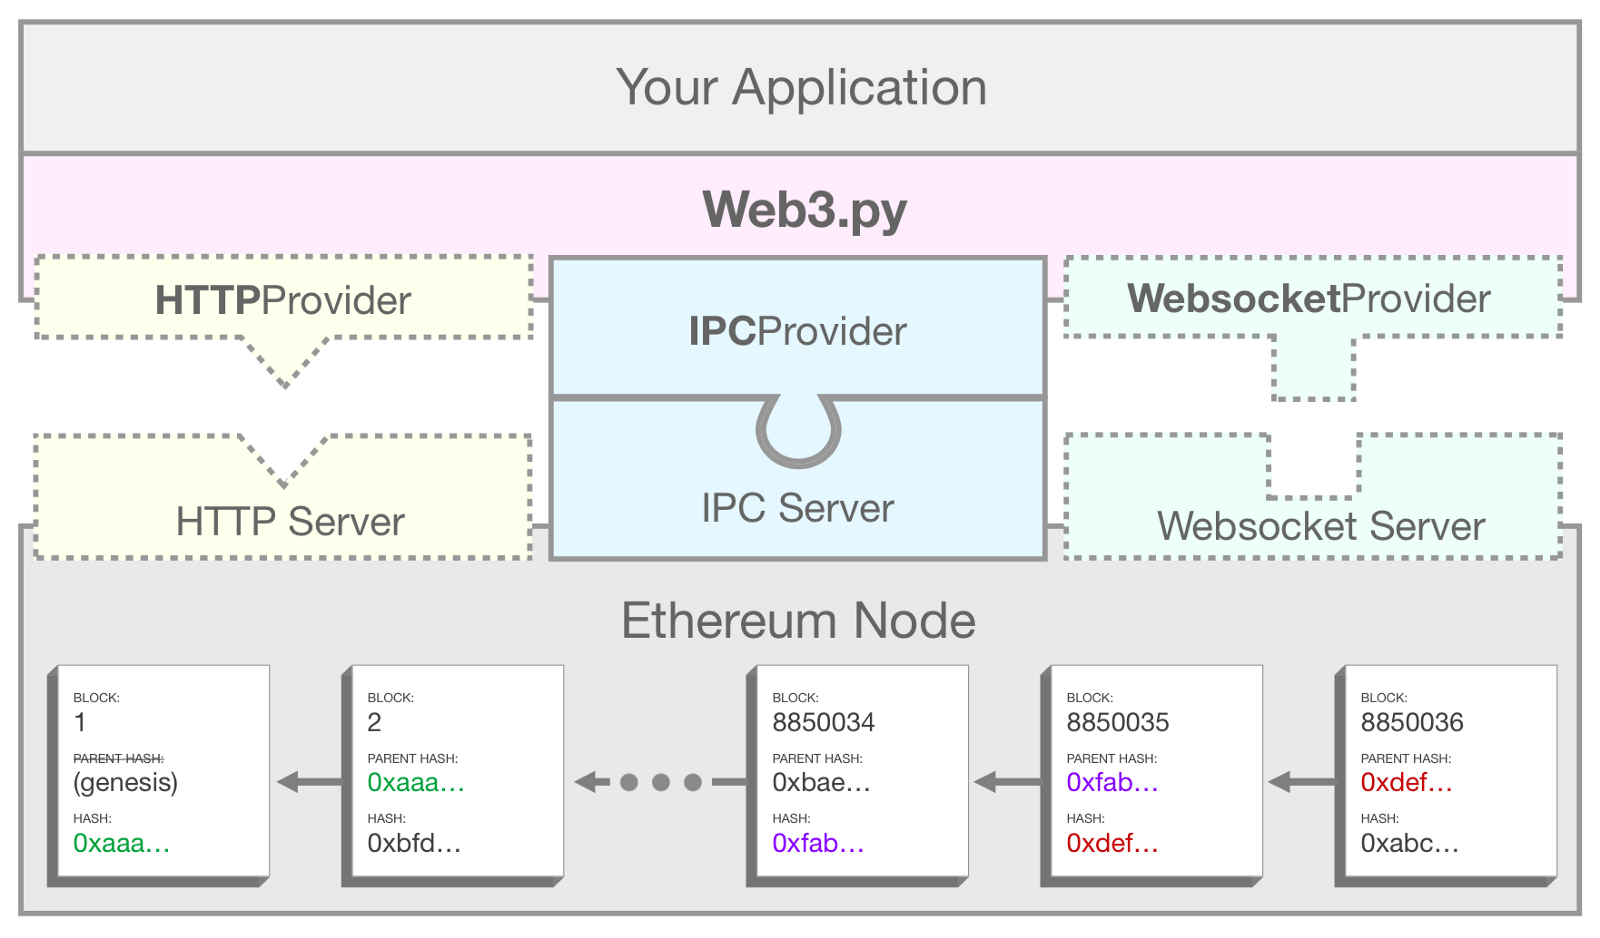
Configure the Ethereum node and Web3.py to communicate via the same protocol, e.g., IPC in this diagram.
Once Web3.py is properly configured, you can begin to interact with the blockchain. Here’s a couple of Web3.py usage examples as a preview of what’s to come:
# read block data:
w3.eth.get_block('latest')

# send a transaction:
w3.eth.send_transaction({'from': ..., 'to': ..., 'value': ...})
Installation
In this walkthrough, we’ll just be working within a Python interpreter. We won't be creating any directories, files, classes or functions.
$ are intended to be run in the terminal. (Do not type the $, it just signifies the start of the line.)First, install IPython (opens in a new tab) for a user-friendly environment to explore in. IPython offers tab completion, among other features, making it much easier to see what’s possible within Web3.py.
pip install ipython
Web3.py is published under the name web3. Install it like so:
pip install web3
One more thing – we're going to simulate a blockchain later, which requires a couple more dependencies. You can install those via:
pip install 'web3[tester]'
You’re all set up to go!
Note: The web3[tester] package works up to Python 3.10.xx
Spin up a sandbox
Open up a new Python environment by running ipython in your terminal. This is comparable to running python, but comes with more bells and whistles.
ipython
This will print out some information about the versions of Python and IPython you’re running, then you should see a prompt waiting for input:
In [1]:
You’re looking at an interactive Python shell now. Essentially, it's a sandbox to play in. If you’ve made it this far, it's time to import Web3.py:
In [1]: from web3 import Web3
Introducing the Web3 module
Besides being a gateway to Ethereum, the Web3 (opens in a new tab) module offers a few convenience functions. Let’s explore a couple.
In an Ethereum application, you will commonly need to convert currency denominations. The Web3 module provides a couple of helper methods just for this: from_wei (opens in a new tab) and to_wei (opens in a new tab).
Note: Computers are notoriously bad at handling decimal math. To get around this, developers often store dollar amounts in cents. For example, an item with a price of $5.99 may be stored in the database as 599.
A similar pattern is used when handling transactions in ether. However, instead of two decimal points, ether has 18! The smallest denomination of ether is called wei, so that’s the value specified when sending transactions.
1 ether = 1000000000000000000 wei
1 wei = 0.000000000000000001 ether
Try converting some values to and from wei. Note that there are names for many of the denominations (opens in a new tab) in between ether and wei. One of the better known among them is gwei, as it’s often how transaction fees are represented.
In [2]: Web3.to_wei(1, 'ether')
Out[2]: 1000000000000000000

In [3]: Web3.from_wei(500000000, 'gwei')
Out[3]: Decimal('0.5')
Other utility methods on the Web3 module include data format converters (e.g., toHex (opens in a new tab)), address helpers (e.g., isAddress (opens in a new tab)), and hash functions (e.g., keccak (opens in a new tab)). Many of these will be covered later in the series. To view all the available methods and properties, utilize IPython’s auto-complete by typing Web3. and hitting the tab key twice after the period.
Talk to the chain
The convenience methods are lovely, but let’s move on to the blockchain. The next step is to configure Web3.py to communicate with an Ethereum node. Here we have the option to use the IPC, HTTP, or Websocket providers.
We won't be going down this path, but an example of a complete workflow using the HTTP Provider might look something like this:
- Download an Ethereum node, e.g., Geth (opens in a new tab).
- Start Geth in one terminal window and wait for it to sync the network. The default HTTP port is
8545, but is configurable. - Tell Web3.py to connect to the node via HTTP, on
localhost:8545.w3 = Web3(Web3.HTTPProvider('http://127.0.0.1:8545')) - Use the
w3instance to interact with the node.
While this is one “real” way to do it, the syncing process takes hours and is unnecessary if you just want a development environment. Web3.py exposes a fourth provider for this purpose, the EthereumTesterProvider. This tester provider links to a simulated Ethereum node with relaxed permissions and fake currency to play with.
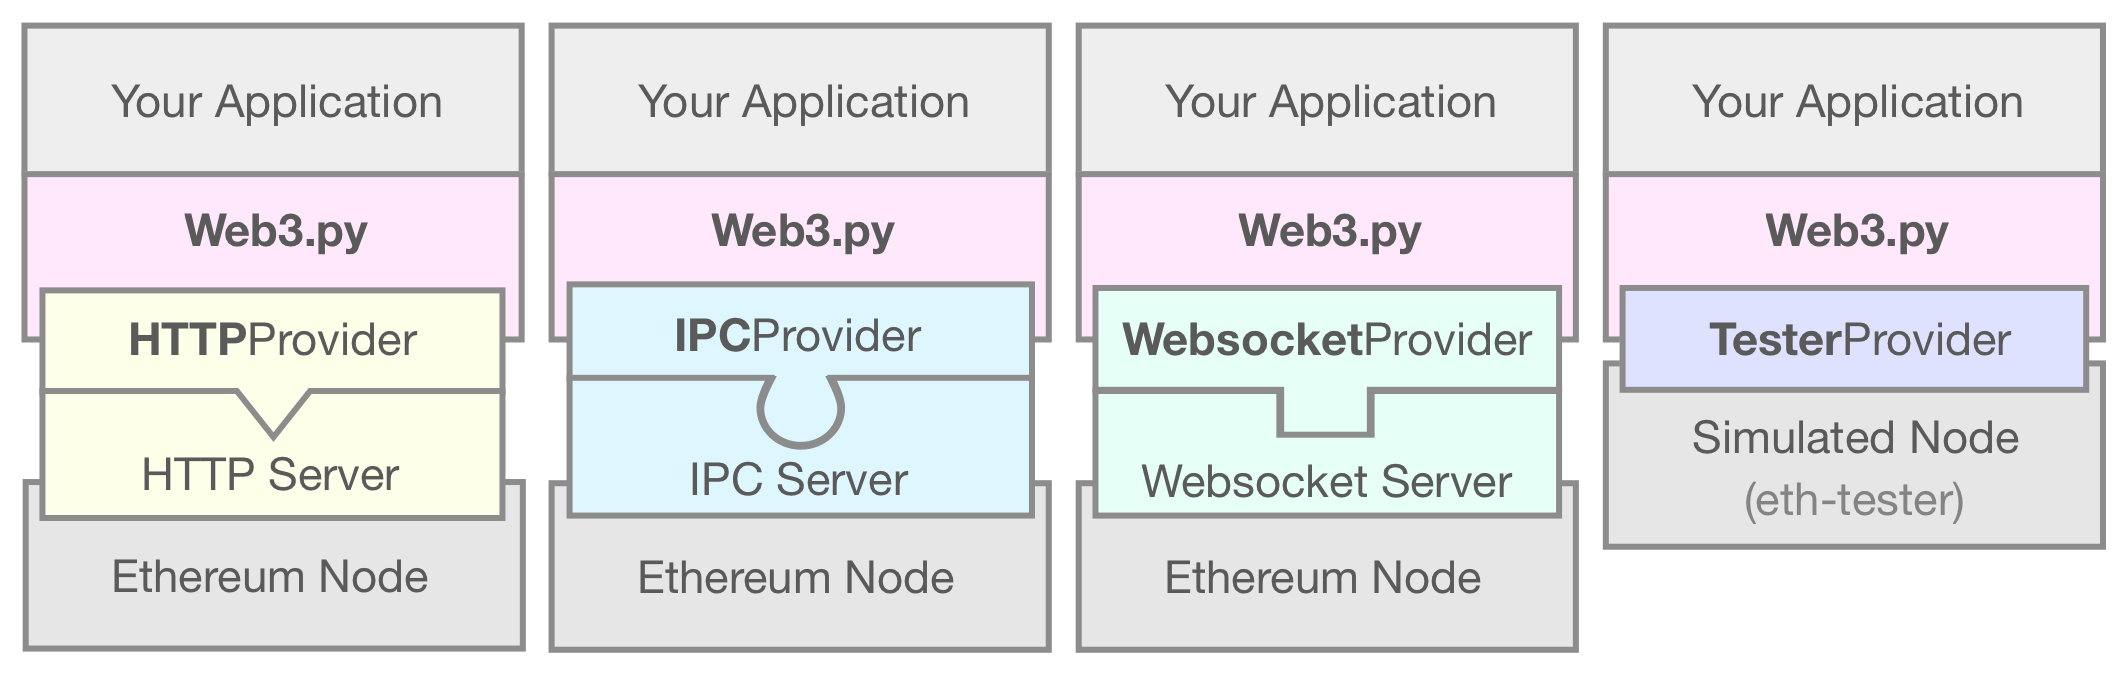
The EthereumTesterProvider connects to a simulated node and is handy for quick development environments.
That simulated node is called eth-tester (opens in a new tab) and we installed it as part of the pip install web3[tester] command. Configuring Web3.py to use this tester provider is as simple as:
In [4]: w3 = Web3(Web3.EthereumTesterProvider())
Now you’re ready to surf the chain! That’s not a thing people say. I just made that up. Let’s take a quick tour.
The quick tour
First things first, a sanity check:
In [5]: w3.is_connected()
Out[5]: True
Since we’re using the tester provider, this isn’t a very valuable test, but if it does fail, chances are you typed something in wrong when instantiating the w3 variable. Double-check that you included the inner parentheses, i.e., Web3.EthereumTesterProvider().
Tour stop #1: accounts
As a convenience, the tester provider created some accounts and preloaded them with test ether.
First, let’s see a list of those accounts:
In [6]: w3.eth.accounts
Out[6]: ['0x7E5F4552091A69125d5DfCb7b8C2659029395Bdf',
 '0x2B5AD5c4795c026514f8317c7a215E218DcCD6cF',
 '0x6813Eb9362372EEF6200f3b1dbC3f819671cBA69', ...]
If you run this command, you should see a list of ten strings that begin with 0x. Each is a public address and is, in some ways, analogous to the account number on a checking account. You would provide this address to someone that wanted to send you ether.
As mentioned, the tester provider has preloaded each of these accounts with some test ether. Let’s find out how much is in the first account:
In [7]: w3.eth.get_balance(w3.eth.accounts[0])
Out[7]: 1000000000000000000000000
That’s a lot of zeros! Before you go laughing all the way to the fake bank, recall that lesson about currency denominations from earlier. Ether values are represented in the smallest denomination, wei. Convert that to ether:
In [8]: w3.from_wei(1000000000000000000000000, 'ether')
Out[8]: Decimal('1000000')
One million test ether — still not too shabby.
Tour stop #2: block data
Let’s take a peek at the state of this simulated blockchain:
In [9]: w3.eth.get_block('latest')
Out[9]: AttributeDict({
   'number': 0,
   'hash': HexBytes('0x9469878...'),
   'parentHash': HexBytes('0x0000000...'),
   ...
   'transactions': []
})
A lot of information gets returned about a block, but just a couple things to point out here:
- The block number is zero — no matter how long ago you configured the tester provider. Unlike the real Ethereum network, which adds a new block every 12 seconds, this simulation will wait until you give it some work to do.
transactionsis an empty list, for the same reason: we haven’t done anything yet. This first block is an empty block, just to kick off the chain.- Notice that the
parentHashis just a bunch of empty bytes. This signifies that it's the first block in the chain, also known as the genesis block.
Tour stop #3: transactions
We’re stuck at block zero until there’s a pending transaction, so let’s give it one. Send a few test ether from one account to another:
In [10]: tx_hash = w3.eth.send_transaction({
   'from': w3.eth.accounts[0],
   'to': w3.eth.accounts[1],
   'value': w3.to_wei(3, 'ether'),
   'gas': 21000
})
This is typically the point where you’d wait for several seconds for your transaction to get included in a new block. The full process goes something like this:
- Submit a transaction and hold on to the transaction hash. Until the block containing the transaction is created and broadcast, the transaction is “pending.”
tx_hash = w3.eth.send_transaction({ … }) - Wait for the transaction to be included in a block:
w3.eth.wait_for_transaction_receipt(tx_hash) - Continue application logic. To view the successful transaction:
w3.eth.get_transaction(tx_hash)
Our simulated environment will add the transaction in a new block instantly, so we can immediately view the transaction:
In [11]: w3.eth.get_transaction(tx_hash)
Out[11]: AttributeDict({
   'hash': HexBytes('0x15e9fb95dc39...'),
   'blockNumber': 1,
   'transactionIndex': 0,
   'from': '0x7E5F4552091A69125d5DfCb7b8C2659029395Bdf',
   'to': '0x2B5AD5c4795c026514f8317c7a215E218DcCD6cF',
   'value': 3000000000000000000,
   ...
})
You’ll see some familiar details here: the from, to, and value fields should match the inputs of our send_transaction call. The other reassuring bit is that this transaction was included as the first transaction ('transactionIndex': 0) within block number 1.
We can also easily verify the success of this transaction by checking the balances of the two accounts involved. Three ether should have moved from one to another.
In [12]: w3.eth.get_balance(w3.eth.accounts[0])
Out[12]: 999996999979000000000000

In [13]: w3.eth.get_balance(w3.eth.accounts[1])
Out[13]: 1000003000000000000000000
The latter looks good! The balance went from 1,000,000 to 1,000,003 ether. But what happened to the first account? It appears to have lost slightly more than three ether. Alas, nothing in life is free, and using the Ethereum public network requires that you compensate your peers for their supporting role. A small transaction fee was deducted from the account that submitted the transaction - this fee is the amount of gas burned (21000 units of gas for an ETH transfer) multiplied by a base fee that varies according to network activity plus a tip that goes to the validator that includes the transaction in a block.
More on gas
And breathe
We’ve been at this for a while, so this seems as good a place as any to take a break. The rabbit hole continues on, and we’ll continue exploring in part two of this series. Some concepts to come: connecting to a real node, smart contracts, and tokens. Have follow-up questions? Let me know! Your feedback will influence where we go from here. Requests welcome via Twitter (opens in a new tab).