Chytrý kontrakt Hello World pro začátečníky
Pokud jste ve vývoji na blockchainu nováčkem a nevíte, kde začít, nebo pokud jen chcete pochopit, jak nasadit a interagovat s chytrými kontrakty, tento průvodce je pro vás. Projdeme si vytvoření a nasazení jednoduchého chytrého kontraktu v testovací síti Sepolia pomocí virtuální peněženky MetaMask (opens in a new tab), Solidity (opens in a new tab), Hardhat (opens in a new tab) a Alchemy (opens in a new tab) (nebojte se, pokud zatím nerozumíte, co to všechno znamená, vysvětlíme si to).
Ve 2. části tohoto tutoriálu si projdeme, jak můžeme s naším chytrým kontraktem interagovat, jakmile je zde nasazen, a ve 3. části se podíváme na to, jak jej publikovat na Etherscanu.
Pokud budete mít kdykoli nějaké dotazy, neváhejte se ozvat na Discordu Alchemy (opens in a new tab)!
Krok 1: Připojení k síti Ethereum
Existuje mnoho způsobů, jak zadávat požadavky na řetězec Ethereum. Pro jednoduchost použijeme bezplatný účet na Alchemy, vývojářské platformě pro blockchain a API, která nám umožňuje komunikovat s řetězcem Ethereum, aniž bychom museli provozovat vlastní uzly. Platforma má také vývojářské nástroje pro monitorování a analytiku, které v tomto tutoriálu využijeme k pochopení toho, co se děje pod pokličkou při nasazení našeho chytrého kontraktu. Pokud ještě nemáte účet na Alchemy, můžete se zde zdarma zaregistrovat (opens in a new tab).
Krok 2: Vytvoření aplikace (a API klíče)
Jakmile si vytvoříte účet na Alchemy, můžete si vygenerovat API klíč vytvořením aplikace. To nám umožní zadávat požadavky do testovací sítě Sepolia. Pokud nejste obeznámeni s testovacími sítěmi, podívejte se na tuto stránku.
- Přejděte na stránku „Create new app“ (Vytvořit novou aplikaci) na svém panelu Alchemy tak, že v navigačním panelu vyberete „Select an app“ (Vybrat aplikaci) a kliknete na „Create new app“.
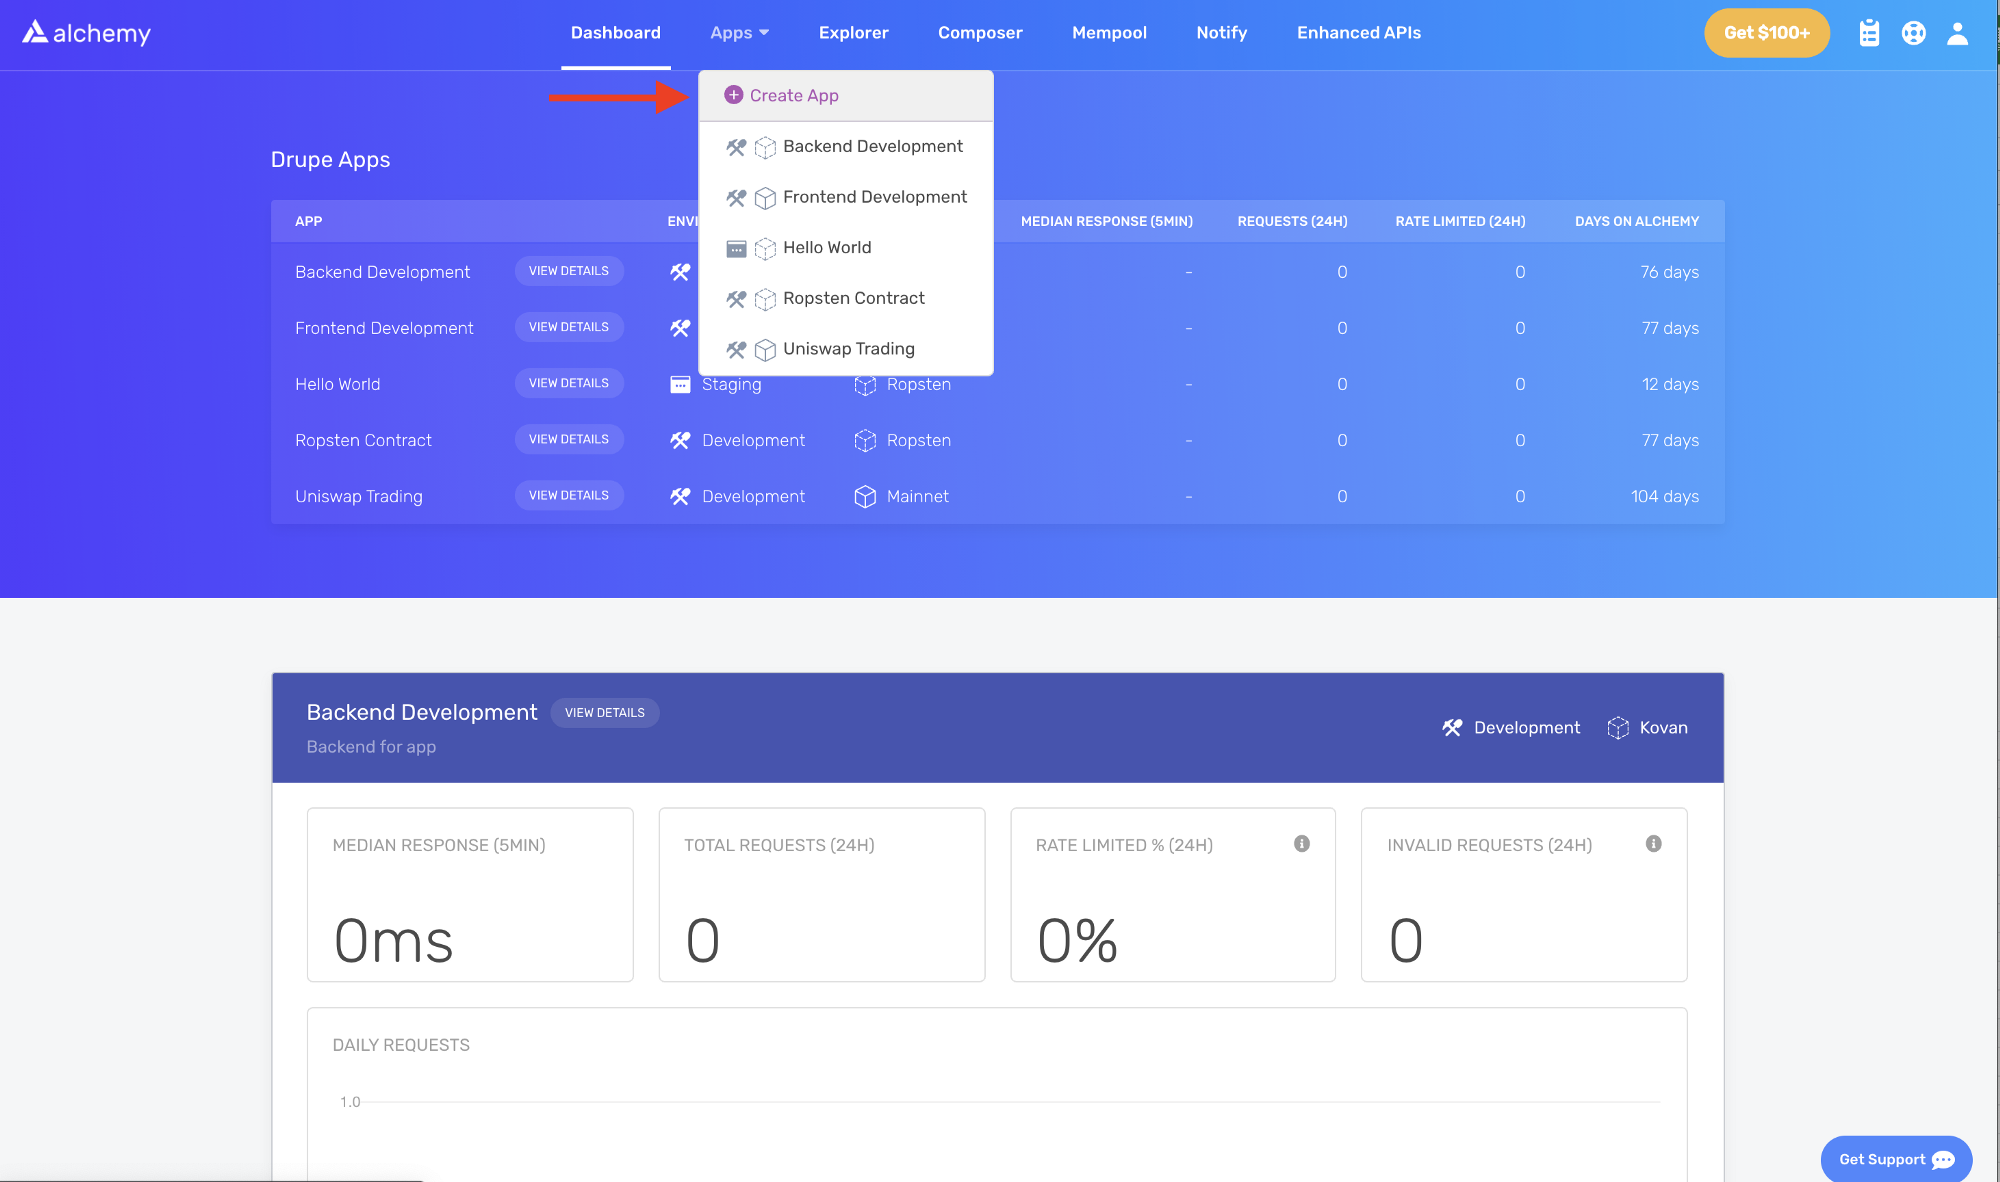
- Pojmenujte svou aplikaci „Hello World“, přidejte krátký popis a vyberte případ použití, např. „Infra & Tooling“. Dále vyhledejte „Ethereum“ a vyberte síť.
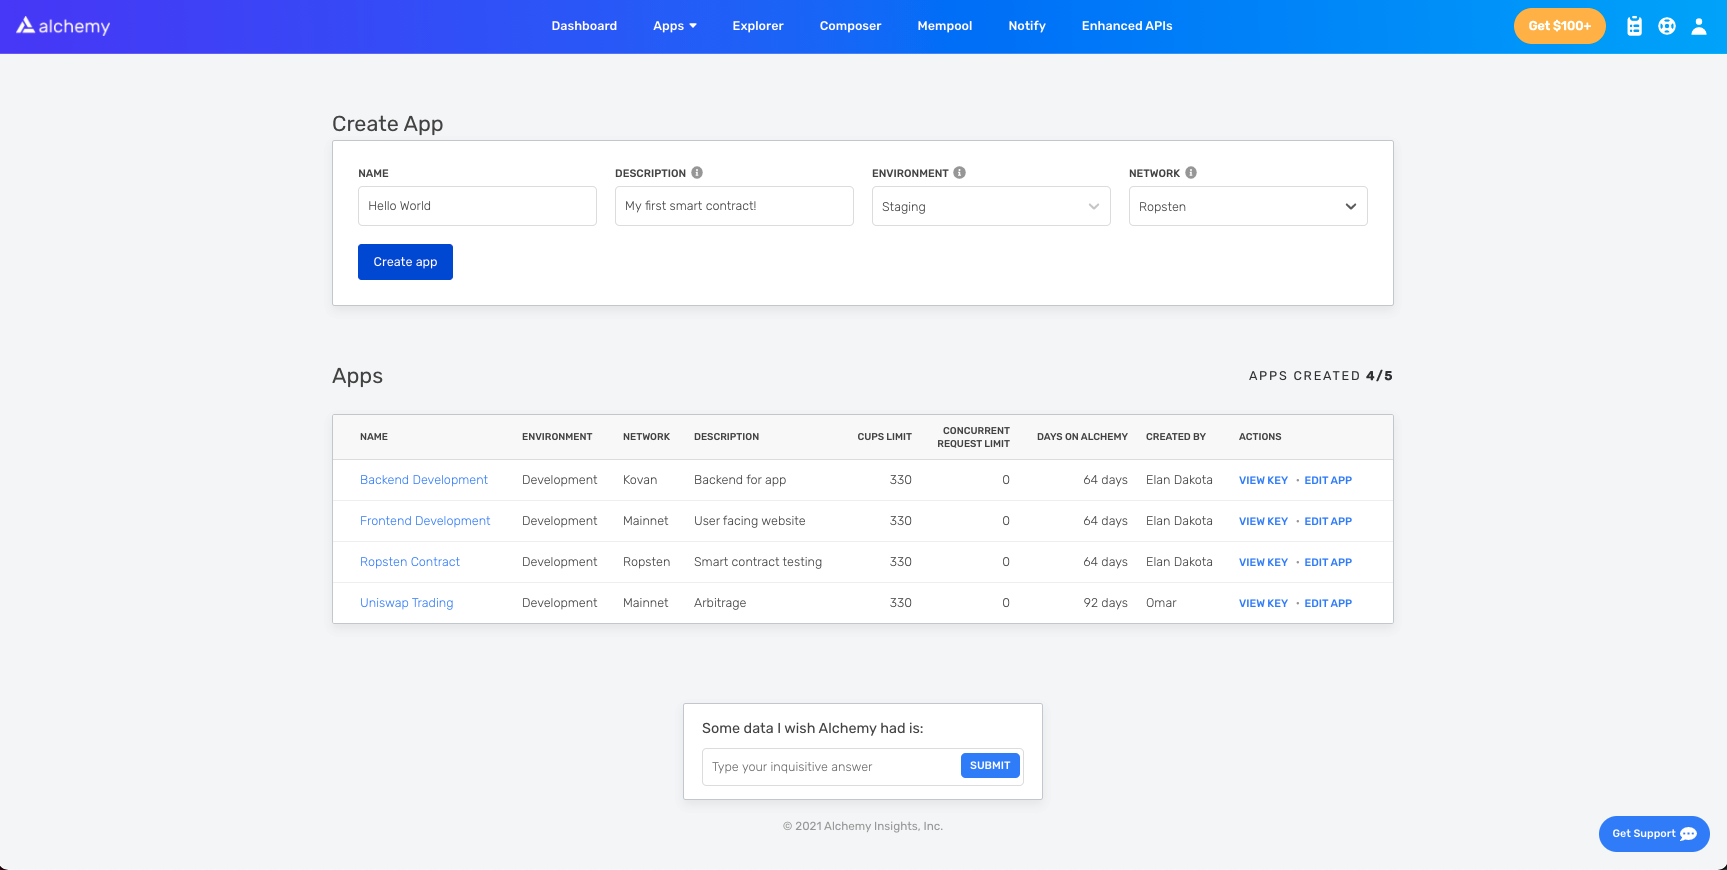
- Pokračujte kliknutím na „Next“ (Další), poté na „Create app“ (Vytvořit aplikaci) a to je vše! Vaše aplikace by se měla objevit v rozbalovací nabídce navigačního panelu s API klíčem, který si můžete zkopírovat.
Krok 3: Vytvoření účtu Ethereum (adresy)
K odesílání a přijímání transakcí potřebujeme účet Ethereum. Pro tento tutoriál použijeme MetaMask, virtuální peněženku v prohlížeči, která se používá ke správě adresy vašeho účtu Ethereum. Více o transakcích.
MetaMask si můžete stáhnout a účet Ethereum si zdarma vytvořit zde (opens in a new tab). Při vytváření účtu, nebo pokud již účet máte, se ujistěte, že jste pomocí rozbalovací nabídky sítí přepnuli na testovací síť „Sepolia“ (abychom nepracovali se skutečnými penězi).
Pokud v seznamu nevidíte síť Sepolia, přejděte do nabídky, poté do Advanced (Pokročilé) a přejděte dolů, abyste zapnuli možnost „Show test networks“ (Zobrazit testovací sítě). V nabídce výběru sítě zvolte kartu „Custom“ (Vlastní), kde najdete seznam testovacích sítí, a vyberte „Sepolia“.

Krok 4: Přidání etheru z faucetu
Abychom mohli nasadit náš chytrý kontrakt do testovací sítě, budeme potřebovat nějaké falešné ETH. Chcete-li získat Sepolia ETH, můžete přejít na podrobnosti o síti Sepolia, kde najdete seznam různých faucetů. Pokud jeden nefunguje, zkuste jiný, protože někdy mohou vyschnout. Přijetí falešného ETH může kvůli provozu v síti nějakou dobu trvat. Brzy poté byste měli vidět ETH na svém účtu MetaMask!
Krok 5: Kontrola zůstatku
Abychom si ověřili, že tam náš zůstatek je, vytvořme požadavek eth_getBalance pomocí nástroje composer od Alchemy (opens in a new tab). Tím se vrátí množství ETH v naší peněžence. Po zadání adresy vašeho účtu MetaMask a kliknutí na „Send Request“ (Odeslat požadavek) byste měli vidět podobnou odpověď:
{ "jsonrpc": "2.0", "id": 0, "result": "0x2B5E3AF16B1880000" }
POZNÁMKA: Tento výsledek je ve Wei, nikoli v ETH. Wei se používá jako nejmenší nominální hodnota etheru. Převod z Wei na ETH je: 1 eth = 1018 Wei. Pokud tedy převedeme 0x2B5E3AF16B1880000 do desítkové soustavy, dostaneme 5*10¹⁸, což se rovná 5 ETH.
Uf! Naše falešné peníze tam všechny jsou .
Krok 6: Inicializace našeho projektu
Nejprve budeme muset vytvořit složku pro náš projekt. Přejděte do příkazového řádku a zadejte:
mkdir hello-world
cd hello-world
Nyní, když jsme ve složce našeho projektu, použijeme npm init k inicializaci projektu. Pokud ještě nemáte nainstalované npm, postupujte podle pokynů k instalaci Node.js (opens in a new tab) (pro tento tutoriál budeme potřebovat Node.js a npm).
npm init
Nezáleží na tom, jak odpovíte na instalační otázky, zde je pro referenci ukázka, jak jsme to udělali my:
package name: (hello-world)
version: (1.0.0)
description: hello world smart contract
entry point: (index.js)
test command:
git repository:
keywords:
author:
license: (ISC)
About to write to /Users/.../.../.../hello-world/package.json:

{
  "name": "hello-world",
  "version": "1.0.0",
  "description": "hello world smart contract",
  "main": "index.js",
  "scripts": {
     "test": "echo \"Error: no test specified\" && exit 1"
  },
  "author": "",
  "license": "ISC"
}
Schvalte soubor package.json a můžeme začít!
Krok 7: Stažení Hardhat (opens in a new tab)
Hardhat je vývojové prostředí pro kompilaci, nasazení, testování a ladění vašeho softwaru pro Ethereum. Pomáhá vývojářům při lokálním vytváření chytrých kontraktů a decentralizovaných aplikací (dapp) před jejich nasazením do živého řetězce.
Uvnitř našeho projektu hello-world spusťte:
npm install --save-dev hardhat
Další podrobnosti o pokynech k instalaci (opens in a new tab) najdete na této stránce.
Krok 8: Vytvoření projektu Hardhat
Uvnitř složky našeho projektu spusťte:
npx hardhat
Poté byste měli vidět uvítací zprávu a možnost vybrat si, co chcete udělat. Vyberte „create an empty hardhat.config.js“:
888 888 888 888 888
888 888 888 888 888
888 888 888 888 888
8888888888 8888b. 888d888 .d88888 88888b. 8888b. 888888
888 888 "88b 888P" d88" 888 888 "88b "88b 888
888 888 .d888888 888 888 888 888 888 .d888888 888
888 888 888 888 888 Y88b 888 888 888 888 888 Y88b.
888 888 "Y888888 888 "Y88888 888 888 "Y888888 "Y888
👷 Welcome to Hardhat v2.0.11 👷?
What do you want to do? …
Create a sample project
❯ Create an empty hardhat.config.js
Quit
Tím se nám vygeneruje soubor hardhat.config.js, ve kterém specifikujeme veškeré nastavení pro náš projekt (v kroku 13).
Krok 9: Přidání složek projektu
Abychom udrželi náš projekt organizovaný, vytvoříme dvě nové složky. Přejděte do kořenového adresáře vašeho projektu v příkazovém řádku a zadejte:
mkdir contracts
mkdir scripts
contracts/je místo, kde budeme uchovávat soubor s kódem našeho chytrého kontraktu hello worldscripts/je místo, kde budeme uchovávat skripty pro nasazení a interakci s naším kontraktem
Krok 10: Napsání našeho kontraktu
Možná se ptáte, kdy už sakra budeme psát kód?? No, jsme tady, u kroku 10.
Otevřete projekt hello-world ve svém oblíbeném editoru (my máme rádi VSCode (opens in a new tab)). Chytré kontrakty se píší v jazyce zvaném Solidity, který použijeme k napsání našeho chytrého kontraktu HelloWorld.sol.
- Přejděte do složky „contracts“ a vytvořte nový soubor s názvem HelloWorld.sol
- Níže je ukázkový chytrý kontrakt Hello World od Nadace Ethereum, který budeme pro tento tutoriál používat. Zkopírujte a vložte níže uvedený obsah do souboru HelloWorld.sol a nezapomeňte si přečíst komentáře, abyste pochopili, co tento kontrakt dělá:
// Určuje verzi Solidity pomocí sémantického verzování.
// Zjistěte více: https://solidity.readthedocs.io/en/v0.5.10/layout-of-source-files.html#pragma
pragma solidity ^0.7.0;

// Definuje kontrakt s názvem `HelloWorld`.
// Kontrakt je sbírka funkcí a dat (jeho stavu). Po nasazení se kontrakt nachází na konkrétní adrese na blockchainu Etherea. Zjistěte více: https://solidity.readthedocs.io/en/v0.5.10/structure-of-a-contract.html
contract HelloWorld {

   // Deklaruje stavovou proměnnou `message` typu `string`.
   // Stavové proměnné jsou proměnné, jejichž hodnoty jsou trvale uloženy v úložišti kontraktu. Klíčové slovo `public` zpřístupňuje proměnné zvenčí kontraktu a vytváří funkci, kterou mohou volat jiné kontrakty nebo klienti pro přístup k hodnotě.
   string public message;

   // Podobně jako v mnoha třídně orientovaných objektových jazycích je konstruktor speciální funkce, která se spustí pouze při vytvoření kontraktu.
   // Konstruktory se používají k inicializaci dat kontraktu. Zjistěte více:https://solidity.readthedocs.io/en/v0.5.10/contracts.html#constructors
   constructor(string memory initMessage) {

      // Přijímá řetězcový argument `initMessage` a nastaví hodnotu do úložné proměnné kontraktu `message`).
      message = initMessage;
   }

   // Veřejná funkce, která přijímá řetězcový argument a aktualizuje úložnou proměnnou `message`.
   function update(string memory newMessage) public {
      message = newMessage;
   }
}
Jedná se o super jednoduchý chytrý kontrakt, který při vytvoření uloží zprávu a lze jej aktualizovat zavoláním funkce update.
Krok 11: Připojení MetaMask a Alchemy k vašemu projektu
Vytvořili jsme peněženku MetaMask, účet Alchemy a napsali náš chytrý kontrakt, nyní je čas tyto tři věci propojit.
Každá transakce odeslaná z vaší virtuální peněženky vyžaduje podpis pomocí vašeho jedinečného soukromého klíče. Abychom našemu programu toto oprávnění poskytli, můžeme náš soukromý klíč (a API klíč Alchemy) bezpečně uložit do souboru prostředí.
Chcete-li se dozvědět více o odesílání transakcí, podívejte se na tento tutoriál o odesílání transakcí pomocí Web3.
Nejprve nainstalujte balíček dotenv v adresáři vašeho projektu:
npm install dotenv --save
Poté vytvořte soubor .env v kořenovém adresáři našeho projektu a přidejte do něj svůj soukromý klíč MetaMask a HTTP URL API Alchemy.
- Postupujte podle těchto pokynů (opens in a new tab) pro export vašeho soukromého klíče
- Níže se podívejte, jak získat HTTP URL API Alchemy

Zkopírujte URL API Alchemy
Váš soubor .env by měl vypadat takto:
API_URL = "https://eth-sepolia.g.alchemy.com/v2/your-api-key"
PRIVATE_KEY = "your-metamask-private-key"
Abychom je skutečně propojili s naším kódem, odkážeme na tyto proměnné v našem souboru hardhat.config.js v kroku 13.
.env! Ujistěte se, že svůj soubor .env nikdy s nikým nesdílíte ani ho nevystavujete, protože tím ohrožujete svá tajemství. Pokud používáte správu verzí, přidejte svůj .env do souboru gitignore.Krok 12: Instalace Ethers.js
Ethers.js je knihovna, která usnadňuje interakci a zadávání požadavků do Etherea tím, že obaluje standardní metody JSON-RPC uživatelsky přívětivějšími metodami.
Hardhat velmi usnadňuje integraci pluginů (opens in a new tab) pro další nástroje a rozšířenou funkcionalitu. Pro nasazení kontraktu využijeme plugin Ethers (opens in a new tab) (Ethers.js (opens in a new tab) má několik super čistých metod pro nasazení kontraktu).
V adresáři vašeho projektu zadejte:
npm install --save-dev @nomiclabs/hardhat-ethers "ethers@^5.0.0"
V dalším kroku budeme také vyžadovat ethers v našem hardhat.config.js.
Krok 13: Aktualizace hardhat.config.js
Dosud jsme přidali několik závislostí a pluginů, nyní musíme aktualizovat hardhat.config.js, aby o nich náš projekt věděl.
Aktualizujte svůj hardhat.config.js tak, aby vypadal takto:
require('dotenv').config();

require("@nomiclabs/hardhat-ethers");
const { API_URL, PRIVATE_KEY } = process.env;

/**
* @type import('hardhat/config').HardhatUserConfig
*/
module.exports = {
   solidity: "0.7.3",
   defaultNetwork: "sepolia",
   networks: {
      hardhat: {},
      sepolia: {
         url: API_URL,
         accounts: [`0x${PRIVATE_KEY}`]
      }
   },
}
Krok 14: Kompilace našeho kontraktu
Abychom se ujistili, že zatím vše funguje, zkompilujme náš kontrakt. Úloha compile je jednou z vestavěných úloh Hardhat.
Z příkazového řádku spusťte:
npx hardhat compile
Možná dostanete varování ohledně SPDX license identifier not provided in source file, ale s tím si nemusíte dělat starosti — doufejme, že vše ostatní vypadá dobře! Pokud ne, vždy můžete napsat na Discord Alchemy (opens in a new tab).
Krok 15: Napsání našeho skriptu pro nasazení
Nyní, když je náš kontrakt napsán a náš konfigurační soubor je připraven, je čas napsat náš skript pro nasazení kontraktu.
Přejděte do složky scripts/ a vytvořte nový soubor s názvem deploy.js, do kterého přidejte následující obsah:
async function main() {
   const HelloWorld = await ethers.getContractFactory("HelloWorld");

   // Zahájení nasazení, vrací promise, který se vyhodnotí jako objekt kontraktu
   const hello_world = await HelloWorld.deploy("Hello World!");
   console.log("Contract deployed to address:", hello_world.address);}

main()
  .then(() => process.exit(0))
  .catch(error => {
    console.error(error);
    process.exit(1);
  });
Hardhat odvádí úžasnou práci při vysvětlování toho, co každý z těchto řádků kódu dělá, ve svém tutoriálu o kontraktech (opens in a new tab), jejich vysvětlení jsme převzali zde.
const HelloWorld = await ethers.getContractFactory("HelloWorld");
ContractFactory v Ethers.js je abstrakce používaná k nasazení nových chytrých kontraktů, takže HelloWorld je zde továrna pro instance našeho kontraktu hello world. Při použití pluginu hardhat-ethers jsou instance ContractFactory a Contract ve výchozím nastavení připojeny k prvnímu podepisujícímu (signer).
const hello_world = await HelloWorld.deploy();
Zavoláním deploy() na ContractFactory se zahájí nasazení a vrátí se Promise, který se vyhodnotí jako Contract. Toto je objekt, který má metodu pro každou z funkcí našeho chytrého kontraktu.
Krok 16: Nasazení našeho kontraktu
Konečně jsme připraveni nasadit náš chytrý kontrakt! Přejděte do příkazového řádku a spusťte:
npx hardhat run scripts/deploy.js --network sepolia
Poté byste měli vidět něco jako:
Contract deployed to address: 0x6cd7d44516a20882cEa2DE9f205bF401c0d23570
Pokud přejdeme na Etherscan sítě Sepolia (opens in a new tab) a vyhledáme adresu našeho kontraktu, měli bychom vidět, že byl úspěšně nasazen. Transakce bude vypadat nějak takto:
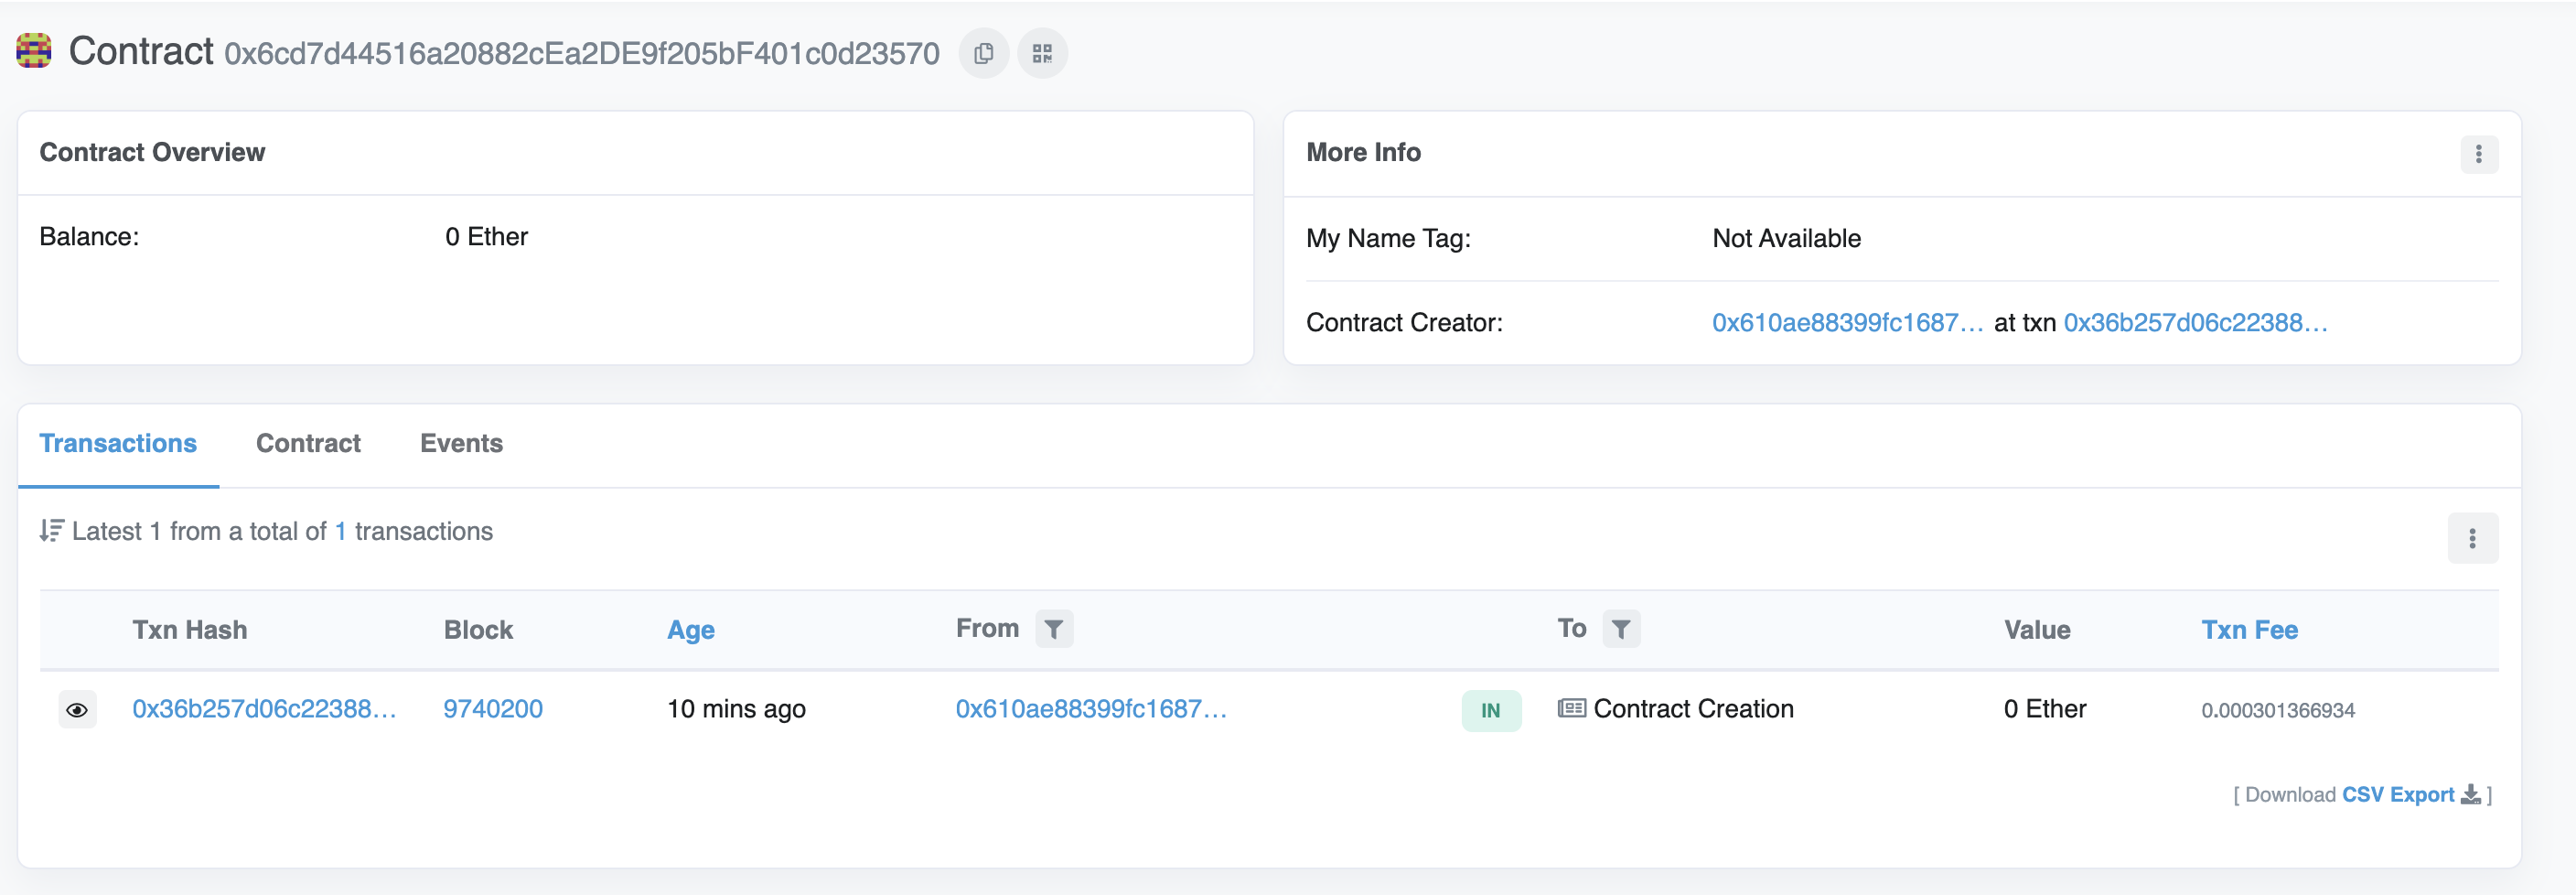
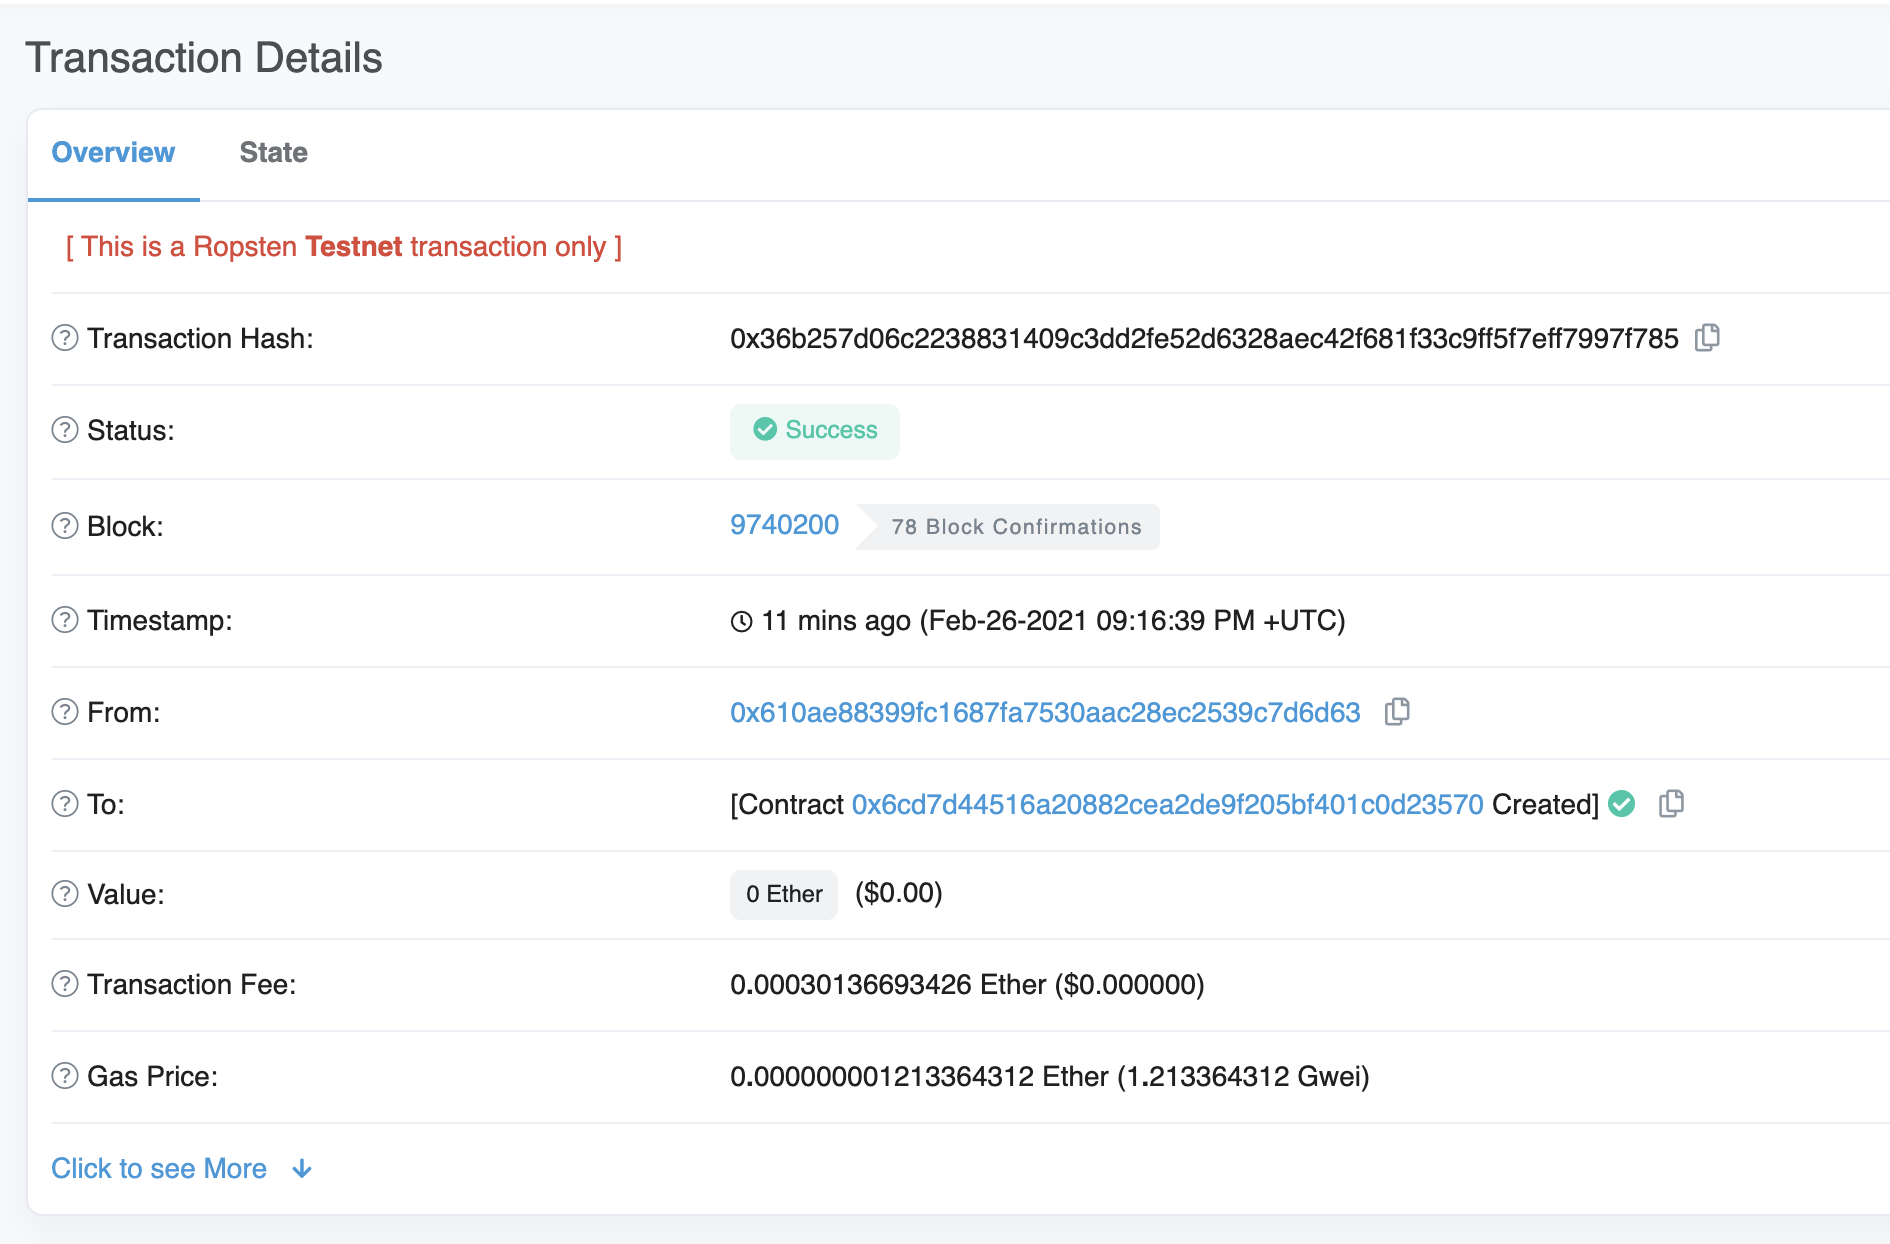
Adresa From by se měla shodovat s adresou vašeho účtu MetaMask a adresa To (Komu) bude uvádět „Contract Creation“ (Vytvoření kontraktu), ale pokud klikneme na transakci, uvidíme adresu našeho kontraktu v poli To:
Gratulujeme! Právě jste nasadili chytrý kontrakt do řetězce Ethereum 🎉
Abychom pochopili, co se děje pod pokličkou, přejděme na kartu Explorer (Průzkumník) na našem panelu Alchemy (opens in a new tab). Pokud máte více aplikací Alchemy, nezapomeňte filtrovat podle aplikace a vybrat „Hello World“.
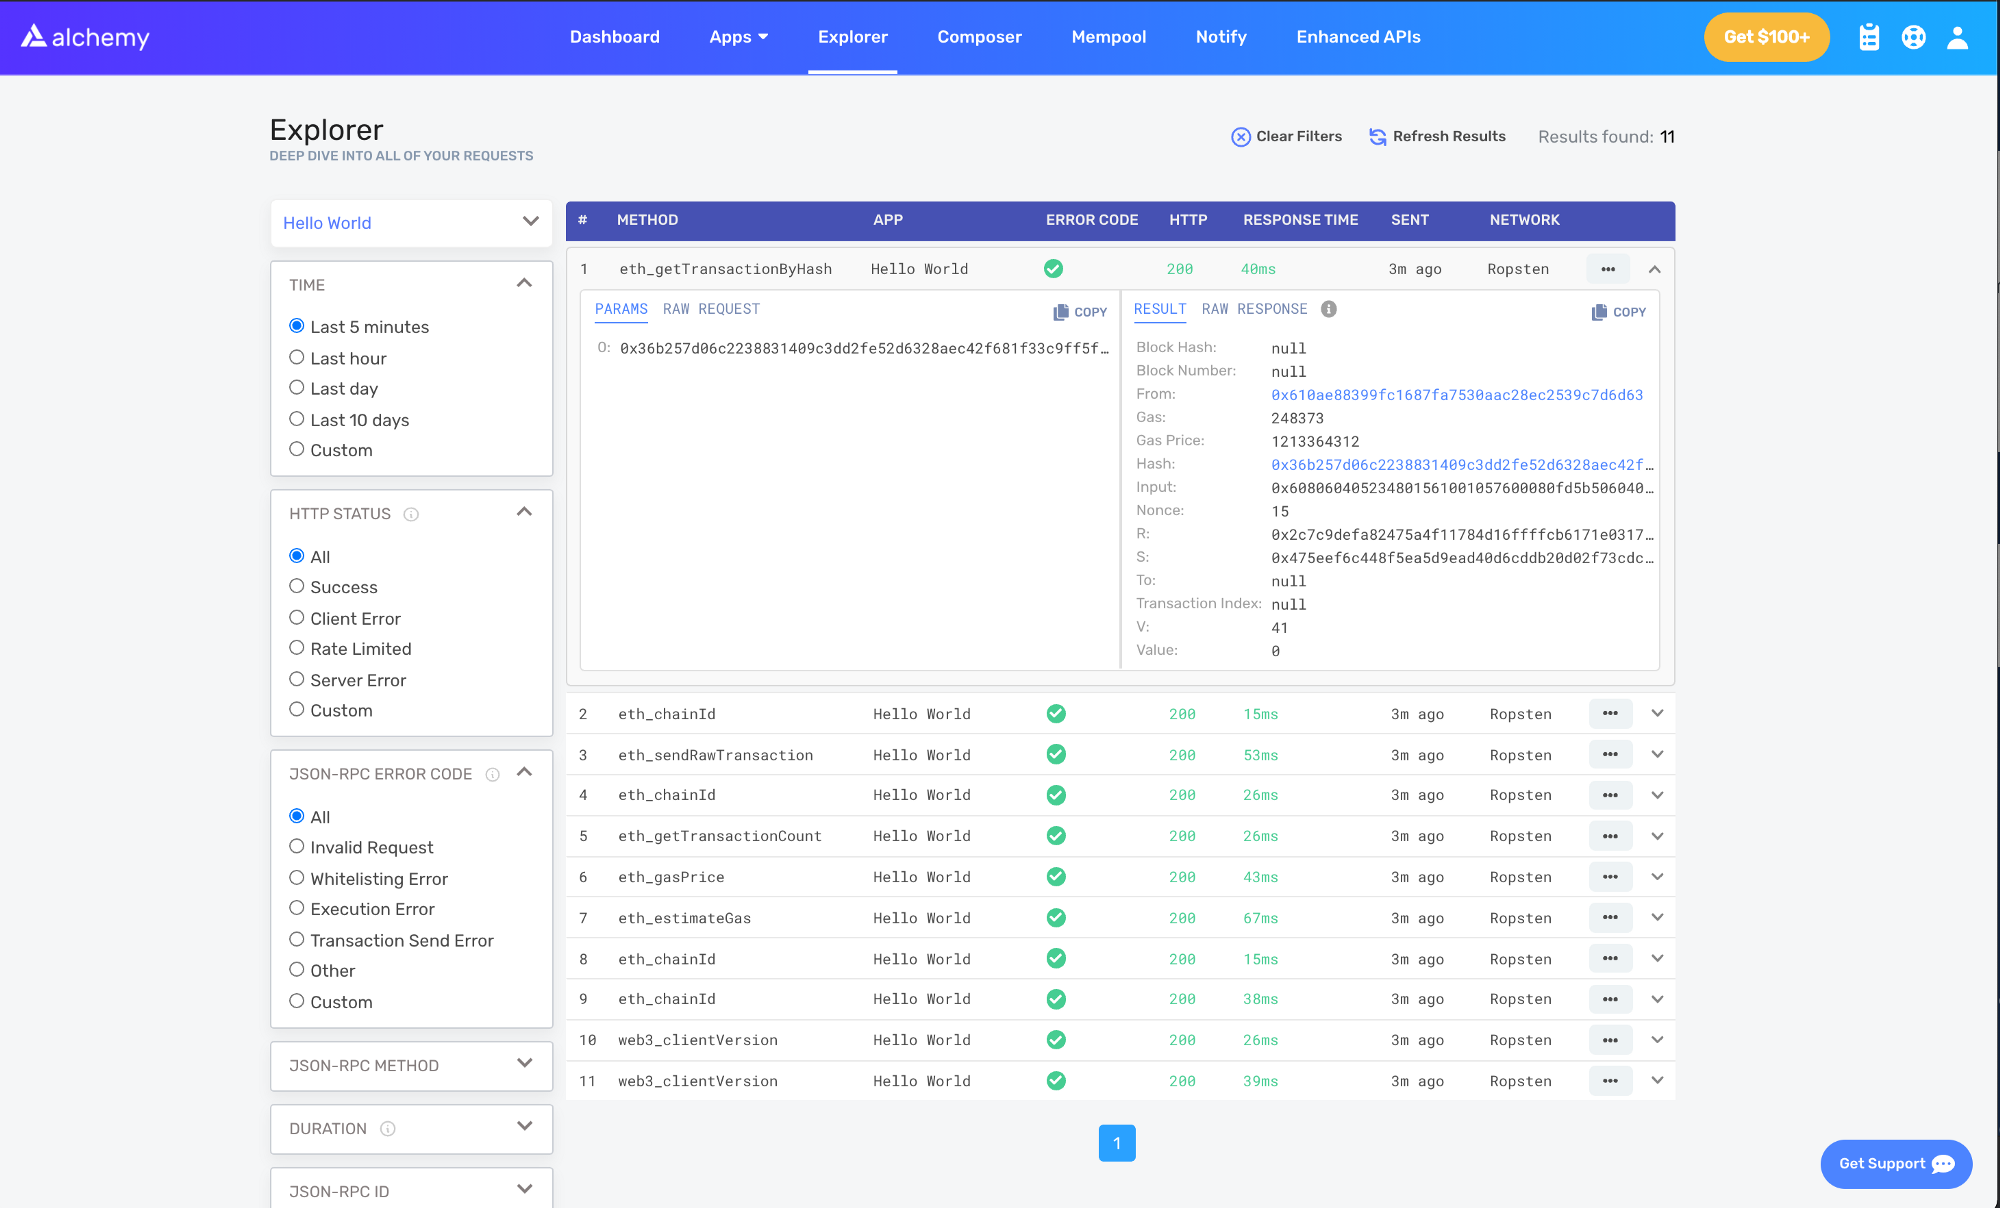
Zde uvidíte hrstku volání JSON-RPC, která pro nás Hardhat/Ethers pod pokličkou provedly, když jsme zavolali funkci .deploy(). Dvě důležitá volání, která zde stojí za zmínku, jsou eth_sendRawTransaction (opens in a new tab), což je požadavek na skutečné zapsání našeho kontraktu do řetězce Sepolia, a eth_getTransactionByHash (opens in a new tab), což je požadavek na přečtení informací o naší transakci na základě hashe (typický vzor při transakcích). Chcete-li se dozvědět více o odesílání transakcí, podívejte se na tento tutoriál o odesílání transakcí pomocí Web3.
To je pro 1. část tohoto tutoriálu vše, ve 2. části budeme s naším chytrým kontraktem skutečně interagovat tím, že aktualizujeme naši počáteční zprávu, a ve 3. části publikujeme náš chytrý kontrakt na Etherscanu, aby všichni věděli, jak s ním interagovat.
Chcete se o Alchemy dozvědět více? Podívejte se na náš web (opens in a new tab). Nechcete zmeškat žádnou novinku? Přihlaste se k odběru našeho newsletteru zde (opens in a new tab)! Nezapomeňte se také připojit k našemu Discordu (opens in a new tab)..