ethers.js를 사용하여 토큰 전송하기
ETHERS.JS
ERC-20
토큰
초급
김용준
2021년 4월 6일
4 분 소요
ethers.js(5.0)를 사용하여 토큰 전송하기
이 튜토리얼에서 배우게 될 내용
- ethers.js 가져오기
- 토큰 전송
- 네트워크 트래픽 상황에 따른 가스 가격 설정
시작하기
시작하려면 먼저 JavaScript에 ethers.js 라이브러리를 가져와야 합니다. ethers.js v5 포함하기
설치
/home/ricmoo> npm install --save ethers
브라우저 환경의 ES6
<script type="module">
  import { ethers } from "https://cdn.ethers.io/lib/ethers-5.0.esm.min.js"
  // 여기에 코드를 작성하세요...
</script>
브라우저 환경의 ES3(UMD)
<script
  src="https://cdn.ethers.io/lib/ethers-5.0.umd.min.js"
  type="application/javascript"
></script>
매개변수
contract_address: 토큰 컨트랙트 주소 (전송하려는 토큰이 이더가 아닌 경우 컨트랙트 주소가 필요합니다)send_token_amount: 수신자에게 전송할 금액to_address: 수신자의 주소send_account: 송신자의 주소private_key: 트랜잭션에 서명하고 실제로 토큰을 전송하기 위한 송신자의 개인 키
주의사항
sendTransaction()가 내부적으로 처리하므로 signTransaction(tx)는 제거되었습니다.
전송 절차
1. 네트워크(테스트넷) 연결
프로바이더 설정 (Infura)
롭스텐 테스트넷에 연결
window.ethersProvider = new ethers.providers.InfuraProvider("ropsten")
2. 지갑 생성
let wallet = new ethers.Wallet(private_key)
3. 지갑을 네트워크에 연결
let walletSigner = wallet.connect(window.ethersProvider)
4. 현재 가스 가격 가져오기
window.ethersProvider.getGasPrice() // 가스 가격
5. 트랜잭션 정의
아래에 정의된 변수들은 send_token()에 따라 달라집니다.
트랜잭션 매개변수
send_account: 토큰 송신자의 주소to_address: 토큰 수신자의 주소send_token_amount: 전송할 토큰의 양gas_limit: 가스 한도gas_price: 가스 가격
const tx = {
  from: send_account,
  to: to_address,
  value: ethers.utils.parseEther(send_token_amount),
  nonce: window.ethersProvider.getTransactionCount(send_account, "latest"),
  gasLimit: ethers.utils.hexlify(gas_limit), // 100000
  gasPrice: gas_price,
}
6. 전송
walletSigner.sendTransaction(tx).then((transaction) => {
  console.dir(transaction)
  alert("Send finished!")
})
사용 방법
let private_key =
  "41559d28e936dc92104ff30691519693fc753ffbee6251a611b9aa1878f12a4d"
let send_token_amount = "1"
let to_address = "0x4c10D2734Fb76D3236E522509181CC3Ba8DE0e80"
let send_address = "0xda27a282B5B6c5229699891CfA6b900A716539E6"
let gas_limit = "0x100000"
let wallet = new ethers.Wallet(private_key)
let walletSigner = wallet.connect(window.ethersProvider)
let contract_address = ""
window.ethersProvider = new ethers.providers.InfuraProvider("ropsten")

send_token(
  contract_address,
  send_token_amount,
  to_address,
  send_address,
  private_key
)
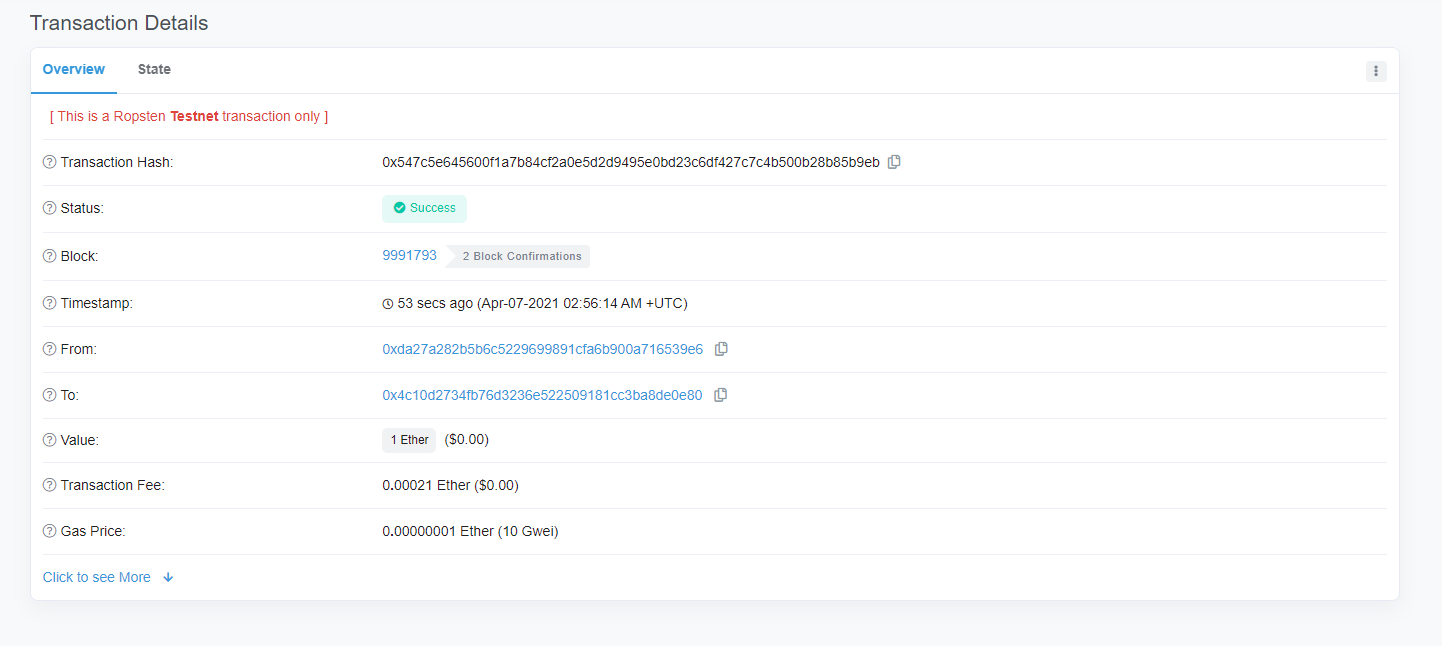
성공!
send_token()
function send_token(
  contract_address,
  send_token_amount,
  to_address,
  send_account,
  private_key
) {
  let wallet = new ethers.Wallet(private_key)
  let walletSigner = wallet.connect(window.ethersProvider)

  window.ethersProvider.getGasPrice().then((currentGasPrice) => {
    let gas_price = ethers.utils.hexlify(parseInt(currentGasPrice))
    console.log(`gas_price: ${gas_price}`)

    if (contract_address) {
      // 일반 토큰 전송
      let contract = new ethers.Contract(
        contract_address,
        send_abi,
        walletSigner
      )

      // 몇 개의 토큰인가요?
      let numberOfTokens = ethers.utils.parseUnits(send_token_amount, 18)
      console.log(`numberOfTokens: ${numberOfTokens}`)

      // 토큰 전송
      contract.transfer(to_address, numberOfTokens).then((transferResult) => {
        console.dir(transferResult)
        alert("sent token")
      })
    } // 이더 전송
    else {
      const tx = {
        from: send_account,
        to: to_address,
        value: ethers.utils.parseEther(send_token_amount),
        nonce: window.ethersProvider.getTransactionCount(
          send_account,
          "latest"
        ),
        gasLimit: ethers.utils.hexlify(gas_limit), // 100000
        gasPrice: gas_price,
      }
      console.dir(tx)
      try {
        walletSigner.sendTransaction(tx).then((transaction) => {
          console.dir(transaction)
          alert("Send finished!")
        })
      } catch (error) {
        alert("failed to send!!")
      }
    }
  })
}