适合初学者的 Hello World 智能合约 - 全栈
如果你是区块链开发的新手,不知道从哪里开始,或者不知道如何部署智能合约并与之交互,那么本指南就是为你准备的。我们将逐步介绍如何使用 梅塔马斯克 (在新标签页中打开)、Solidity (在新标签页中打开)、Hardhat (在新标签页中打开) 和 Alchemy (在新标签页中打开) 在 Goerli 测试网络上创建和部署一个简单的智能合约。
你需要一个 Alchemy 账户才能完成本教程。注册一个免费账户 (在新标签页中打开)。
如果你在任何时候有疑问,请随时在 Alchemy Discord (在新标签页中打开) 中提问!
第 1 部分 - 使用 Hardhat 创建和部署你的智能合约
连接到以太坊网络
向以太坊链发出请求的方法有很多。为了简单起见,我们将使用 Alchemy 上的免费账户。Alchemy 是一个区块链开发者平台和 API,允许我们与以太坊链进行通信,而无需自己运行节点。Alchemy 还有用于监控和分析的开发者工具;在本教程中,我们将利用这些工具来了解智能合约部署的内部运作原理。
创建你的应用和 API 密钥
创建 Alchemy 账户后,你可以通过创建应用来生成 API 密钥。这将允许你向 Sepolia 测试网发出请求。如果你对测试网不熟悉,可以阅读 Alchemy 的选择网络指南 (在新标签页中打开)。
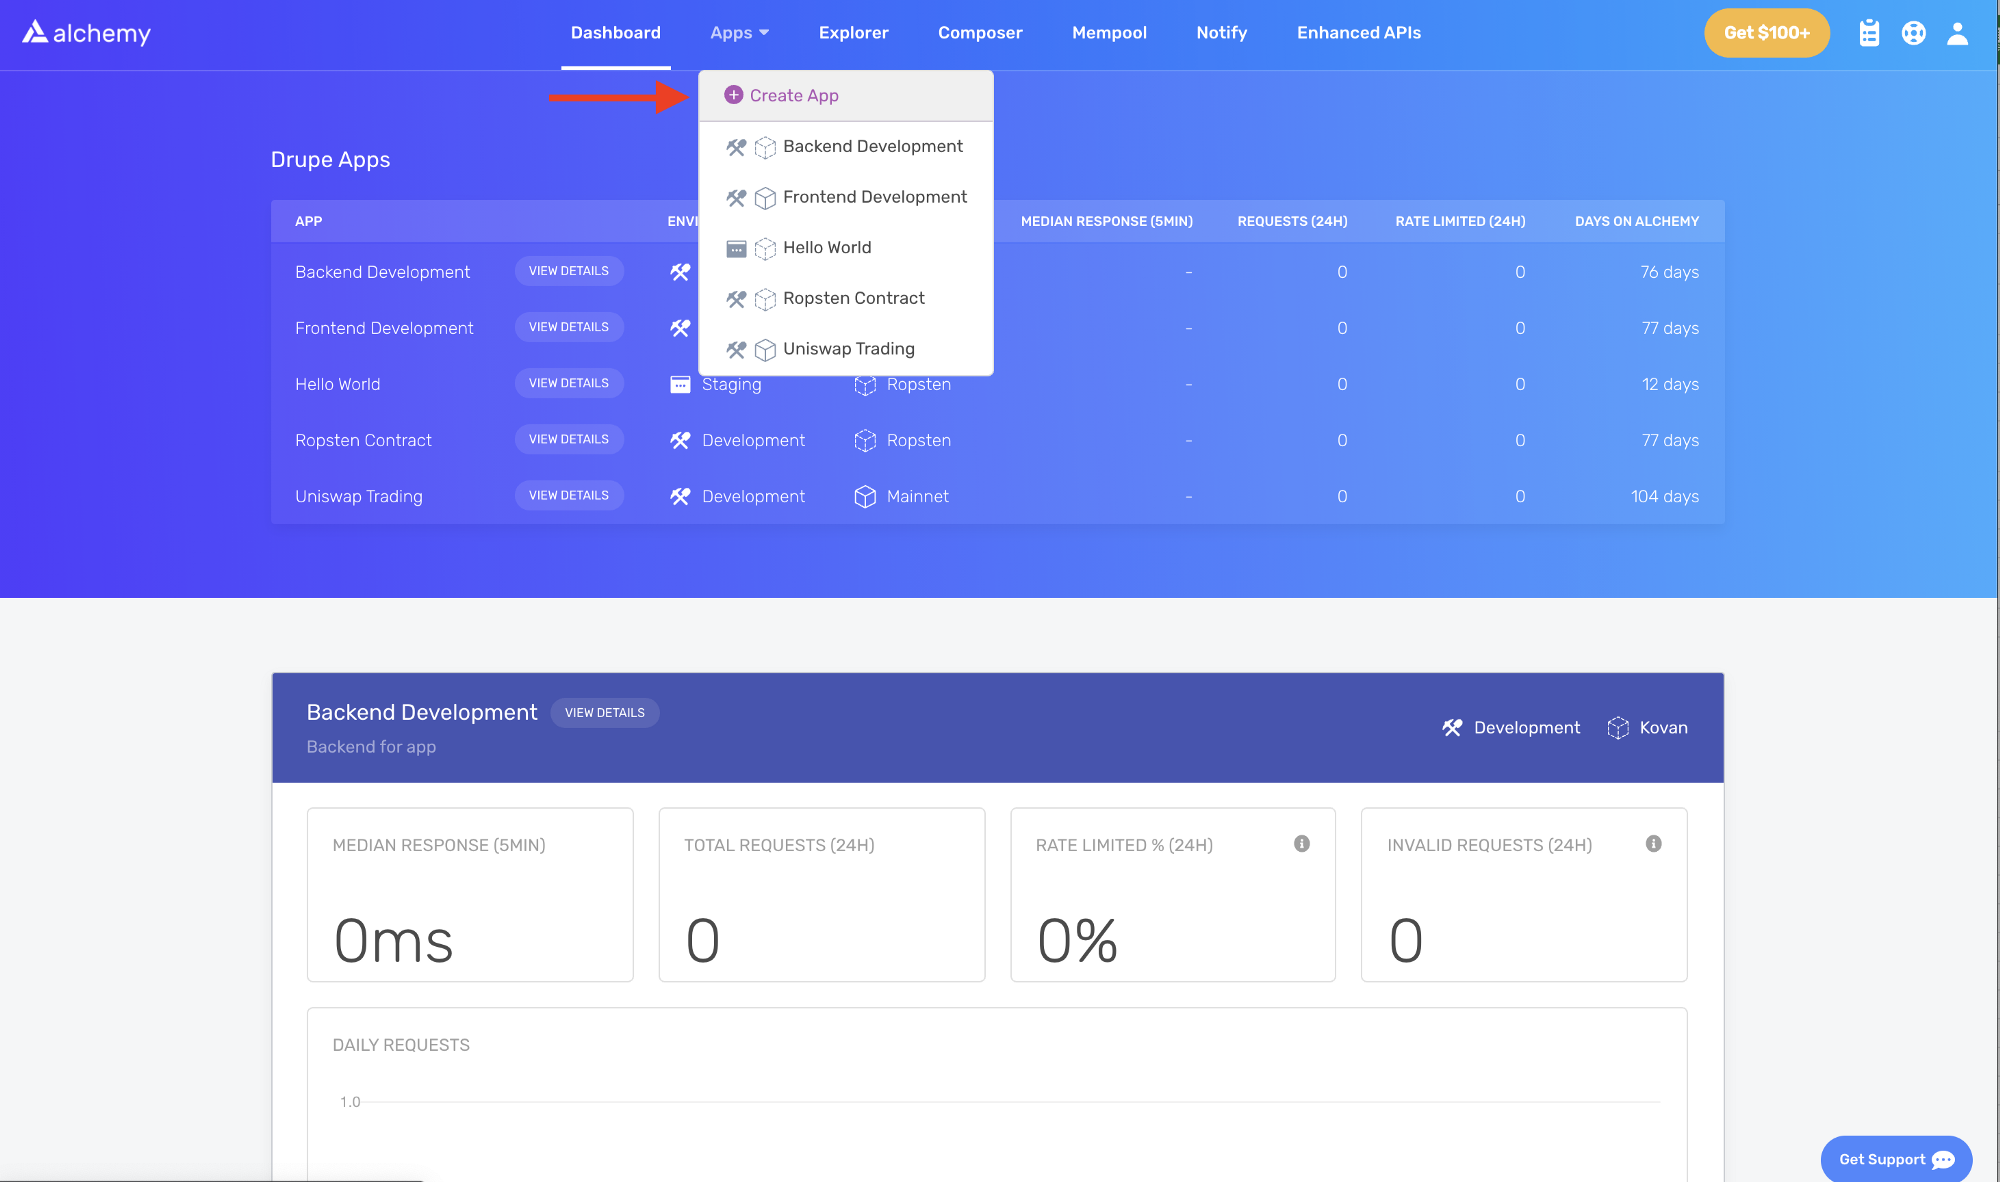
在 Alchemy 仪表板上,找到导航栏中的 Apps 下拉菜单,然后点击 Create App。
将你的应用命名为“Hello World”并编写简短的描述。选择 Staging 作为你的环境,并选择 Sepolia 作为你的网络。
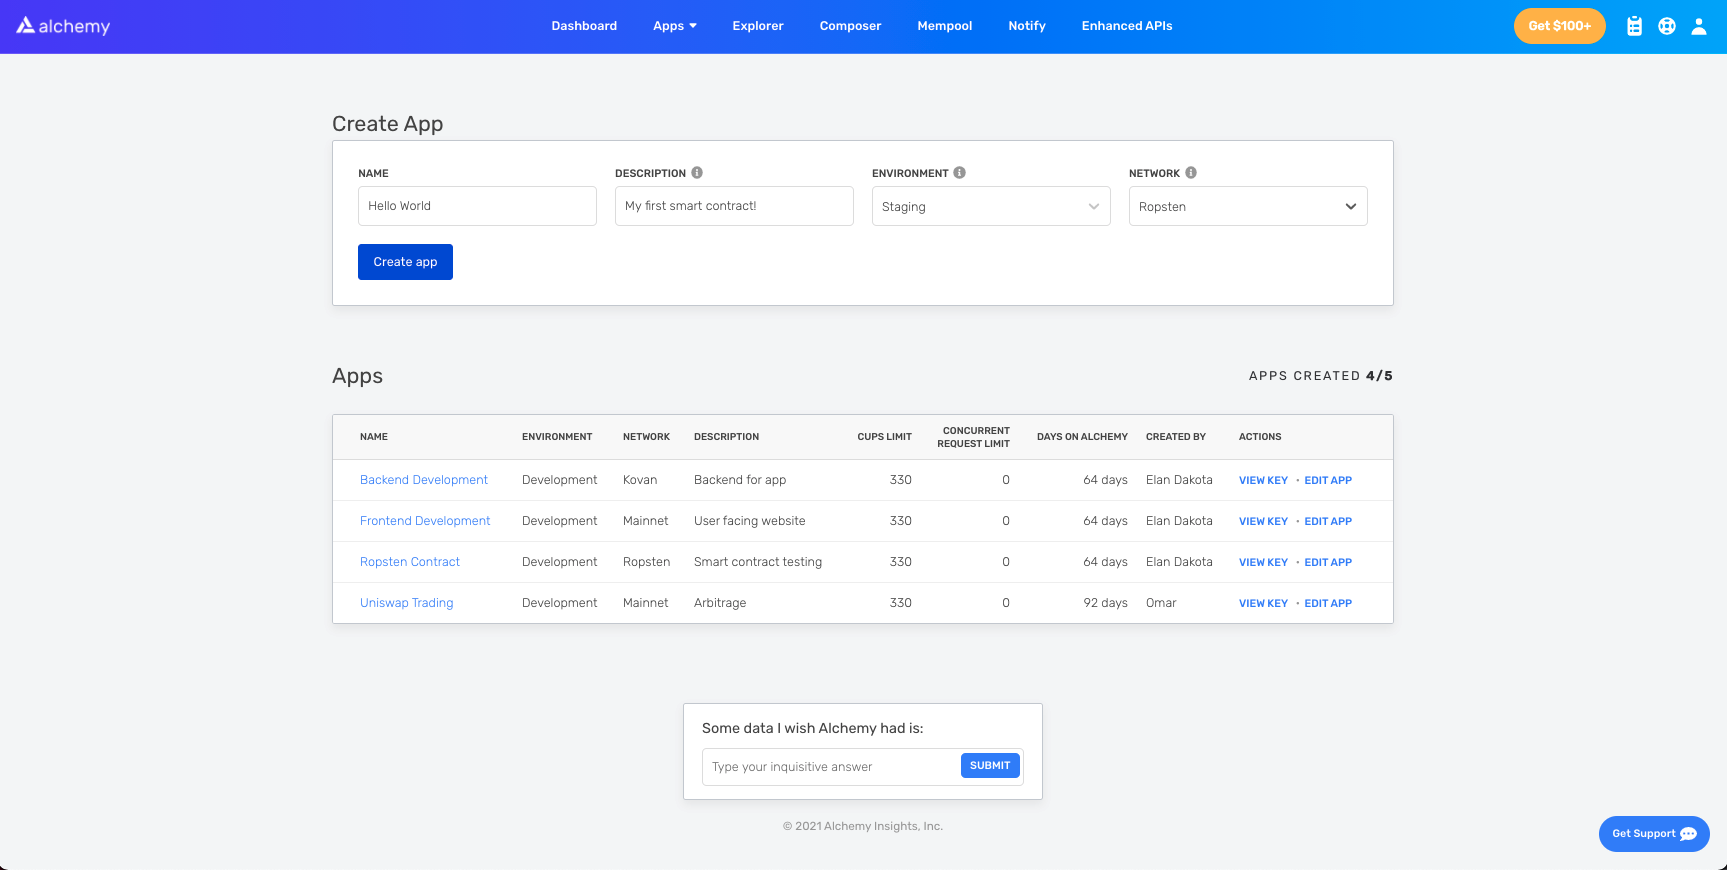
注意:请务必选择 Sepolia,否则本教程将无法运行。
点击 Create app。你的应用将出现在下方的表格中。
创建以太坊账户
你需要一个以太坊账户来发送和接收交易。我们将使用梅塔马斯克,这是一款浏览器中的虚拟钱包,允许用户管理其以太坊账户地址。
你可以在此处 (在新标签页中打开)免费下载并创建一个梅塔马斯克账户。在创建账户时,或者如果你已经有一个账户,请确保切换到右上角的“Sepolia 测试网络”(这样我们就不会涉及到真实的资金)。
第 4 步:从水龙头添加以太币
要将你的智能合约部署到测试网络,你需要一些假 ETH。要在 Sepolia 网络上获取 ETH,请前往 Sepolia 水龙头并输入你的 Sepolia 账户地址。请参阅测试网络页面以获取可供尝试的选项列表:
注意:由于网络拥堵,这可能需要一些时间。 ``
第 5 步:检查你的余额
为了仔细检查 ETH 是否在你的钱包中,让我们使用 Alchemy 的沙盒工具 (在新标签页中打开)发出一个 eth_getBalance (在新标签页中打开) 请求。这将返回我们钱包中的 ETH 数量。要了解更多信息,请查看 Alchemy 关于如何使用 composer 工具的简短教程 (在新标签页中打开)。
输入你的梅塔马斯克账户地址,然后点击 Send Request。你将看到一个类似于以下代码片段的响应。
{ "jsonrpc": "2.0", "id": 0, "result": "0x2B5E3AF16B1880000" }
注意:此结果的单位是 wei,而不是 ETH。wei 被用作以太币的最小面额。
呼!我们的假钱都在那里。
第 6 步:初始化我们的项目
首先,我们需要为我们的项目创建一个文件夹。导航到你的命令行并输入以下内容。
mkdir hello-world
cd hello-world
现在我们进入了项目文件夹,我们将使用 npm init 来初始化项目。
如果你还没有安装 npm,请按照 Node.js 安装说明 (在新标签页中打开)安装 Node.js 和 npm。
对于本教程而言,你如何回答初始化问题并不重要。以下是我们的做法,仅供参考:
package name: (hello-world)
version: (1.0.0)
description: hello world smart contract
entry point: (index.js)
test command:
git repository:
keywords:
author:
license: (ISC)

About to write to /Users/.../.../.../hello-world/package.json:

{
   "name": "hello-world",
   "version": "1.0.0",
   "description": "hello world smart contract",
   "main": "index.js",
   "scripts": {
      "test": "echo \"Error: no test specified\" && exit 1"
   },
   "author": "",
   "license": "ISC"
}
批准 package.json,我们就可以开始了!
第 7 步:下载 Hardhat
Hardhat 是一个用于编译、部署、测试和调试以太坊软件的开发环境。它可以帮助开发者在部署到实时链之前,在本地构建智能合约和去中心化应用 (dapp)。
在我们的 hello-world 项目中运行:
npm install --save-dev hardhat
查看此页面以获取有关安装说明 (在新标签页中打开)的更多详细信息。
第 8 步:创建 Hardhat 项目
在我们的 hello-world 项目文件夹中,运行:
npx hardhat
然后你应该会看到一条欢迎消息以及选择你要执行的操作的选项。选择“create an empty hardhat.config.js”:
888 888 888 888 888
888 888 888 888 888
888 888 888 888 888
8888888888 8888b. 888d888 .d88888 88888b. 8888b. 888888
888 888 "88b 888P" d88" 888 888 "88b "88b 888
888 888 .d888888 888 888 888 888 888 .d888888 888
888 888 888 888 888 Y88b 888 888 888 888 888 Y88b.
888 888 "Y888888 888 "Y88888 888 888 "Y888888 "Y888
👷 Welcome to Hardhat v2.0.11 👷
What do you want to do? …
Create a sample project
❯ Create an empty hardhat.config.js
Quit
这将在项目中生成一个 hardhat.config.js 文件。我们将在本教程的后面使用它来指定我们项目的设置。
第 9 步:添加项目文件夹
为了保持项目井然有序,让我们创建两个新文件夹。在命令行中,导航到你的 hello-world 项目的根目录并输入:
mkdir contracts
mkdir scripts
contracts/是我们将存放 hello world 智能合约代码文件的地方scripts/是我们将存放用于部署和与我们的合约进行交互的脚本的地方
第 10 步:编写我们的合约
你可能会问自己,我们什么时候开始写代码?就是现在!
在你最喜欢的编辑器中打开 hello-world 项目。智能合约最常使用 Solidity 编写,我们将使用它来编写我们的智能合约。
- 导航到
contracts文件夹并创建一个名为HelloWorld.sol的新文件 - 下面是我们将在本教程中使用的示例 Hello World 智能合约。将以下内容复制到
HelloWorld.sol文件中。
注意:请务必阅读注释以了解此合约的作用。
// 指定 Solidity 的版本,使用语义化版本控制。
// 了解更多:https://solidity.readthedocs.io/en/v0.5.10/layout-of-source-files.html#pragma
pragma solidity >=0.7.3;

// 定义一个名为 `HelloWorld` 的合约。
// 合约是函数和数据(其状态)的集合。一旦部署,合约就驻留在以太坊区块链上的特定地址。了解更多:https://solidity.readthedocs.io/en/v0.5.10/structure-of-a-contract.html
contract HelloWorld {

   //在调用 update 函数时触发
   //智能合约事件是你的合约向应用前端传达区块链上发生某事的一种方式,前端可以“监听”某些事件并在它们发生时采取行动。
   event UpdatedMessages(string oldStr, string newStr);

   // 声明一个类型为 `string` 的状态变量 `message`。
   // 状态变量是其值永久存储在合约存储中的变量。关键字 `public` 使变量可以从合约外部访问,并创建一个函数,其他合约或客户端可以调用该函数来访问该值。
   string public message;

   // 与许多基于类的面向对象语言类似,构造函数是一个仅在合约创建时执行的特殊函数。
   // 构造函数用于初始化合约的数据。了解更多:https://solidity.readthedocs.io/en/v0.5.10/contracts.html#constructors
   constructor(string memory initMessage) {

      // 接受一个字符串参数 `initMessage` 并将该值设置到合约的 `message` 存储变量中)。
      message = initMessage;
   }

   // 一个公共函数,接受一个字符串参数并更新 `message` 存储变量。
   function update(string memory newMessage) public {
      string memory oldMsg = message;
      message = newMessage;
      emit UpdatedMessages(oldMsg, newMessage);
   }
}
这是一个基本的智能合约,在创建时存储一条消息。可以通过调用 update 函数来更新它。
第 11 步:将梅塔马斯克和 Alchemy 连接到你的项目
我们已经创建了梅塔马斯克钱包、Alchemy 账户,并编写了我们的智能合约,现在是时候将这三者连接起来了。
从你的钱包发送的每笔交易都需要使用你唯一的私钥进行签名。为了向我们的程序提供此权限,我们可以安全地将私钥存储在环境文件中。我们还将在此处存储 Alchemy 的 API 密钥。
要了解有关发送交易的更多信息,请查看这篇关于使用 Web3 发送交易的教程。
首先,在你的项目目录中安装 dotenv 包:
npm install dotenv --save
然后,在项目的根目录中创建一个 .env 文件。将你的梅塔马斯克私钥和 HTTP Alchemy API URL 添加到其中。
你的环境文件必须命名为 .env,否则它将不会被识别为环境文件。
不要将其命名为 process.env 或 .env-custom 或任何其他名称。
- 按照这些说明 (在新标签页中打开)导出你的私钥
- 请参阅下文以获取 HTTP Alchemy API URL
你的 .env 应该如下所示:
API_URL = "https://eth-goerli.alchemyapi.io/v2/your-api-key"
PRIVATE_KEY = "your-metamask-private-key"
为了将这些实际连接到我们的代码,我们将在第 13 步的 hardhat.config.js 文件中引用这些变量。
第 12 步:安装 Ethers.js
Ethers.js 是一个库,它通过使用更用户友好的方法包装标准 JSON-RPC 方法,使与以太坊的交互和发出请求变得更加容易。
Hardhat 允许我们集成插件 (在新标签页中打开)以获得额外的工具和扩展功能。我们将利用 Ethers 插件 (在新标签页中打开)进行合约部署。
在你的项目目录中输入:
npm install --save-dev @nomiclabs/hardhat-ethers "ethers@^5.0.0"
第 13 步:更新 hardhat.config.js
到目前为止,我们已经添加了几个依赖项和插件,现在我们需要更新 hardhat.config.js,以便我们的项目了解所有这些内容。
将你的 hardhat.config.js 更新为如下所示:
/**
 * @type import('hardhat/config').HardhatUserConfig
 */

require("dotenv").config()
require("@nomiclabs/hardhat-ethers")

const { API_URL, PRIVATE_KEY } = process.env

module.exports = {
  solidity: "0.7.3",
  defaultNetwork: "goerli",
  networks: {
    hardhat: {},
    goerli: {
      url: API_URL,
      accounts: [`0x${PRIVATE_KEY}`],
    },
  },
}
第 14 步:编译我们的合约
为了确保到目前为止一切正常,让我们编译我们的合约。compile 任务是内置的 Hardhat 任务之一。
在命令行中运行:
npx hardhat compile
你可能会收到关于 SPDX license identifier not provided in source file 的警告,但无需担心——希望其他一切看起来都不错!如果不是,你可以随时在 Alchemy Discord (在新标签页中打开) 中留言。
第 15 步:编写我们的部署脚本
现在我们的合约已经编写完毕,配置文件也准备就绪,是时候编写我们的合约部署脚本了。
导航到 scripts/ 文件夹并创建一个名为 deploy.js 的新文件,向其中添加以下内容:
async function main() {
  const HelloWorld = await ethers.getContractFactory("HelloWorld")

  // 开始部署,返回一个解析为合约对象的 promise
  const hello_world = await HelloWorld.deploy("Hello World!")
  console.log("Contract deployed to address:", hello_world.address)
}

main()
  .then(() => process.exit(0))
  .catch((error) => {
    console.error(error)
    process.exit(1)
  })
Hardhat 在其合约教程 (在新标签页中打开)中非常出色地解释了这些代码行中每一行的作用,我们在此采用了他们的解释。
const HelloWorld = await ethers.getContractFactory("HelloWorld")
ethers.js 中的 ContractFactory 是用于部署新智能合约的抽象,因此这里的 HelloWorld 是我们 hello world 合约实例的工厂 (在新标签页中打开)。当使用 hardhat-ethers 插件 ContractFactory 和 Contract 时,实例默认连接到第一个签名者(所有者)。
const hello_world = await HelloWorld.deploy()
在 ContractFactory 上调用 deploy() 将启动部署,并返回一个解析为 Contract 对象的 Promise。这个对象为我们的每个智能合约函数提供了一个方法。
第 16 步:部署我们的合约
我们终于准备好部署我们的智能合约了!导航到命令行并运行:
npx hardhat run scripts/deploy.js --network sepolia
然后你应该会看到类似以下的内容:
Contract deployed to address: 0x6cd7d44516a20882cEa2DE9f205bF401c0d23570
请保存此地址。我们将在本教程的后面使用它。
如果我们转到 Sepolia Etherscan (在新标签页中打开) 并搜索我们的合约地址,我们应该能够看到它已成功部署。交易将如下所示:
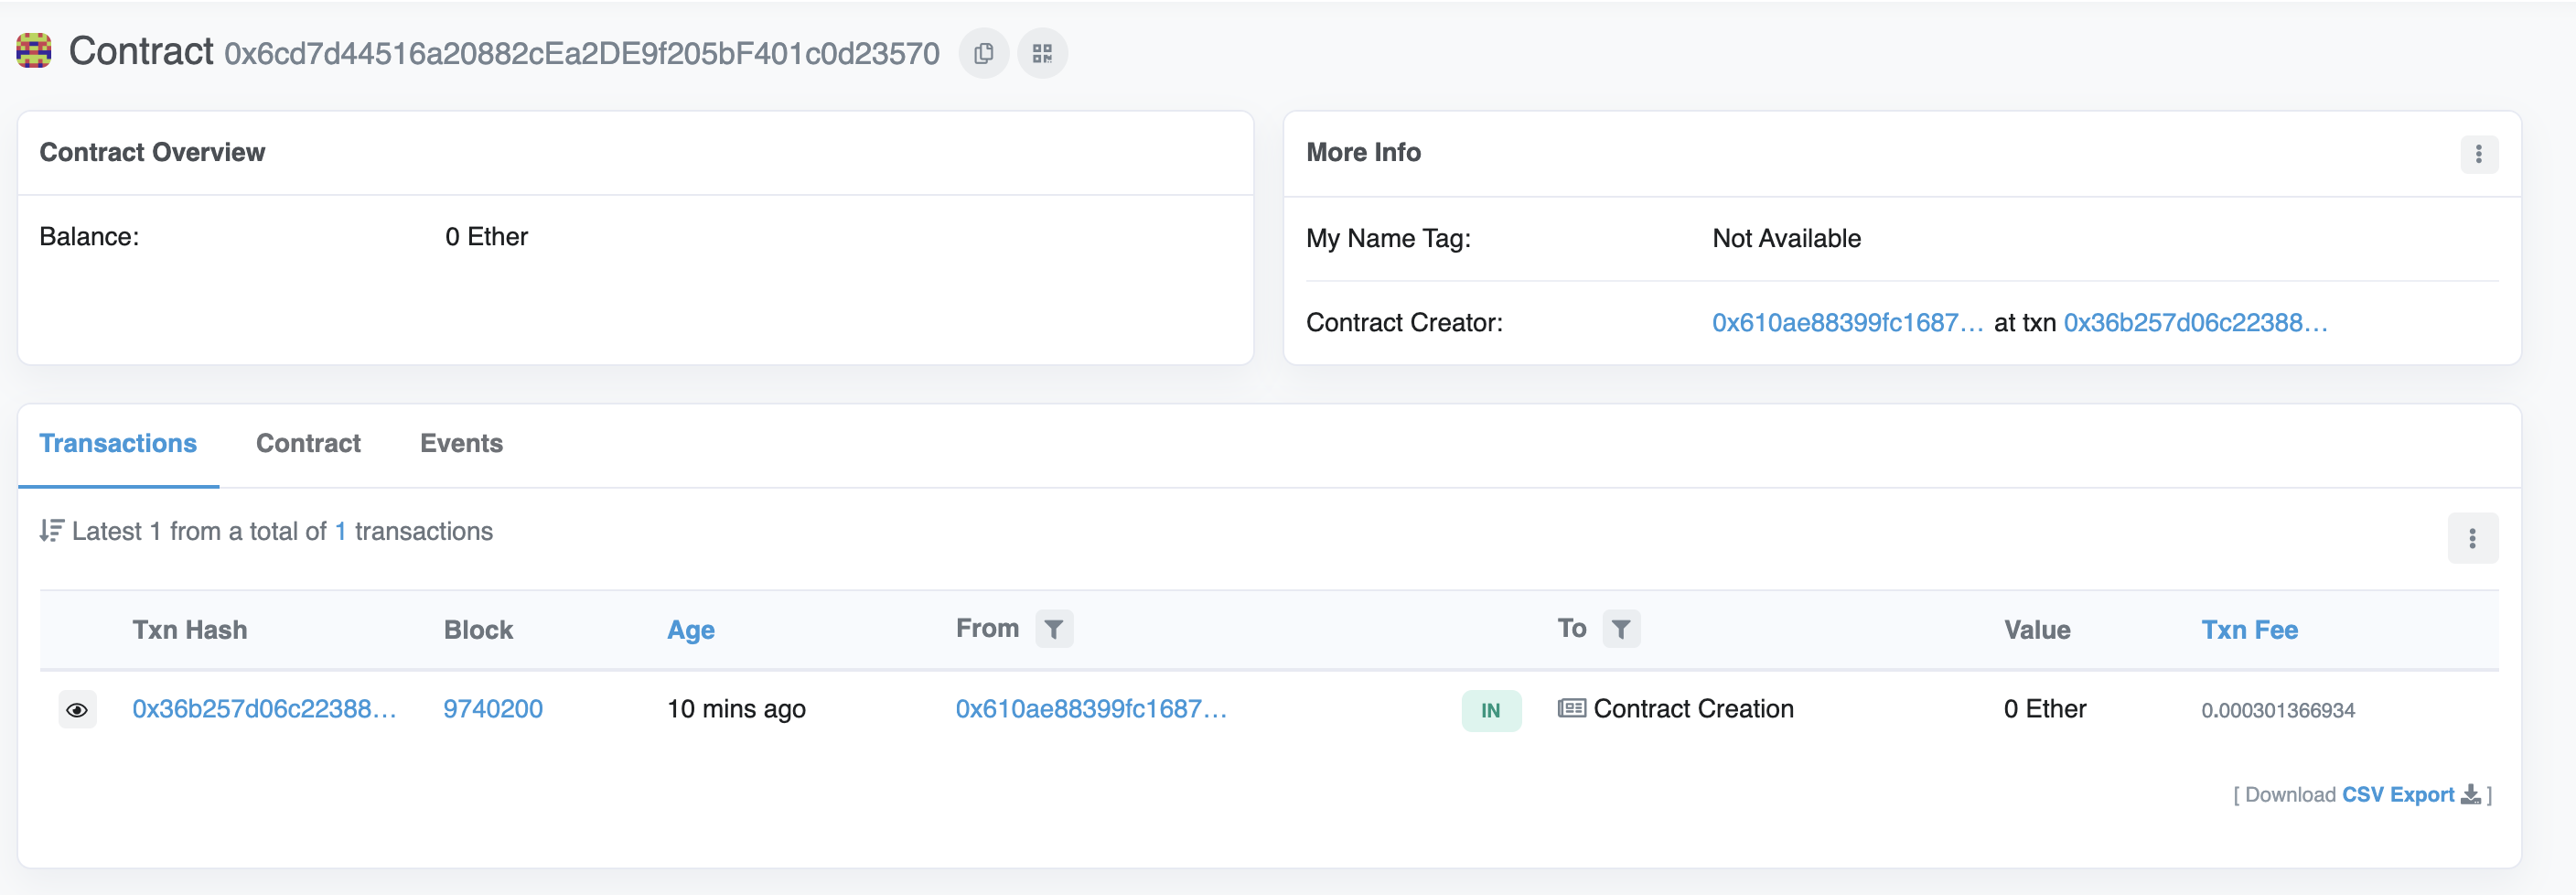
From 地址应与你的梅塔马斯克账户地址匹配,而 To 地址将显示 Contract Creation。如果我们点击进入交易,我们将在 To 字段中看到我们的合约地址。
![]()
恭喜!你刚刚将智能合约部署到了以太坊测试网。
为了了解其内部运作原理,让我们导航到 Alchemy 仪表板 (在新标签页中打开)中的 Explorer 选项卡。如果你有多个 Alchemy 应用,请确保按应用进行过滤并选择 Hello World。
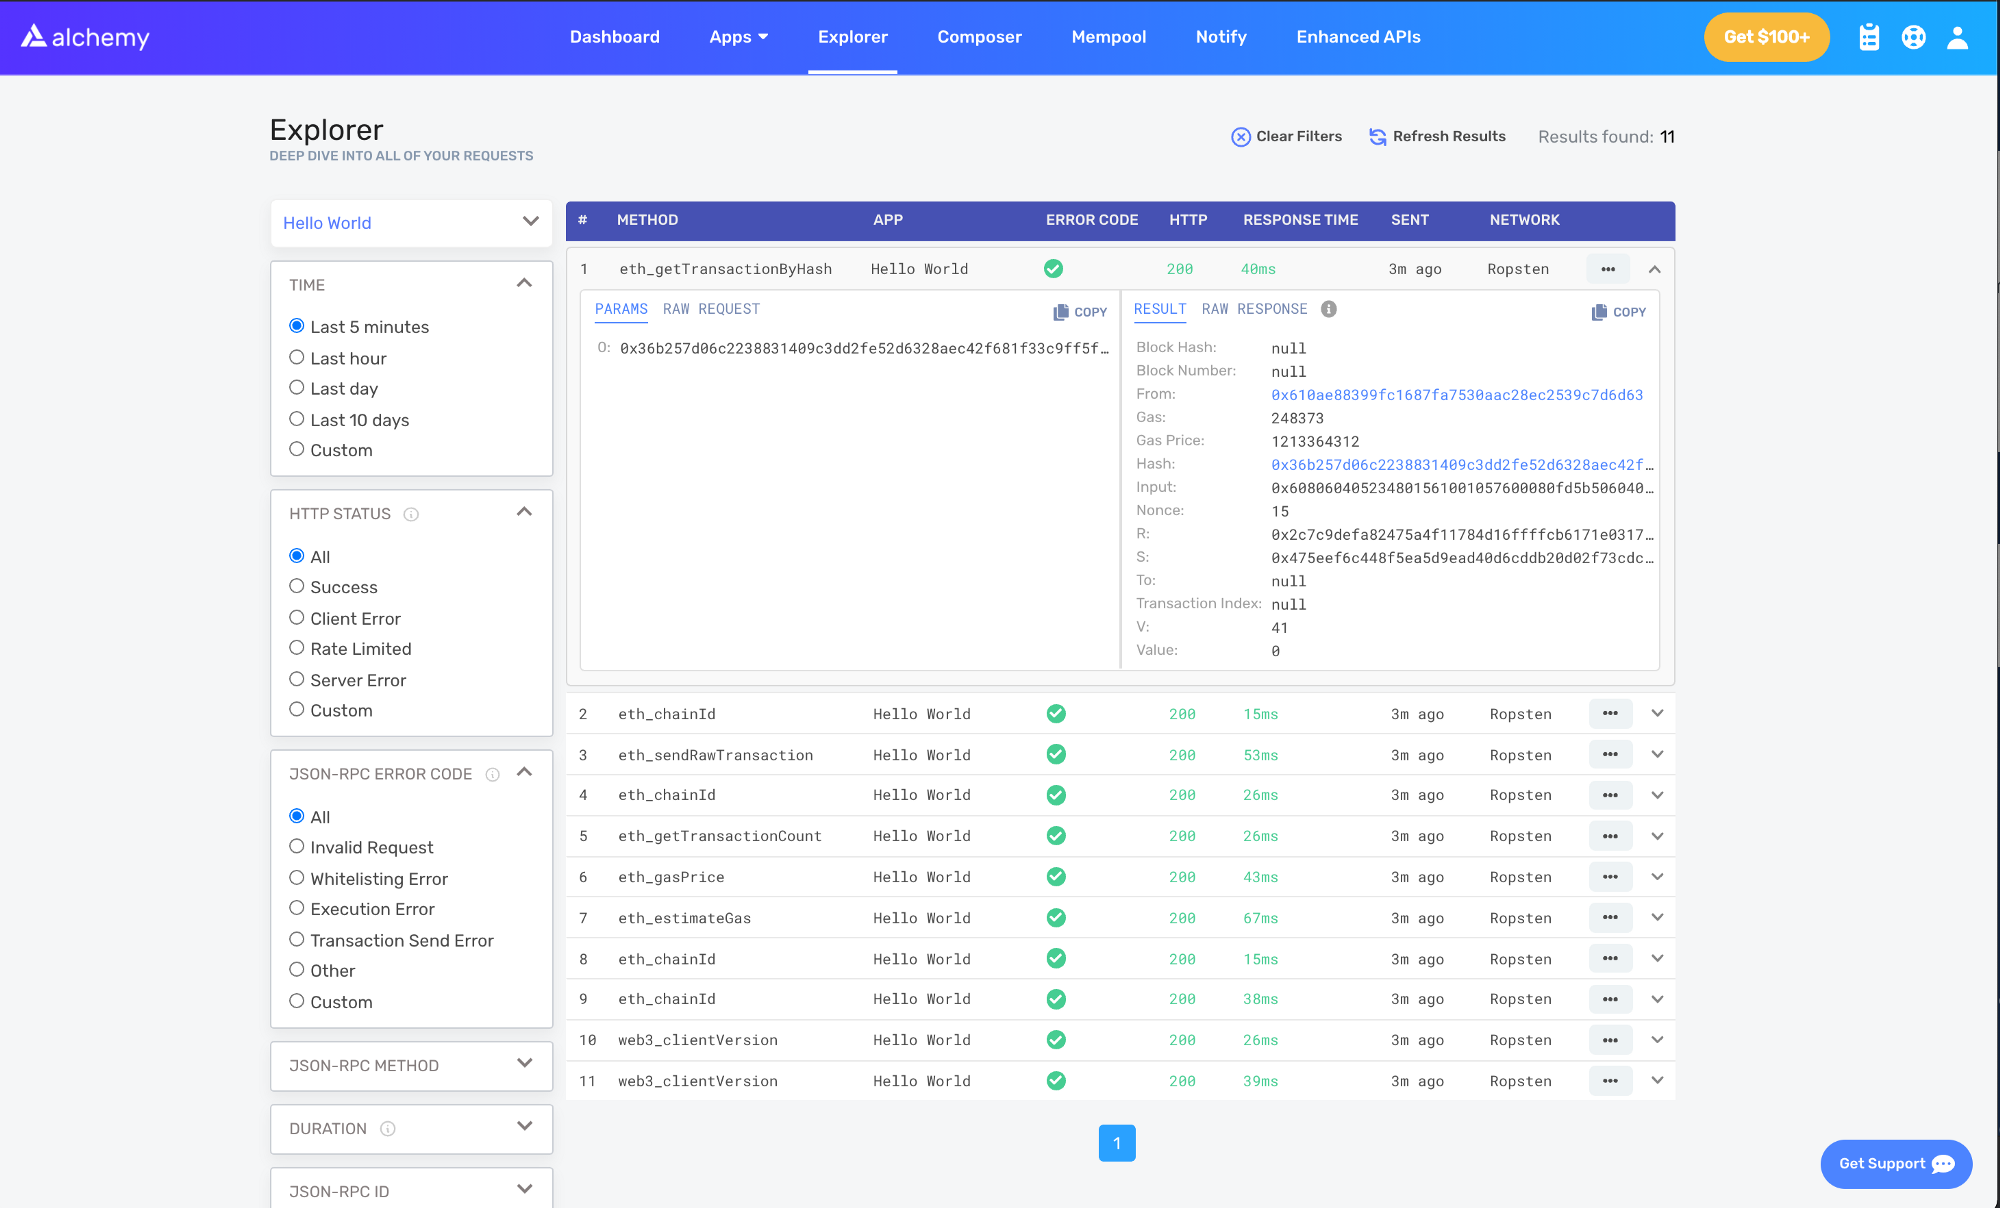
在这里,你将看到当我们调用 .deploy() 函数时,Hardhat/Ethers 在内部为我们发出的一些 JSON-RPC 方法。这里有两个重要的方法:eth_sendRawTransaction (在新标签页中打开),这是将我们的合约写入 Sepolia 链的请求;以及 eth_getTransactionByHash (在新标签页中打开),这是在给定哈希值的情况下读取有关我们交易信息的请求。要了解有关发送交易的更多信息,请查看我们关于使用 Web3 发送交易的教程。
第 2 部分:与你的智能合约交互
既然我们已经成功地将智能合约部署到了 Goerli 网络,接下来让我们学习如何与它进行交互。
创建 interact.js 文件
我们将在这个文件中编写交互脚本。我们将使用你在第 1 部分中安装的 Ethers.js 库。
在 scripts/ 文件夹中,创建一个名为 interact.js 的新文件并添加以下代码:
// interact.js

const API_KEY = process.env.API_KEY
const PRIVATE_KEY = process.env.PRIVATE_KEY
const CONTRACT_ADDRESS = process.env.CONTRACT_ADDRESS
更新你的 .env 文件
我们将使用新的环境变量,因此我们需要在之前创建的 .env 文件中定义它们。
我们需要为我们的 Alchemy API_KEY 以及部署智能合约的 CONTRACT_ADDRESS 添加定义。
你的 .env 文件应该类似于以下内容:
# .env

API_URL = "https://eth-goerli.alchemyapi.io/v2/<your-api-key>"
API_KEY = "<your-api-key>"
PRIVATE_KEY = "<your-metamask-private-key>"
CONTRACT_ADDRESS = "0x<your contract address>"
获取你的合约 ABI
我们的合约 是与智能合约交互的接口。Hardhat 会自动生成一个 ABI 并将其保存在 HelloWorld.json 中。要使用该 ABI,我们需要通过在 interact.js 文件中添加以下代码行来解析其内容:
// interact.js
const contract = require("../artifacts/contracts/HelloWorld.sol/HelloWorld.json")
如果你想查看该 ABI,可以将其打印到控制台:
console.log(JSON.stringify(contract.abi))
要查看打印到控制台的 ABI,请导航到终端并运行:
npx hardhat run scripts/interact.js
创建你的合约实例
为了与我们的合约交互,我们需要在代码中创建一个合约实例。要使用 Ethers.js 执行此操作,我们需要了解三个概念:
- 提供者 (Provider) - 为你提供区块链读写访问权限的节点提供者
- 签名者 (Signer) - 代表一个可以签署交易的以太坊账户
- 合约 (Contract) - 代表部署在链上的特定合约的 Ethers.js 对象
我们将使用上一步中的合约 ABI 来创建我们的合约实例:
// interact.js

// Provider
const alchemyProvider = new ethers.providers.AlchemyProvider(
  (network = "goerli"),
  API_KEY
)

// Signer
const signer = new ethers.Wallet(PRIVATE_KEY, alchemyProvider)

// Contract
const helloWorldContract = new ethers.Contract(
  CONTRACT_ADDRESS,
  contract.abi,
  signer
)
在 ethers.js 文档 (在新标签页中打开)中了解有关提供者、签名者和合约的更多信息。
读取初始消息
还记得我们使用 initMessage = "Hello world!" 部署合约的时候吗?我们现在将读取存储在智能合约中的那条消息,并将其打印到控制台。
在 JavaScript 中,与网络交互时会使用异步函数。要了解有关异步函数的更多信息,请阅读这篇 Medium 文章 (在新标签页中打开)。
使用下面的代码调用智能合约中的 message 函数并读取初始消息:
// interact.js

// ...

async function main() {
  const message = await helloWorldContract.message()
  console.log("The message is: " + message)
}
main()
在终端中使用 npx hardhat run scripts/interact.js 运行该文件后,我们应该会看到以下响应:
The message is: Hello world!
恭喜!你刚刚成功地从以太坊区块链中读取了智能合约数据,干得漂亮!
更新消息
除了读取消息之外,我们还可以使用 update 函数更新保存在智能合约中的消息!很酷吧?
要更新消息,我们可以直接在实例化的 Contract 对象上调用 update 函数:
// interact.js

// ...

async function main() {
  const message = await helloWorldContract.message()
  console.log("The message is: " + message)

  console.log("Updating the message...")
  const tx = await helloWorldContract.update("This is the new message.")
  await tx.wait()
}
main()
请注意,在第 11 行,我们对返回的交易对象调用了 .wait()。这确保了我们的脚本在退出函数之前会等待交易在区块链上被打包。如果不包含 .wait() 调用,脚本可能无法看到合约中更新后的 message 值。
读取新消息
你应该能够重复上一步来读取更新后的 message 值。花点时间看看你是否能进行必要的更改以打印出该新值!
如果你需要提示,以下是你的 interact.js 文件此时应有的样子:
// interact.js

const API_KEY = process.env.API_KEY
const PRIVATE_KEY = process.env.PRIVATE_KEY
const CONTRACT_ADDRESS = process.env.CONTRACT_ADDRESS

const contract = require("../artifacts/contracts/HelloWorld.sol/HelloWorld.json")

// 提供者 - Alchemy
const alchemyProvider = new ethers.providers.AlchemyProvider(
  (network = "sepolia"),
  API_KEY
)

// 签名者 - 你
const signer = new ethers.Wallet(PRIVATE_KEY, alchemyProvider)

// 合约实例
const helloWorldContract = new ethers.Contract(
  CONTRACT_ADDRESS,
  contract.abi,
  signer
)

async function main() {
  const message = await helloWorldContract.message()
  console.log("The message is: " + message)

  console.log("Updating the message...")
  const tx = await helloWorldContract.update("this is the new message")
  await tx.wait()

  const newMessage = await helloWorldContract.message()
  console.log("The new message is: " + newMessage)
}

main()
现在只需运行脚本,你应该就能看到旧消息、更新状态以及打印到终端的新消息!
npx hardhat run scripts/interact.js --network sepolia
The message is: Hello World!
Updating the message...
The new message is: This is the new message.
在运行该脚本时,你可能会注意到 Updating the message... 步骤需要加载一段时间才能加载新消息。这是由于挖矿过程所致;如果你对在交易被打包时跟踪交易感兴趣,请访问 Alchemy 内存池 (在新标签页中打开)以查看交易的状态。如果交易被丢弃,检查 Sepolia Etherscan (在新标签页中打开) 并搜索你的交易哈希也会很有帮助。
第 3 部分:将你的智能合约发布到 Etherscan
你已经完成了让智能合约运行的所有艰苦工作;现在是时候与世界分享它了!
通过在 Etherscan 上验证你的智能合约,任何人都可以查看你的源代码并与你的智能合约进行交互。让我们开始吧!
第 1 步:在你的 Etherscan 账户上生成 API 密钥
Etherscan API 密钥对于验证你拥有试图发布的智能合约是必不可少的。
如果你还没有 Etherscan 账户,请注册一个账户 (在新标签页中打开)。
登录后,在导航栏中找到你的用户名,将鼠标悬停在上面并选择 My profile 按钮。
在你的个人资料页面上,你应该会看到一个侧边导航栏。从侧边导航栏中选择 API Keys。接下来,点击“Add”按钮创建一个新的 API 密钥,将你的应用命名为 hello-world,然后点击 Create New API Key 按钮。
你的新 API 密钥应该会出现在 API 密钥表格中。将该 API 密钥复制到剪贴板。
接下来,我们需要将 Etherscan API 密钥添加到我们的 .env 文件中。
添加后,你的 .env 文件应该如下所示:
API_URL = "https://eth-goerli.alchemyapi.io/v2/your-api-key"
PUBLIC_KEY = "your-public-account-address"
PRIVATE_KEY = "your-private-account-address"
CONTRACT_ADDRESS = "your-contract-address"
ETHERSCAN_API_KEY = "your-etherscan-key"
使用 Hardhat 部署的智能合约
安装 hardhat-etherscan
使用 Hardhat 将你的合约发布到 Etherscan 非常简单。首先,你需要安装 hardhat-etherscan 插件才能开始。hardhat-etherscan 会自动在 Etherscan 上验证智能合约的源代码和 ABI。要添加此插件,请在 hello-world 目录中运行:
npm install --save-dev @nomiclabs/hardhat-etherscan
安装完成后,在你的 hardhat.config.js 顶部包含以下语句,并添加 Etherscan 配置选项:
// hardhat.config.js

require("dotenv").config()
require("@nomiclabs/hardhat-ethers")
require("@nomiclabs/hardhat-etherscan")

const { API_URL, PRIVATE_KEY, ETHERSCAN_API_KEY } = process.env

module.exports = {
  solidity: "0.7.3",
  defaultNetwork: "goerli",
  networks: {
    hardhat: {},
    goerli: {
      url: API_URL,
      accounts: [`0x${PRIVATE_KEY}`],
    },
  },
  etherscan: {
    // 你的 Etherscan API 密钥
    // 在 https://etherscan.io/ 获取
    apiKey: ETHERSCAN_API_KEY,
  },
}
在 Etherscan 上验证你的智能合约
确保所有文件都已保存,并且所有 .env 变量都已正确配置。
运行 verify 任务,传入合约地址以及它部署到的网络:
npx hardhat verify --network sepolia DEPLOYED_CONTRACT_ADDRESS 'Hello World!'
确保 DEPLOYED_CONTRACT_ADDRESS 是你在 Sepolia 测试网上部署的智能合约的地址。此外,最后一个参数('Hello World!')必须与在第 1 部分的部署步骤中使用的字符串值相同。
如果一切顺利,你将在终端中看到以下消息:
Successfully submitted source code for contract
contracts/HelloWorld.sol:HelloWorld at 0xdeployed-contract-address
for verification on Etherscan. Waiting for verification result...


Successfully verified contract HelloWorld on Etherscan.
https://sepolia.etherscan.io/address/<contract-address>#contracts
恭喜!你的智能合约代码已在 Etherscan 上!
在 Etherscan 上查看你的智能合约!
当你导航到终端中提供的链接时,你应该能够看到你的智能合约代码和 ABI 已发布在 Etherscan 上!
太棒了——你做到了,冠军!现在任何人都可以调用或写入你的智能合约!我们迫不及待地想看到你接下来会构建什么!
第 4 部分 - 将智能合约与前端集成
在本教程结束时,你将了解如何:
- 将梅塔马斯克钱包连接到你的去中心化应用 (dapp)
- 使用 Alchemy Web3 (在新标签页中打开) API 从你的智能合约中读取数据
- 使用梅塔马斯克签署以太坊交易
对于这个 dapp,我们将使用 React (在新标签页中打开) 作为前端框架;但需要注意的是,我们不会花太多时间讲解它的基础知识,因为我们将主要专注于为我们的项目引入 Web3 功能。
作为先决条件,你应该对 React 有初学者水平的了解。如果没有,我们建议你完成官方的 React 入门教程 (在新标签页中打开)。
克隆启动文件
首先,前往 hello-world-part-four GitHub 仓库 (在新标签页中打开) 获取此项目的启动文件,并将此仓库克隆到你的本地计算机。
在本地打开克隆的仓库。请注意,它包含两个文件夹:starter-files 和 completed。
starter-files- 我们将在此目录中工作,我们会将用户界面 (UI) 连接到你的以太坊钱包以及我们在第 3 部分中发布到 Etherscan 的智能合约。completed包含整个已完成的教程,仅应在你遇到困难时作为参考。
接下来,在你最喜欢的代码编辑器中打开你的 starter-files 副本,然后导航到 src 文件夹。
我们将编写的所有代码都将位于 src 文件夹下。我们将编辑 HelloWorld.js 组件和 util/interact.js JavaScript 文件,为我们的项目赋予 Web3 功能。
检查启动文件
在开始编码之前,让我们探索一下启动文件中为我们提供了什么。
运行你的 React 项目
让我们从在浏览器中运行 React 项目开始。React 的美妙之处在于,一旦我们的项目在浏览器中运行,我们保存的任何更改都将在浏览器中实时更新。
要运行该项目,请导航到 starter-files 文件夹的根目录,然后在终端中运行 npm install 以安装项目的依赖项:
cd starter-files
npm install
安装完成后,在终端中运行 npm start:
npm start
这样做应该会在你的浏览器中打开 http://localhost:3000/ (在新标签页中打开),你将在其中看到我们项目的前端。它应该包含一个字段(用于更新存储在智能合约中的消息的地方)、一个“Connect Wallet”(连接钱包)按钮和一个“Update”(更新)按钮。
如果你尝试点击任一按钮,你会发现它们不起作用——这是因为我们仍然需要对它们的功能进行编程。
HelloWorld.js 组件
让我们回到编辑器中的 src 文件夹并打开 HelloWorld.js 文件。理解此文件中的所有内容非常重要,因为它是我们将要处理的主要 React 组件。
在此文件的顶部,你会注意到我们有几个使项目运行所必需的导入语句,包括 React 库、useEffect 和 useState 钩子、来自 ./util/interact.js 的一些项(我们很快会更详细地描述它们!)以及 Alchemy 徽标。
// HelloWorld.js

import React from "react"
import { useEffect, useState } from "react"
import {
  helloWorldContract,
  connectWallet,
  updateMessage,
  loadCurrentMessage,
  getCurrentWalletConnected,
} from "./util/interact.js"

import alchemylogo from "./alchemylogo.svg"
接下来,我们有将在特定事件后更新的状态变量。
// HelloWorld.js

//状态变量
const [walletAddress, setWallet] = useState("")
const [status, setStatus] = useState("")
const [message, setMessage] = useState("No connection to the network.")
const [newMessage, setNewMessage] = useState("")
以下是每个变量代表的含义:
walletAddress- 存储用户钱包地址的字符串status- 存储有用消息的字符串,用于指导用户如何与 dapp 交互message- 存储智能合约中当前消息的字符串newMessage- 存储将写入智能合约的新消息的字符串
在状态变量之后,你会看到五个未实现的函数:useEffect、addSmartContractListener、addWalletListener、connectWalletPressed 和 onUpdatePressed。我们将在下面解释它们的作用:
// HelloWorld.js

//仅调用一次
useEffect(async () => {
  //TODO: 实现
}, [])

function addSmartContractListener() {
  //TODO: 实现
}

function addWalletListener() {
  //TODO: 实现
}

const connectWalletPressed = async () => {
  //TODO: 实现
}

const onUpdatePressed = async () => {
  //TODO: 实现
}
useEffect(在新标签页中打开) - 这是一个在组件渲染后调用的 React 钩子。因为它传入了一个空数组[]属性(见第 4 行),所以它只会在组件的首次渲染时被调用。在这里,我们将加载存储在智能合约中的当前消息,调用我们的智能合约和钱包监听器,并更新我们的 UI 以反映钱包是否已连接。addSmartContractListener- 此函数设置一个监听器,它将监视我们的 HelloWorld 合约的UpdatedMessages事件,并在智能合约中的消息更改时更新我们的 UI。addWalletListener- 此函数设置一个监听器,用于检测用户梅塔马斯克钱包状态的变化,例如当用户断开钱包连接或切换地址时。connectWalletPressed- 将调用此函数以将用户的梅塔马斯克钱包连接到我们的 dapp。onUpdatePressed- 当用户想要更新存储在智能合约中的消息时,将调用此函数。
在此文件接近末尾的地方,我们有组件的 UI。
// HelloWorld.js

//我们组件的 UI
return (
  <div id="container">
    <img id="logo" src={alchemylogo}></img>
    <button id="walletButton" onClick={connectWalletPressed}>
      {walletAddress.length > 0 ? (
        "Connected: " +
        String(walletAddress).substring(0, 6) +
        "..." +
        String(walletAddress).substring(38)
      ) : (
        <span>Connect Wallet</span>
      )}
    </button>

    <h2 style={{ paddingTop: "50px" }}>Current Message:</h2>
    <p>{message}</p>

    <h2 style={{ paddingTop: "18px" }}>New Message:</h2>

    <div>
      <input
        type="text"
        placeholder="Update the message in your smart contract."
        onChange={(e) => setNewMessage(e.target.value)}
        value={newMessage}
      />
      <p id="status">{status}</p>

      <button id="publishButton" onClick={onUpdatePressed}>
        Update
      </button>

</div>

</div>
)
如果你仔细浏览这段代码,你会注意到我们在 UI 中使用各种状态变量的位置:
- 在第 6-12 行,如果用户的钱包已连接(即
walletAddress.length > 0),我们会在 ID 为“walletButton”的按钮中显示用户walletAddress的截断版本;否则它只显示“Connect Wallet”(连接钱包)。 - 在第 17 行,我们显示存储在智能合约中的当前消息,该消息捕获在
message字符串中。 - 在第 23-26 行,当文本字段中的输入发生变化时,我们使用受控组件 (在新标签页中打开)来更新我们的
newMessage状态变量。
除了我们的状态变量之外,你还会看到当分别点击 ID 为 publishButton 和 walletButton 的按钮时,会调用 connectWalletPressed 和 onUpdatePressed 函数。
最后,让我们说明一下这个 HelloWorld.js 组件添加到了哪里。
如果你转到 App.js 文件(它是 React 中的主要组件,充当所有其他组件的容器),你会看到我们的 HelloWorld.js 组件被注入到了第 7 行。
最后同样重要的是,让我们检查一下为你提供的另一个文件,即 interact.js 文件。
interact.js 文件
因为我们希望遵循 M-V-C (在新标签页中打开) 范式,所以我们需要一个单独的文件来包含管理 dapp 逻辑、数据和规则的所有函数,然后能够将这些函数导出到我们的前端(我们的 HelloWorld.js 组件)。
👆🏽这正是我们 interact.js 文件的目的!
导航到 src 目录中的 util 文件夹,你会注意到我们包含了一个名为 interact.js 的文件,它将包含我们所有的智能合约交互以及钱包函数和变量。
// interact.js

//export const helloWorldContract;

export const loadCurrentMessage = async () => {}

export const connectWallet = async () => {}

const getCurrentWalletConnected = async () => {}

export const updateMessage = async (message) => {}
你会注意到在文件顶部,我们注释掉了 helloWorldContract 对象。在本教程的后面,我们将取消注释此对象并在此变量中实例化我们的智能合约,然后将其导出到我们的 HelloWorld.js 组件中。
在我们的 helloWorldContract 对象之后的四个未实现函数执行以下操作:
loadCurrentMessage- 此函数处理加载存储在智能合约中的当前消息的逻辑。它将使用 Alchemy Web3 API (在新标签页中打开) 对 Hello World 智能合约进行读取调用。connectWallet- 此函数将用户的梅塔马斯克连接到我们的 dapp。getCurrentWalletConnected- 此函数将在页面加载时检查以太坊账户是否已连接到我们的 dapp,并相应地更新我们的 UI。updateMessage- 此函数将更新存储在智能合约中的消息。它将对 Hello World 智能合约进行写入调用,因此用户的梅塔马斯克钱包必须签署以太坊交易才能更新消息。
现在我们了解了正在处理的内容,让我们弄清楚如何从智能合约中读取数据!
第 3 步:从智能合约中读取数据
要从智能合约中读取数据,你需要成功设置:
- 与以太坊链的 API 连接
- 智能合约的已加载实例
- 调用智能合约函数的函数
- 一个监听器,用于在从智能合约读取的数据发生更改时监视更新
这听起来可能有很多步骤,但别担心!我们将逐步引导你完成每个步骤!:)
建立与以太坊链的 API 连接
还记得在本教程的第 2 部分中,我们是如何使用 Alchemy Web3 密钥从智能合约中读取数据的吗?你还需要在你的去中心化应用 (dapp) 中使用 Alchemy Web3 密钥来从链上读取数据。
如果你还没有安装,请首先导航到 starter-files 的根目录并在终端中运行以下命令来安装 Alchemy Web3 (在新标签页中打开):
npm install @alch/alchemy-web3
Alchemy Web3 (在新标签页中打开) 是 Web3.js (在新标签页中打开) 的一个包装器,提供了增强的 API 方法和其他关键优势,让你的 Web3 开发者生活更加轻松。它的设计旨在只需最少的配置,因此你可以立即开始在你的应用中使用它!
然后,在你的项目目录中安装 dotenv (在新标签页中打开) 包,这样我们在获取 API 密钥后就有一个安全的地方来存储它。
npm install dotenv --save
对于我们的 dapp,我们将使用 Websockets API 密钥而不是 HTTP API 密钥,因为它将允许我们设置一个监听器,用于检测存储在智能合约中的消息何时发生变化。
获得 API 密钥后,在你的根目录中创建一个 .env 文件,并将你的 Alchemy Websockets URL 添加到其中。之后,你的 .env 文件应该如下所示:
REACT_APP_ALCHEMY_KEY = wss://eth-goerli.ws.alchemyapi.io/v2/<key>
现在,我们准备好在我们的 dapp 中设置 Alchemy Web3 端点了!让我们回到嵌套在 util 文件夹中的 interact.js,并在文件顶部添加以下代码:
// interact.js

require("dotenv").config()
const alchemyKey = process.env.REACT_APP_ALCHEMY_KEY
const { createAlchemyWeb3 } = require("@alch/alchemy-web3")
const web3 = createAlchemyWeb3(alchemyKey)

//export const helloWorldContract;
在上面的代码中,我们首先从 .env 文件中导入了 Alchemy 密钥,然后将我们的 alchemyKey 传递给 createAlchemyWeb3 以建立我们的 Alchemy Web3 端点。
端点准备就绪后,是时候加载我们的智能合约了!
加载你的 Hello World 智能合约
要加载你的 Hello World 智能合约,你需要它的合约地址和 ABI,如果你完成了本教程的第 3 部分,这两者都可以在 Etherscan 上找到。
如何从 Etherscan 获取你的合约 ABI
如果你跳过了本教程的第 3 部分,请首先部署并验证你自己的 HelloWorld 合约。然后在 Sepolia Etherscan (在新标签页中打开) 上打开你的合约页面以复制其 ABI。
合约 ABI 对于指定合约将调用哪个函数以及确保该函数将以你期望的格式返回数据是必不可少的。复制合约 ABI 后,让我们将其保存为 src 目录中名为 contract-abi.json 的 JSON 文件。
你的 contract-abi.json 应该存储在你的 src 文件夹中。
有了我们的合约地址、ABI 和 Alchemy Web3 端点,我们就可以使用 contract 方法 (在新标签页中打开)来加载我们的智能合约实例。将你的合约 ABI 导入 interact.js 文件并添加你的合约地址。
// interact.js

const contractABI = require("../contract-abi.json")
// 在此处使用你的合约地址
const contractAddress = "0x..."
现在我们终于可以取消注释 helloWorldContract 变量,并使用我们的 AlchemyWeb3 端点加载智能合约:
// interact.js
export const helloWorldContract = new web3.eth.Contract(
  contractABI,
  contractAddress
)
回顾一下,你的 interact.js 的前 12 行现在应该如下所示:
// interact.js

require("dotenv").config()
const alchemyKey = process.env.REACT_APP_ALCHEMY_KEY
const { createAlchemyWeb3 } = require("@alch/alchemy-web3")
const web3 = createAlchemyWeb3(alchemyKey)

const contractABI = require("../contract-abi.json")
const contractAddress = "0x6f3f635A9762B47954229Ea479b4541eAF402A6A"

export const helloWorldContract = new web3.eth.Contract(
  contractABI,
  contractAddress
)
现在我们已经加载了合约,我们可以实现我们的 loadCurrentMessage 函数了!
在 interact.js 文件中实现 loadCurrentMessage
这个函数非常简单。我们将进行一个简单的异步 Web3 调用来从合约中读取数据。我们的函数将返回存储在智能合约中的消息:
将 interact.js 文件中的 loadCurrentMessage 更新为以下内容:
// interact.js

export const loadCurrentMessage = async () => {
  const message = await helloWorldContract.methods.message().call()
  return message
}
由于我们想在 UI 中显示此智能合约,让我们将 HelloWorld.js 组件中的 useEffect 函数更新为以下内容:
// HelloWorld.js

//仅调用一次
useEffect(async () => {
  const message = await loadCurrentMessage()
  setMessage(message)
}, [])
请注意,我们只希望 loadCurrentMessage 在组件的首次渲染期间被调用一次。我们很快将实现 addSmartContractListener,以便在智能合约中的消息更改后自动更新 UI。
在深入研究监听器之前,让我们检查一下目前所取得的进展!保存你的 HelloWorld.js 和 interact.js 文件,然后转到 http://localhost:3000/ (在新标签页中打开)
你会注意到当前消息不再显示“No connection to the network.”(未连接到网络)。相反,它反映了存储在智能合约中的消息。太棒了!
你的 UI 现在应该反映存储在智能合约中的消息
现在说到那个监听器……
实现 addSmartContractListener
回想一下我们在本系列教程第 1 部分中编写的 HelloWorld.sol 文件,你会记得有一个名为 UpdatedMessages 的智能合约事件,它在调用智能合约的 update 函数后发出(见第 9 行和第 27 行):
// HelloWorld.sol

// 指定 Solidity 的版本,使用语义化版本控制。
// 了解更多:https://solidity.readthedocs.io/en/v0.5.10/layout-of-source-files.html#pragma
pragma solidity ^0.7.3;

// 定义一个名为 `HelloWorld` 的合约。
// 合约是函数和数据(其状态)的集合。一旦部署,合约就驻留在以太坊区块链上的特定地址。了解更多:https://solidity.readthedocs.io/en/v0.5.10/structure-of-a-contract.html
contract HelloWorld {

   //在调用 update 函数时触发
   //智能合约事件是你的合约向应用前端传达区块链上发生了某事的一种方式,前端可以“监听”某些事件并在其发生时采取行动。
   event UpdatedMessages(string oldStr, string newStr);

   // 声明一个 `string` 类型的状态变量 `message`。
   // 状态变量是其值永久存储在合约存储中的变量。关键字 `public` 使变量可以从合约外部访问,并创建一个函数,其他合约或客户端可以调用该函数来访问该值。
   string public message;

   // 与许多基于类的面向对象语言类似,构造函数是一种仅在合约创建时执行的特殊函数。
   // 构造函数用于初始化合约的数据。了解更多:https://solidity.readthedocs.io/en/v0.5.10/contracts.html#constructors
   constructor(string memory initMessage) {

      // 接受一个字符串参数 `initMessage` 并将该值设置到合约的 `message` 存储变量中)。
      message = initMessage;
   }

   // 一个公共函数,接受一个字符串参数并更新 `message` 存储变量。
   function update(string memory newMessage) public {
      string memory oldMsg = message;
      message = newMessage;
      emit UpdatedMessages(oldMsg, newMessage);
   }
}
智能合约事件是合约向前端应用程序传达区块链上发生了某事(即发生了事件)的一种方式,前端应用程序可以“监听”特定事件并在事件发生时采取行动。
addSmartContractListener 函数将专门监听我们的 Hello World 智能合约的 UpdatedMessages 事件,并更新我们的 UI 以显示新消息。
将 addSmartContractListener 修改为以下内容:
// HelloWorld.js

function addSmartContractListener() {
  helloWorldContract.events.UpdatedMessages({}, (error, data) => {
    if (error) {
      setStatus("😥 " + error.message)
    } else {
      setMessage(data.returnValues[1])
      setNewMessage("")
      setStatus("🎉 Your message has been updated!")
    }
  })
}
让我们分解一下当监听器检测到事件时会发生什么:
- 如果在发出事件时发生错误,它将通过我们的
status状态变量反映在 UI 中。 - 否则,我们将使用返回的
data对象。data.returnValues是一个从零开始索引的数组,其中数组的第一个元素存储先前的消息,第二个元素存储更新后的消息。总而言之,在成功触发事件时,我们会将message字符串设置为更新后的消息,清除newMessage字符串,并更新status状态变量以反映新消息已发布到我们的智能合约上。
最后,让我们在 useEffect 函数中调用监听器,以便在 HelloWorld.js 组件的首次渲染时对其进行初始化。总而言之,你的 useEffect 函数应如下所示:
// HelloWorld.js

useEffect(async () => {
  const message = await loadCurrentMessage()
  setMessage(message)
  addSmartContractListener()
}, [])
既然我们能够从智能合约中读取数据,如果能弄清楚如何向其写入数据就太好了!然而,要向我们的 dapp 写入数据,我们必须首先连接一个以太坊钱包。
因此,接下来我们将着手设置以太坊钱包(梅塔马斯克),然后将其连接到我们的 dapp!
第 4 步:设置你的以太坊钱包
要向以太坊链写入任何内容,用户必须使用其虚拟钱包的私钥签署交易。在本教程中,我们将使用梅塔马斯克 (在新标签页中打开),这是一款浏览器中的虚拟钱包,用于管理你的以太坊账户地址,因为它使最终用户签署交易变得非常容易。
如果你想了解更多关于以太坊交易如何工作的信息,请查看以太坊基金会的此页面。
你可以在这里 (在新标签页中打开)免费下载并创建一个梅塔马斯克账户。在创建账户时,或者如果你已经有一个账户,请确保切换到右上角的“Sepolia 测试网络” (这样我们就不会涉及真实资金)。
从水龙头添加以太币
要在以太坊区块链上签署交易,我们需要一些测试 ETH。要获取 ETH,你可以前往测试网络页面上列出的 Sepolia 水龙头,并输入你的 Sepolia 账户地址。不久之后,你应该就会在你的梅塔马斯克账户中看到 ETH!
检查你的余额
为了再次确认我们的余额已到账,让我们使用 Alchemy 的沙盒工具 (在新标签页中打开)发出一个 eth_getBalance (在新标签页中打开) 请求。这将返回我们钱包中的 ETH 数量。在输入你的梅塔马斯克账户地址并点击“Send Request”(发送请求)后,你应该会看到类似以下的响应:
{"jsonrpc": "2.0", "id": 0, "result": "0xde0b6b3a7640000"}
注意: 此结果的单位是 wei,而不是 ETH。wei 被用作以太币的最小面额。从 wei 到 ETH 的换算关系是:1 ETH = 10¹⁸ wei。因此,如果我们将 0xde0b6b3a7640000 转换为十进制,我们会得到 1*10¹⁸,即等于 1 ETH。
呼!我们的假钱都在那里!🤑
第 5 步:将梅塔马斯克连接到你的 UI
现在我们的梅塔马斯克钱包已设置完毕,让我们将 dapp 连接到它!
connectWallet 函数
在我们的 interact.js 文件中,让我们实现 connectWallet 函数,然后我们可以在 HelloWorld.js 组件中调用它。
让我们将 connectWallet 修改为以下内容:
// interact.js

export const connectWallet = async () => {
  if (window.ethereum) {
    try {
      const addressArray = await window.ethereum.request({
        method: "eth_requestAccounts",
      })
      const obj = {
        status: "👆🏽 Write a message in the text-field above.",
        address: addressArray[0],
      }
      return obj
    } catch (err) {
      return {
        address: "",
        status: "😥 " + err.message,
      }
    }
  } else {
    return {
      address: "",
      status: (
        <span>
          <p>
            {" "}
            🦊 <a target="_blank" href={`https://metamask.io/download`}>
              You must install MetaMask, a virtual Ethereum wallet, in your
              browser.
            </a>
          </p>
        </span>
      ),
    }
  }
}
那么这大块代码到底是做什么的呢?
首先,它会检查你的浏览器中是否启用了 window.ethereum。
window.ethereum 是由梅塔马斯克和其他钱包提供商注入的全局 API,允许网站请求用户的以太坊账户。如果获得批准,它可以从用户连接的区块链读取数据,并建议用户签署消息和交易。查看梅塔马斯克文档 (在新标签页中打开)了解更多信息!
如果 window.ethereum 不存在,则意味着未安装梅塔马斯克。这将导致返回一个 JSON 对象,其中返回的 address 是一个空字符串,并且 status JSX 对象传达用户必须安装梅塔马斯克。
现在,如果 window.ethereum 存在,事情就变得有趣了。
使用 try/catch 循环,我们将尝试通过调用 window.ethereum.request({ method: "eth_requestAccounts" }); (在新标签页中打开) 连接到梅塔马斯克。调用此函数将在浏览器中打开梅塔马斯克,从而提示用户将其钱包连接到你的 dapp。
- 如果用户选择连接,
method: "eth_requestAccounts"将返回一个数组,其中包含连接到 dapp 的所有用户账户地址。总而言之,我们的connectWallet函数将返回一个 JSON 对象,其中包含此数组中的第一个address(见第 9 行)以及提示用户向智能合约写入消息的status消息。 - 如果用户拒绝连接,则 JSON 对象将包含一个空字符串作为返回的
address,以及反映用户拒绝连接的status消息。
现在我们已经编写了这个 connectWallet 函数,下一步是在我们的 HelloWorld.js 组件中调用它。
将 connectWallet 函数添加到你的 HelloWorld.js UI 组件
导航到 HelloWorld.js 中的 connectWalletPressed 函数,并将其更新为以下内容:
// HelloWorld.js

const connectWalletPressed = async () => {
  const walletResponse = await connectWallet()
  setStatus(walletResponse.status)
  setWallet(walletResponse.address)
}
注意到我们的大部分功能是如何从 interact.js 文件中抽象出来,脱离 HelloWorld.js 组件的吗?这是为了让我们遵守 M-V-C 范式!
在 connectWalletPressed 中,我们只需对导入的 connectWallet 函数进行 await 调用,并使用其响应通过状态钩子更新我们的 status 和 walletAddress 变量。
现在,让我们保存这两个文件(HelloWorld.js 和 interact.js)并测试一下目前的 UI。
在浏览器中打开 http://localhost:3000/ (在新标签页中打开) 页面,然后按页面右上角的“Connect Wallet”(连接钱包)按钮。
如果你安装了梅塔马斯克,系统会提示你将钱包连接到 dapp。接受连接邀请。
你应该会看到钱包按钮现在反映你的地址已连接!太棒了 🔥
接下来,尝试刷新页面……这很奇怪。我们的钱包按钮提示我们连接梅塔马斯克,即使它已经连接了……
不过,别担心!我们可以通过实现 getCurrentWalletConnected 轻松解决(address)这个问题(懂了吗?),它将检查地址是否已连接到我们的 dapp 并相应地更新我们的 UI!
getCurrentWalletConnected 函数
将 interact.js 文件中的 getCurrentWalletConnected 函数更新为以下内容:
// interact.js

export const getCurrentWalletConnected = async () => {
  if (window.ethereum) {
    try {
      const addressArray = await window.ethereum.request({
        method: "eth_accounts",
      })
      if (addressArray.length > 0) {
        return {
          address: addressArray[0],
          status: "👆🏽 Write a message in the text-field above.",
        }
      } else {
        return {
          address: "",
          status: "🦊 Connect to MetaMask using the top right button.",
        }
      }
    } catch (err) {
      return {
        address: "",
        status: "😥 " + err.message,
      }
    }
  } else {
    return {
      address: "",
      status: (
        <span>
          <p>
            {" "}
            🦊 <a target="_blank" href={`https://metamask.io/download`}>
              You must install MetaMask, a virtual Ethereum wallet, in your
              browser.
            </a>
          </p>
        </span>
      ),
    }
  }
}
这段代码与我们在上一步中刚刚编写的 connectWallet 函数非常相似。
主要区别在于,这里我们不调用打开梅塔马斯克让用户连接钱包的 eth_requestAccounts 方法,而是调用 eth_accounts 方法,它只返回一个包含当前连接到我们 dapp 的梅塔马斯克地址的数组。
要查看此函数的实际效果,让我们在 HelloWorld.js 组件的 useEffect 函数中调用它:
// HelloWorld.js

useEffect(async () => {
  const message = await loadCurrentMessage()
  setMessage(message)
  addSmartContractListener()

  const { address, status } = await getCurrentWalletConnected()
  setWallet(address)
  setStatus(status)
}, [])
请注意,我们使用对 getCurrentWalletConnected 调用的响应来更新我们的 walletAddress 和 status 状态变量。
现在你已经添加了这段代码,让我们尝试刷新浏览器窗口。
太棒了!按钮应该显示你已连接,并显示已连接钱包地址的预览——即使在刷新后也是如此!
实现 addWalletListener
我们 dapp 钱包设置的最后一步是实现钱包监听器,以便在钱包状态发生变化(例如用户断开连接或切换账户)时更新我们的 UI。
在你的 HelloWorld.js 文件中,将 addWalletListener 函数修改为以下内容:
// HelloWorld.js

function addWalletListener() {
  if (window.ethereum) {
    window.ethereum.on("accountsChanged", (accounts) => {
      if (accounts.length > 0) {
        setWallet(accounts[0])
        setStatus("👆🏽 Write a message in the text-field above.")
      } else {
        setWallet("")
        setStatus("🦊 Connect to MetaMask using the top right button.")
      }
    })
  } else {
    setStatus(
      <p>
        {" "}
        🦊 <a target="_blank" href={`https://metamask.io/download`}>
          You must install MetaMask, a virtual Ethereum wallet, in your browser.
        </a>
      </p>
    )
  }
}
我敢打赌,此时你甚至不需要我们的帮助就能理解这里发生了什么,但为了全面起见,让我们快速分解一下:
- 首先,我们的函数检查是否启用了
window.ethereum(即是否安装了梅塔马斯克)。- 如果没有,我们只需将
status状态变量设置为提示用户安装梅塔马斯克的 JSX 字符串。 - 如果已启用,我们在第 3 行设置监听器
window.ethereum.on("accountsChanged"),它监听梅塔马斯克钱包中的状态变化,包括用户将其他账户连接到 dapp、切换账户或断开账户连接时。如果至少连接了一个账户,则walletAddress状态变量将更新为监听器返回的accounts数组中的第一个账户。否则,walletAddress将设置为空字符串。
- 如果没有,我们只需将
最后同样重要的是,我们必须在 useEffect 函数中调用它:
// HelloWorld.js

useEffect(async () => {
  const message = await loadCurrentMessage()
  setMessage(message)
  addSmartContractListener()

  const { address, status } = await getCurrentWalletConnected()
  setWallet(address)
  setStatus(status)

  addWalletListener()
}, [])
就是这样!我们已经成功完成了所有钱包功能的编程!现在进入我们的最后一项任务:更新存储在智能合约中的消息!
第 6 步:实现 updateMessage 函数
好了家人们,我们已经到了最后冲刺阶段!在 interact.js 文件的 updateMessage 中,我们将执行以下操作:
- 确保我们希望在智能合约中发布的消息有效
- 使用梅塔马斯克签署我们的交易
- 从我们的
HelloWorld.js前端组件调用此函数
这不会花很长时间;让我们完成这个 dapp!
输入错误处理
自然地,在函数开始时进行某种输入错误处理是有意义的。
如果没有安装梅塔马斯克扩展程序、没有连接钱包(即传入的 address 是空字符串)或者 message 是空字符串,我们希望函数尽早返回。让我们将以下错误处理添加到 updateMessage:
// interact.js

export const updateMessage = async (address, message) => {
  if (!window.ethereum || address === null) {
    return {
      status:
        "💡 Connect your MetaMask wallet to update the message on the blockchain.",
    }
  }

  if (message.trim() === "") {
    return {
      status: "❌ Your message cannot be an empty string.",
    }
  }
}
现在它有了适当的输入错误处理,是时候通过梅塔马斯克签署交易了!
签署我们的交易
如果你已经熟悉传统的 Web3 以太坊交易,我们接下来编写的代码将会非常熟悉。在你的输入错误处理代码下方,将以下内容添加到 updateMessage:
// interact.js

//设置交易参数
const transactionParameters = {
  to: contractAddress, // 除合约发布期间外必填。
  from: address, // 必须与用户的活动地址匹配。
  data: helloWorldContract.methods.update(message).encodeABI(),
}

//签署交易
try {
  const txHash = await window.ethereum.request({
    method: "eth_sendTransaction",
    params: [transactionParameters],
  })
  return {
    status: (
      <span>
        ✅{" "}
        <a target="_blank" href={`https://goerli.etherscan.io/tx/${txHash}`}>
          View the status of your transaction on Etherscan!
        </a>
        <br />
        ℹ️ Once the transaction is verified by the network, the message will be
        updated automatically.
      </span>
    ),
  }
} catch (error) {
  return {
    status: "😥 " + error.message,
  }
}
让我们分解一下正在发生的事情。首先,我们设置交易参数,其中:
to指定接收方地址(我们的智能合约)from指定交易的签名者,即我们传递给函数的address变量data包含对 Hello World 智能合约的update方法的调用,接收我们的message字符串变量作为输入
然后,我们进行 await 调用 window.ethereum.request,要求梅塔马斯克签署交易。请注意,在第 11 行和第 12 行,我们指定了 eth 方法 eth_sendTransaction 并传入了我们的 transactionParameters。
此时,梅塔马斯克将在浏览器中打开,并提示用户签署或拒绝交易。
- 如果交易成功,该函数将返回一个 JSON 对象,其中
statusJSX 字符串提示用户查看 Etherscan 以获取有关其交易的更多信息。 - 如果交易失败,该函数将返回一个 JSON 对象,其中
status字符串传达错误消息。
总而言之,我们的 updateMessage 函数应如下所示:
// interact.js

export const updateMessage = async (address, message) => {
  //输入错误处理
  if (!window.ethereum || address === null) {
    return {
      status:
        "💡 Connect your MetaMask wallet to update the message on the blockchain.",
    }
  }

  if (message.trim() === "") {
    return {
      status: "❌ Your message cannot be an empty string.",
    }
  }

  //设置交易参数
  const transactionParameters = {
    to: contractAddress, // 除合约发布期间外必填。
    from: address, // 必须与用户的活动地址匹配。
    data: helloWorldContract.methods.update(message).encodeABI(),
  }

  //签署交易
  try {
    const txHash = await window.ethereum.request({
      method: "eth_sendTransaction",
      params: [transactionParameters],
    })
    return {
      status: (
        <span>
          ✅{" "}
          <a target="_blank" href={`https://goerli.etherscan.io/tx/${txHash}`}>
            View the status of your transaction on Etherscan!
          </a>
          <br />
          ℹ️ Once the transaction is verified by the network, the message will
          be updated automatically.
        </span>
      ),
    }
  } catch (error) {
    return {
      status: "😥 " + error.message,
    }
  }
}
最后同样重要的是,我们需要将 updateMessage 函数连接到我们的 HelloWorld.js 组件。
将 updateMessage 连接到 HelloWorld.js 前端
我们的 onUpdatePressed 函数应该对导入的 updateMessage 函数进行 await 调用,并修改 status 状态变量以反映我们的交易是成功还是失败:
// HelloWorld.js

const onUpdatePressed = async () => {
  const { status } = await updateMessage(walletAddress, newMessage)
  setStatus(status)
}
它非常干净简单。你猜怎么着……你的 DAPP 完成了!!!
继续测试 Update(更新)按钮吧!
制作你自己的自定义 dapp
哇哦,你已经到了教程的结尾!回顾一下,你学习了如何:
- 将梅塔马斯克钱包连接到你的 dapp 项目
- 使用 Alchemy Web3 (在新标签页中打开) API 从你的智能合约中读取数据
- 使用梅塔马斯克签署以太坊交易
现在你已完全具备应用本教程中的技能来构建你自己的自定义 dapp 项目的能力!一如既往,如果你有任何疑问,请随时在 Alchemy Discord (在新标签页中打开) 中联系我们寻求帮助。🧙♂️
完成本教程后,请在推特上标记我们 @alchemyplatform (在新标签页中打开),让我们知道你的体验如何或是否有任何反馈!