Create and deploy a DeFi App
In this tutorial we will build a DeFi Application with Solidity where users can deposit an ERC20 token to the smart contract and it will mint and transfer Farm Tokens to them. The users can later withdraw their ERC20 tokens by burning their Farm Token on smart contract and the ERC20 tokens will be transferred back to them.
Install Truffle and Ganache
If this is the first time you are writing a smart contract, you will need to set up your environment. We are going to use two tools: Truffle(opens in a new tab) and Ganache(opens in a new tab).
Truffle is a development environment and testing framework for developing smart contracts for Ethereum. With Truffle it is easy to build and deploy smart contracts to the blockchain. Ganache allows us to create a local Ethereum blockchain in order to test smart contracts. It simulates the features of the real network and the first 10 accounts are funded with 100 test ether, thus making the smart contract deployment and testing free and easy. Ganache is available as a desktop application and a command-line tool. For this article we will be using the UI desktop application.
 (opens in a new tab)Ganache UI desktop application
To create the project, run the following commands
mkdir your-project-namecd your-project-nametruffle init
This will create a blank project for the development and deployment of our smart contracts. The created project structure is the following:
contracts: Folder for the solidity smart contractsmigrations: Folder for the deployment scriptstest: Folder for testing our smart contractstruffle-config.js: Truffle configuration file
Create the ERC20 Token
First we need to create our ERC20 token that we will use to stake on the smart contract. To create our fungible token, we will first need to install the OpenZeppelin library. This library contains the implementations of standards such as the ERC20 and the ERC721. To install it, run the command:
npm install @openzeppelin/contracts
Using the OpenZeppelin library we can create our ERC20 token by writing to contracts/MyToken.sol with the following solidity code:
1pragma solidity ^0.8.0;23import "@openzeppelin/contracts/token/ERC20/ERC20.sol";45contract MyToken is ERC20 {6 constructor() public ERC20("MyToken", "MTKN"){7 _mint(msg.sender, 1000000000000000000000000);8 }9}എല്ലാം കാണിക്കുകപകര്പ്പ്
In the code above on:
Line 3: We import the contract ERC20.sol from openzeppelin that contains the implementation for this token standard.
Line 5: We inherit from the ERC20.sol contract.
Line 6: We are calling the ERC20.sol constructor and passing for the name and symbol parameters as
"MyToken"and"MTKN"respectively.Line 7: We are minting and transferring 1 million tokens for the account that is deploying the smart contract (we are using the default 18 decimals for the ERC20 token, that means that if we want to mint 1 token, you will represent it as 1000000000000000000, 1 with 18 zeros).
We can see below the ERC20.sol constructor implementation where the _decimals field is set to 18:
1string private _name;2string private _symbol;3uint8 private _decimals;45constructor (string memory name_, string memory symbol_) public {6 _name = name_;7 _symbol = symbol_;8 _decimals = 18;9}എല്ലാം കാണിക്കുകപകര്പ്പ്
Compile the ERC20 Token
To compile our smart contract, we must first check our solidity compiler version. You can check that by running the command:
truffle version
The default version is the Solidity v0.5.16. Since our token is written using the solidity version 0.6.2, if we run the command to compile our contracts we will get a compiler error. In order to specify which solidity compiler version to use, go to the file truffle-config.js and set to the desired compiler version as seen below:
1// Configure your compilers2compilers: {3 solc: {4 version: "^0.8.0", // Fetch exact version from solc-bin (default: truffle's version)5 // docker: true, // Use "0.5.1" you've installed locally with docker (default: false)6 // settings: { // See the solidity docs for advice about optimization and evmVersion7 // optimizer: {8 // enabled: false,9 // runs: 20010 // },11 // evmVersion: "byzantium"12 // }13 }14}എല്ലാം കാണിക്കുക
Now we can compile our smart contract by running the following command:
truffle compile
Deploy ERC20 Token
After compiling, we can now deploy our token.
On the migrations folder, create a file called 2_deploy_Tokens.js. This file is where we will deploy both our ERC20 Token and our FarmToken smart contract. The code below is used to deploy our MyToken.sol contract:
1const MyToken = artifacts.require("MyToken")23module.exports = async function (deployer, network, accounts) {4 // Deploy MyToken5 await deployer.deploy(MyToken)6 const myToken = await MyToken.deployed()7}
Open Ganache and select the option "Quickstart" to start a local Ethereum blockchain. To deploy our contract, run:
truffle migrate
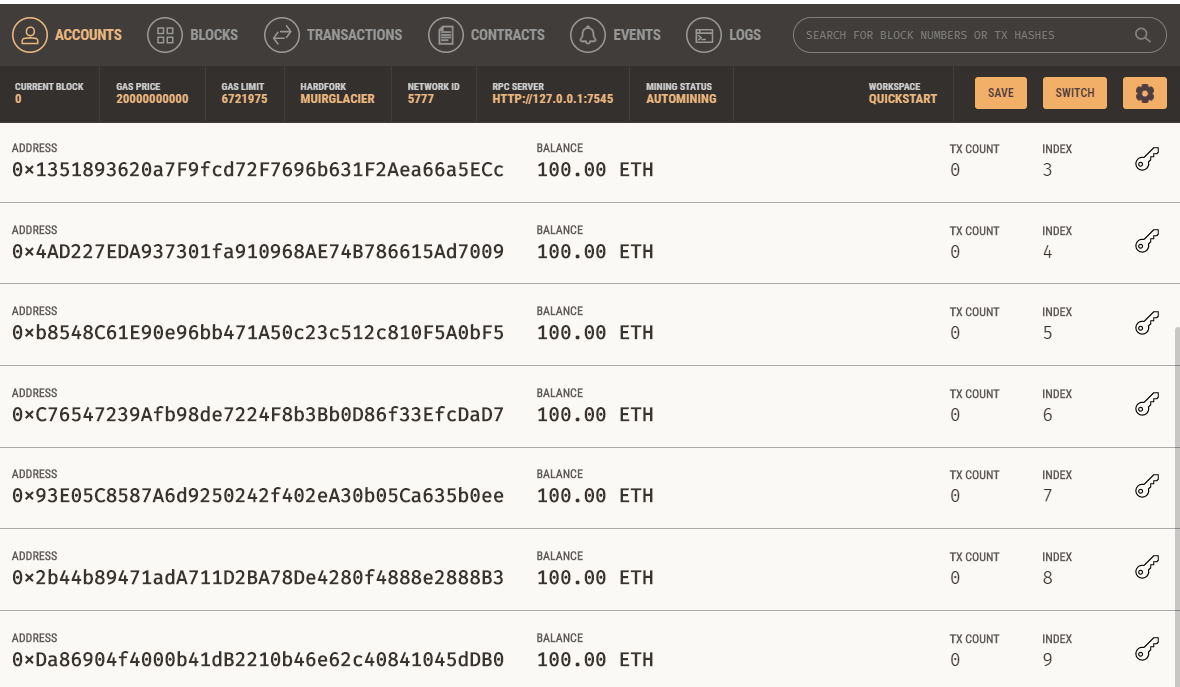
The address used to deploy our contracts is the first one from the list of addresses that Ganache shows us. To verify that, we can open the Ganache desktop application and we can verify that the balance of ether for the first account has been reduced due to the cost of ether to deploy our smart contracts:
 (opens in a new tab)Ganache desktop application
To verify that 1 million MyToken tokens have been sent to the deployer address, we can use the Truffle Console to interact with our deployed smart contract.
In order to interact with our smart contract, run the following command:
truffle console
Now we can write the following commands in the terminal:
Get the smart contract:
myToken = await MyToken.deployed()Get the array of accounts from Ganache:
accounts = await web3.eth.getAccounts()Get the balance for the first account:
balance = await myToken.balanceOf(accounts[0])Format the balance from 18 decimals:
web3.utils.fromWei(balance.toString())
By running the commands above, we will see that the first address has in fact 1 million MyTokens:

First address has 1000000 MyTokens
Create FarmToken Smart Contract
The FarmToken smart contract will have 3 functions:
balance(): Get the MyToken balance on the FarmToken smart contract.deposit(uint256 _amount): Transfer MyToken on behalf of the user to the FarmToken smart contract then mint and transfer FarmToken to the user.withdraw(uint256 _amount): Burn user's FarmTokens and transfer MyTokens to the user's address.
Let's look at the FarmToken constructor:
1pragma solidity ^0.6.2;23import "@openzeppelin/contracts/token/ERC20/IERC20.sol";4import "@openzeppelin/contracts/utils/Address.sol";5import "@openzeppelin/contracts/token/ERC20/utils/SafeERC20.sol";6import "@openzeppelin/contracts/token/ERC20/ERC20.sol";78contract FarmToken is ERC20 {9 using Address for address;10 using SafeMath for uint256; // As of Solidity v0.8.0, mathematical operations can be done safely without the need for SafeMath11 using SafeERC20 for IERC20;1213 IERC20 public token;1415 constructor(address _token)16 public17 ERC20("FarmToken", "FRM")18 {19 token = IERC20(_token);20 }എല്ലാം കാണിക്കുകപകര്പ്പ്
Lines 3-6: We are importing the following contracts from openzeppelin: IERC20.sol, Address.sol, SafeERC20.sol and ERC20.sol.
Line 8: The FarmToken will inherit from the ERC20 contract.
Lines 14-19: The FarmToken constructor will receive as parameter the address of MyToken contract and we will assign its contract to our public variable called
token.
Let's implement the balance() function. It will receive no parameters and it will return the balance of MyToken on this smart contract. It is implemented as shown below:
1function balance() public view returns (uint256) {2 return token.balanceOf(address(this));3}പകര്പ്പ്
For the deposit(uint256 _amount) function, it will receive as parameter the amount the user wants to deposit and it will mint and transfer FarmTokens to the user:
1function deposit(uint256 _amount) public {2 // Amount must be greater than zero3 require(_amount > 0, "amount cannot be 0");45 // Transfer MyToken to smart contract6 token.safeTransferFrom(msg.sender, address(this), _amount);78 // Mint FarmToken to msg sender9 _mint(msg.sender, _amount);10}എല്ലാം കാണിക്കുകപകര്പ്പ്
For the withdraw(uint256 _amount) function, we will receive as parameter the amount of FarmTokens the user wants to burn and then transfer the same amount of MyTokens back to the user:
1function withdraw(uint256 _amount) public {2 // Burn FarmTokens from msg sender3 _burn(msg.sender, _amount);45 // Transfer MyTokens from this smart contract to msg sender6 token.safeTransfer(msg.sender, _amount);7}പകര്പ്പ്
Now we will deploy our smart contract. To do so, we will go back to the file 2_deploy_Tokens.js and add the new contract to be deployed:
1const MyToken = artifacts.require("MyToken")2const FarmToken = artifacts.require("FarmToken")34module.exports = async function (deployer, network, accounts) {5 // Deploy MyToken6 await deployer.deploy(MyToken)7 const myToken = await MyToken.deployed()89 // Deploy Farm Token10 await deployer.deploy(FarmToken, myToken.address)11 const farmToken = await FarmToken.deployed()12}എല്ലാം കാണിക്കുക
Note that when deploying the FarmToken, we pass as parameter the address of the deployed MyToken contract.
Now, run truffle compile and truffle migrate to deploy our contracts.
Let's test our smart contract. Instead of using the truffle console to interact with our smart contract, we will create a script to automate this process. Create a folder called scripts and add the following file getMyTokenBalance.js. It will check the balance of MyTokens on the FarmToken smart contract:
1const MyToken = artifacts.require("MyToken")2const FarmToken = artifacts.require("FarmToken")34module.exports = async function (callback) {5 myToken = await MyToken.deployed()6 farmToken = await FarmToken.deployed()7 balance = await myToken.balanceOf(farmToken.address)8 console.log(web3.utils.fromWei(balance.toString()))9 callback()10}എല്ലാം കാണിക്കുക
To execute this script, run the following cli command:
truffle exec .\scripts\getMyTokenBalance.js
We will get the expected result that is 0. If you get an error about the FarmToken not being deployed yet, the truffle network has not received the latest version of your contract code. Just close ganache, quickstart it again and make sure to run truffle migrate.
Now, let's stake the MyToken to the smart contract. Since the function deposit(uint256 _amount) calls the function safeTransferFrom from the ERC20, the user must first approve the smart contract to transfer MyToken on the user's behalf. So on the script below, we will first approve this step then we will call the function:
1const MyToken = artifacts.require("MyToken")2const FarmToken = artifacts.require("FarmToken")34module.exports = async function (callback) {5 const accounts = await new web3.eth.getAccounts()6 const myToken = await MyToken.deployed()7 const farmToken = await FarmToken.deployed()89 // Returns the remaining number of tokens that spender will be allowed to spend on behalf of owner through transferFrom.10 // This is zero by default.11 const allowanceBefore = await myToken.allowance(12 accounts[0],13 farmToken.address14 )15 console.log(16 "Amount of MyToken FarmToken is allowed to transfer on our behalf Before: " +17 allowanceBefore.toString()18 )1920 // In order to allow the Smart Contract to transfer to MyToken (ERC-20) on the accounts[0] behalf,21 // we must explicitly allow it.22 // We allow farmToken to transfer x amount of MyToken on our behalf23 await myToken.approve(farmToken.address, web3.utils.toWei("100", "ether"))2425 // Validate that the farmToken can now move x amount of MyToken on our behalf26 const allowanceAfter = await myToken.allowance(accounts[0], farmToken.address)27 console.log(28 "Amount of MyToken FarmToken is allowed to transfer on our behalf After: " +29 allowanceAfter.toString()30 )3132 // Verify accounts[0] and farmToken balance of MyToken before and after the transfer33 balanceMyTokenBeforeAccounts0 = await myToken.balanceOf(accounts[0])34 balanceMyTokenBeforeFarmToken = await myToken.balanceOf(farmToken.address)35 console.log("*** My Token ***")36 console.log(37 "Balance MyToken Before accounts[0] " +38 web3.utils.fromWei(balanceMyTokenBeforeAccounts0.toString())39 )40 console.log(41 "Balance MyToken Before TokenFarm " +42 web3.utils.fromWei(balanceMyTokenBeforeFarmToken.toString())43 )4445 console.log("*** Farm Token ***")46 balanceFarmTokenBeforeAccounts0 = await farmToken.balanceOf(accounts[0])47 balanceFarmTokenBeforeFarmToken = await farmToken.balanceOf(farmToken.address)48 console.log(49 "Balance FarmToken Before accounts[0] " +50 web3.utils.fromWei(balanceFarmTokenBeforeAccounts0.toString())51 )52 console.log(53 "Balance FarmToken Before TokenFarm " +54 web3.utils.fromWei(balanceFarmTokenBeforeFarmToken.toString())55 )56 // Call Deposit function from FarmToken57 console.log("Call Deposit Function")58 await farmToken.deposit(web3.utils.toWei("100", "ether"))59 console.log("*** My Token ***")60 balanceMyTokenAfterAccounts0 = await myToken.balanceOf(accounts[0])61 balanceMyTokenAfterFarmToken = await myToken.balanceOf(farmToken.address)62 console.log(63 "Balance MyToken After accounts[0] " +64 web3.utils.fromWei(balanceMyTokenAfterAccounts0.toString())65 )66 console.log(67 "Balance MyToken After TokenFarm " +68 web3.utils.fromWei(balanceMyTokenAfterFarmToken.toString())69 )7071 console.log("*** Farm Token ***")72 balanceFarmTokenAfterAccounts0 = await farmToken.balanceOf(accounts[0])73 balanceFarmTokenAfterFarmToken = await farmToken.balanceOf(farmToken.address)74 console.log(75 "Balance FarmToken After accounts[0] " +76 web3.utils.fromWei(balanceFarmTokenAfterAccounts0.toString())77 )78 console.log(79 "Balance FarmToken After TokenFarm " +80 web3.utils.fromWei(balanceFarmTokenAfterFarmToken.toString())81 )8283 // End function84 callback()85}എല്ലാം കാണിക്കുക
To run this script: truffle exec .\scripts\transferMyTokenToFarmToken.js. You should see on your console:
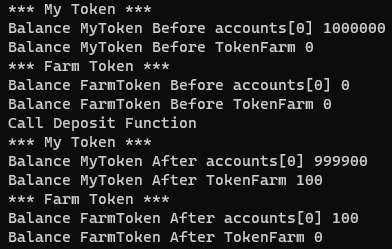
output of transferMyTokenToFarmToken.js
As we can see, we have successfully deposited MyTokens to the smart contract as the first account has now FarmTokens.
In order to withdraw:
1const MyToken = artifacts.require("MyToken")2const FarmToken = artifacts.require("FarmToken")34module.exports = async function (callback) {5 const accounts = await new web3.eth.getAccounts()6 const myToken = await MyToken.deployed()7 const farmToken = await FarmToken.deployed()89 // Verify accounts[0] and farmToken balance of MyToken before and after the transfer10 balanceMyTokenBeforeAccounts0 = await myToken.balanceOf(accounts[0])11 balanceMyTokenBeforeFarmToken = await myToken.balanceOf(farmToken.address)12 console.log("*** My Token ***")13 console.log(14 "Balance MyToken Before accounts[0] " +15 web3.utils.fromWei(balanceMyTokenBeforeAccounts0.toString())16 )17 console.log(18 "Balance MyToken Before TokenFarm " +19 web3.utils.fromWei(balanceMyTokenBeforeFarmToken.toString())20 )2122 console.log("*** Farm Token ***")23 balanceFarmTokenBeforeAccounts0 = await farmToken.balanceOf(accounts[0])24 balanceFarmTokenBeforeFarmToken = await farmToken.balanceOf(farmToken.address)25 console.log(26 "Balance FarmToken Before accounts[0] " +27 web3.utils.fromWei(balanceFarmTokenBeforeAccounts0.toString())28 )29 console.log(30 "Balance FarmToken Before TokenFarm " +31 web3.utils.fromWei(balanceFarmTokenBeforeFarmToken.toString())32 )3334 // Call Deposit function from FarmToken35 console.log("Call Withdraw Function")36 await farmToken.withdraw(web3.utils.toWei("100", "ether"))3738 console.log("*** My Token ***")39 balanceMyTokenAfterAccounts0 = await myToken.balanceOf(accounts[0])40 balanceMyTokenAfterFarmToken = await myToken.balanceOf(farmToken.address)41 console.log(42 "Balance MyToken After accounts[0] " +43 web3.utils.fromWei(balanceMyTokenAfterAccounts0.toString())44 )45 console.log(46 "Balance MyToken After TokenFarm " +47 web3.utils.fromWei(balanceMyTokenAfterFarmToken.toString())48 )4950 console.log("*** Farm Token ***")51 balanceFarmTokenAfterAccounts0 = await farmToken.balanceOf(accounts[0])52 balanceFarmTokenAfterFarmToken = await farmToken.balanceOf(farmToken.address)53 console.log(54 "Balance FarmToken After accounts[0] " +55 web3.utils.fromWei(balanceFarmTokenAfterAccounts0.toString())56 )57 console.log(58 "Balance FarmToken After TokenFarm " +59 web3.utils.fromWei(balanceFarmTokenAfterFarmToken.toString())60 )6162 // End function63 callback()64}എല്ലാം കാണിക്കുക
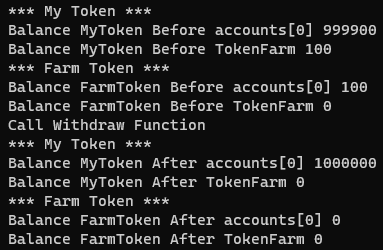
To run this script: truffle exec .\scripts\withdrawMyTokenFromTokenFarm.js. As we can see on the output below, we have successfully got the MyTokens back and we have burned the FarmTokens:
output of withdrawMyTokenFromTokenFarm.js
References
Contracts - OpenZeppelin Docs(opens in a new tab)
Sweet Tools for Smart Contracts | Truffle Suite(opens in a new tab)
Ganache | Truffle Suite(opens in a new tab)
What is DeFi? A Beginner's Guide (2021 Updated) (99bitcoins.com)(opens in a new tab)
DeFi - The Decentralized Finance Leaderboard at DeFi Llama(opens in a new tab)
അവസാന എഡിറ്റ്: @nhsz(opens in a new tab), 2023, ഓഗസ്റ്റ് 15