Consentire agli utenti senza gas di detenere token e chiamare contratti
Introduzione
Un articolo precedente ha discusso l'utilizzo dell'accesso senza gas alla propria applicazione utilizzando le firme EIP-712, ma è limitato ai propri smart contract. Utilizzando l'astrazione dell'account, possiamo creare portafogli smart contract che accettano due tipi di transazioni e le inoltrano a una destinazione richiesta:
- Transazioni inviate da un EOA specifico (che richiedono che tale EOA abbia ETH)
- Transazioni inviate da qualsiasi luogo, ma firmate dallo stesso EOA.
In questo modo, possiamo fornire un modo senza gas per un account di detenere asset (token, ecc.) ed eseguire tutte le funzioni che un EOA con gas può fare.
Perché non possiamo semplicemente inoltrare la richiesta?
In ERC-20 e negli standard correlati, il proprietario dell'account è msg.sender (opens in a new tab), l'indirizzo che ha chiamato il contratto del token, che non è necessariamente l'origine della transazione, tx.origin (opens in a new tab). Questo è richiesto per motivi di sicurezza (opens in a new tab). Ciò significa che se inoltriamo richieste di trasferimento di token, tenteranno di trasferire i token dall'indirizzo del relayer piuttosto che da un indirizzo controllato dall'utente.
Esiste una soluzione che consente di utilizzare l'indirizzo EOA tramite EIP-7702 (opens in a new tab), ma richiede la firma di una delega potenzialmente pericolosa, quindi è possibile utilizzarla solo per delegare a uno smart contract approvato dal fornitore del portafoglio. Per questo tutorial preferisco il metodo molto più semplice di creare uno smart contract come proxy per l'utente.
Vederlo in azione
-
Assicurati di avere sia Node (opens in a new tab) che Foundry (opens in a new tab).
-
Clona l'applicazione e installa il software necessario.
git clone https://github.com/qbzzt/260315-gasless-tokens.git cd 260315-gasless-tokens forge build cd server npm install -
Modifica
.envper impostareSEPOLIA_PRIVATE_KEYsu un portafoglio che ha ETH su Sepolia. Se hai bisogno di ETH su Sepolia, usa un faucet per ottenerli. Idealmente, questa chiave privata dovrebbe essere diversa da quella che hai nel portafoglio del tuo browser. -
Avvia il server.
npm run dev -
Naviga verso l'applicazione all'URL
http://localhost:5173(opens in a new tab). -
Fai clic su Connect with Injected per connetterti a un portafoglio. Approva nel portafoglio e approva il passaggio a Sepolia se necessario.
-
Scorri verso il basso e fai clic su Deploy UserProxy (slow process).
-
Puoi vedere quando il proxy utente è distribuito perché c'è un indirizzo accanto a UserProxy access. Se hai aspettato 24 secondi (2 blocchi) e non è ancora successo, potrebbe esserci un problema nel rilevamento delle modifiche.
In tal caso, vai al Sepolia Explorer (opens in a new tab) e inserisci l'hash della transazione di distribuzione che vedi nell'output del server in
npm run dev. Fai clic sul contratto creato per visualizzarne l'indirizzo, quindi copialo. Incolla l'indirizzo nel campo Or enter existing proxy address, quindi fai clic su Set proxy address. -
Fai clic su Request more tokens for proxy per inviare una chiamata alla funzione
faucet(opens in a new tab) del contratto ERC-20 per ottenere token. Conferma la firma nel portafoglio. Naturalmente, i token raggiungono l'indirizzo del proxy, non quello dell'utente. -
Scorri verso il basso e fai clic sul link sotto Last transaction:. Questo aprirà il browser per mostrarti la transazione
faucet. -
In amount to transfer, inserisci un numero compreso tra uno e mille. Fai clic su Transfer per trasferire i token al tuo indirizzo. Prima di fare clic su Confirm per la richiesta, nota che i dati firmati sono opachi. Gli utenti avrebbero difficoltà a capire cosa stanno firmando. Ricorda che ne discuteremo di seguito.
-
Dopo che la transazione è stata confermata, attendi di vedere la modifica sia in your balance che in proxy balance. Nota che anche questo richiederà del tempo, perché Sepolia ha un tempo di blocco di 12 secondi.
Come funziona
Per un'esperienza senza gas, abbiamo bisogno di un'interfaccia utente per l'utente, un server per instradare i messaggi dall'interfaccia utente alla catena e uno smart contract per riceverli e verificarli.
Lo smart contract del portafoglio
Questo è lo smart contract (opens in a new tab). Il suo scopo è fare tutto ciò che il vero proprietario richiede, indipendentemente dal canale utilizzato per richiederlo, e ignorare tutto il resto. Per fare ciò, le sue funzioni ricevono un indirizzo di destinazione da chiamare e i dati da utilizzare per chiamarlo.
// SPDX-License-Identifier: MIT
pragma solidity ^0.8.21;

contract UserProxy {
    address immutable OWNER;
    uint public nonce = 0;
L'identità del proprietario e un nonce (opens in a new tab) per impedire la ripetizione dei messaggi. Poiché il nonce è una variabile public, il compilatore Solidity crea anche una funzione di visualizzazione (view), nonce() (opens in a new tab), che consente al codice offchain di leggerne il valore.
    bytes32 private constant SIGNED_ACCESS_TYPEHASH =
        keccak256("SignedAccess(address target,bytes data,uint256 nonce)");

    bytes32 private constant SIGNED_ACCESS_PAYABLE_TYPEHASH =
        keccak256("SignedAccessPayable(address target,bytes data,uint256 nonce,uint256 value)");

    bytes32 immutable DOMAIN_SEPARATOR;
Le informazioni necessarie per verificare le firme EIP-712 (opens in a new tab).
    constructor(address owner_) {
        OWNER = owner_;
Un UserProxy è legato a un singolo indirizzo del proprietario. Questo è necessario perché può possedere asset (token ERC-20, NFT, ecc.). Non vogliamo mescolare asset appartenenti a proprietari diversi.
        DOMAIN_SEPARATOR = keccak256(
            abi.encode(
                keccak256(
                    "EIP712Domain(string name,string version,uint256 chainId,address verifyingContract)"
                ),
                keccak256(bytes("UserProxy")),
                keccak256(bytes("1")),
                block.chainid,
                address(this)
            )
        );
    }
Il separatore di dominio (opens in a new tab). Non può essere calcolato in fase di compilazione, perché dipende dall'ID della catena e dall'indirizzo del contratto. Questo rende impossibile per un UserProxy essere ingannato da un messaggio preparato per un altro.
event CallResult(address target, bytes returnData);
Registra nei log i risultati di una chiamata.
    function directAccess(address target, bytes calldata data)
            external returns (bytes memory) {
Questa funzione può essere chiamata direttamente dal proprietario. Se non sono disponibili relay, il proprietario può comunque accedere agli asset direttamente sulla blockchain (se l'utente ha ETH).
        require(msg.sender == OWNER, "Only owner can call");
        (bool success, bytes memory returnData) = target.call(data);
        require(success, "Call failed");

        emit CallResult(target, returnData);

        return returnData;
    }
Se veniamo chiamati direttamente dal proprietario, chiama la destinazione con i dati di chiamata forniti.
    function signedAccess(
        address target,
        bytes calldata data,
        uint8 v,
        bytes32 r,
        bytes32 s)
Questa è la funzione principale di UserProxy. Ottiene target e data, oltre a una firma.
    external returns (bytes memory) {
        // Calcola il digest EIP-712
        bytes32 digest = keccak256(
            abi.encodePacked(
                "\x19\x01",
                DOMAIN_SEPARATOR,
                keccak256(
                    abi.encode(
                        SIGNED_ACCESS_TYPEHASH,
                        target,
                        keccak256(data),
                        nonce
                    )
                )
            )
        );
Il digest include anche il nonce, ma non abbiamo bisogno di riceverlo dalla transazione; conosciamo già il valore corretto. Una firma con il nonce sbagliato verrà rifiutata.
    // Recupera il firmatario
    address signer = ecrecover(digest, v, r, s);
    require(signer == OWNER, "Signature invalid or not by owner");
Se la firma non è valida, ecrecover di solito restituirà un indirizzo diverso e non verrà accettata.
    (bool success, bytes memory returnData) = target.call(data);
    require(success, "Call failed");
Chiama il contratto che l'utente ci ha detto di chiamare ed esegui il revert in caso di insuccesso.
    emit CallResult(target, returnData);

    nonce++; // Incrementa il nonce per prevenire i replay

    return returnData;
}
In caso di successo, emetti un evento di log e incrementa il nonce.
    function directAccessPayable(address target, uint value, bytes calldata data)
            external payable returns (bytes memory) {
        .
        .
        .
    }

    function signedAccessPayable(
        .
        .
        .
    }
}
Queste sono varianti quasi identiche che consentono anche di trasferire ETH fuori dal contratto.
Il relayer
Il relayer è un componente server. È scritto in JavaScript; puoi vedere il codice sorgente qui (opens in a new tab).
import express from "express";
import { createServer as createViteServer } from "vite";
import { createWalletClient, createPublicClient, http } from 'viem'
import { privateKeyToAccount } from 'viem/accounts'
import { sepolia } from 'viem/chains'
import dotenv from 'dotenv'
Le librerie di cui abbiamo bisogno. Questo è un server Express (opens in a new tab), che utilizza Vite (opens in a new tab) per servire il codice dell'interfaccia utente. Utilizziamo Viem (opens in a new tab) per comunicare con la blockchain e dotenv (opens in a new tab) per leggere la chiave privata per l'indirizzo che invia la transazione.
import { createRequire } from 'module'
const require = createRequire(import.meta.url)
const UserProxy = require('../contracts/out/UserProxy.sol/UserProxy.json')
Questo è un modo semplice per leggere il UserProxy compilato. Abbiamo bisogno dell'ABI per poter chiamare UserProxy e del codice compilato per poterlo distribuire per un utente.
dotenv.config()
const sepoliaAccount = privateKeyToAccount(process.env.SEPOLIA_PRIVATE_KEY)
console.log("Using account:", sepoliaAccount.address)
Leggi il file .env, estrai l'indirizzo e stampalo nella console.
const sepoliaClient = createWalletClient({
  account: sepoliaAccount,
  chain: sepolia,
  transport: http("https://rpc.sentio.xyz/sepolia"),
})

const publicClient = createPublicClient({
  chain: sepolia,
  transport: http(),
})
I client Viem che comunicano con la blockchain.
const start = async () => {
  const app = express()
Esegui un server Express.
app.use(express.json())
Dì a Express di leggere il corpo della richiesta e, se è JSON, di analizzarlo.
app.post("/server/deploy", async (req, res) => {
Questo è il codice che gestisce le richieste per distribuire il proxy. Nota che qui siamo vulnerabili agli attacchi denial-of-service (opens in a new tab) perché un utente malintenzionato può inondarci di richieste per distribuire il proxy fino all'esaurimento dei nostri ETH. Su un sistema di produzione, probabilmente richiederemmo che la richiesta di distribuire il proxy sia firmata e che il firmatario sia un cliente esistente.
    try {
      const ownerAddress = req.body.ownerAddress
Ottieni l'indirizzo del proprietario dalla richiesta.
      const txHash = await sepoliaClient.deployContract({
        abi: UserProxy.abi,
        bytecode: UserProxy.bytecode.object,
        args: [ownerAddress],
        account: sepoliaAccount,
      })

      console.log("Deployment transaction hash:", txHash)

      const receipt = await publicClient.waitForTransactionReceipt({
        hash: txHash,
      })
Distribuisci il contratto (opens in a new tab) e attendi fino a quando non viene distribuito (opens in a new tab).
res.json({ contractAddress: receipt.contractAddress })
Se tutto va bene, restituisci l'indirizzo del proxy all'interfaccia utente.
    } catch (err) {
      console.error(err)
      res.status(500).json({ error: err.message })
    }
  })
Se c'è un problema, segnalalo.
app.post("/server/message", async (req, res) => {
Questo è il codice che elabora i messaggi dell'utente per il contratto UserProxy. Questo è un altro punto vulnerabile a un attacco denial-of-service.
    try {
      const { proxy, target, data, v, r, s } = req.body

      const txHash = await sepoliaClient.writeContract({
        address: proxy,
        abi: UserProxy.abi,
        functionName: 'signedAccess',
        args: [target, data, v, r, s],
        account: sepoliaAccount,
      })
Ottieni i dati della richiesta e usali per chiamare signedAccess sul proxy.
      console.log("Message transaction hash:", txHash)

      res.json({ txHash })
Riporta l'hash della transazione. Questo consente all'interfaccia utente di visualizzare un URL affinché l'utente possa controllare la transazione.
    } catch (err) {
      console.error(err)
      res.status(500).json({ error: err.message })
    }
  })
Ancora una volta, se c'è un problema, segnalalo.
  // Lascia che Vite gestisca tutto il resto
  const vite = await createViteServer({
    server: { middlewareMode: true }
  })

  app.use(vite.middlewares)

  app.listen(5173, () => {
    console.log("Dev server running on http://localhost:5173");
  })
}

start()
Per tutto il resto, usa Vite, che gestisce per noi il servizio dell'interfaccia utente.
Interfaccia utente
Questo è il codice dell'interfaccia utente (opens in a new tab). La maggior parte del codice è quasi identica a quella documentata in questo articolo, ad eccezione di Token.jsx (opens in a new tab).
Parti di Token.jsx (opens in a new tab) sono simili a Greeter.jsx (opens in a new tab) in questo articolo. Ecco le parti nuove.
import {
   encodeFunctionData
       } from 'viem'
Questa funzione (opens in a new tab) crea i dati di chiamata per una chiamata di funzione EVM. Questo è necessario affinché l'utente possa firmare i dati di chiamata.
import UserProxy from '../../contracts/out/UserProxy.sol/UserProxy.json'
Il UserProxy, spiegato sopra.
import Erc20 from '../../contracts/out/Faucet.sol/FaucetToken.json'
Questo contratto (opens in a new tab) è per lo più un normale contratto ERC-20, con l'aggiunta di un'importante funzione, faucet(). Questa funzione concede token a chiunque li richieda per scopi di test.
const erc20Addrs = {
  // Sepolia
    11155111: '0x4cBedDEDA88fDd9e116618a5cD71BB0E440C2A78'
}
L'indirizzo per FaucetToken.
const Address = ({ address }) => {
   if (!address) return null
   return (
      <a href={`https://eth-sepolia.blockscout.com/address/${address}?tab=read_write_contract`} target="_blank">{address}</a>
   )
}
Questo componente restituisce un indirizzo con un link al contratto su un block explorer.
const Token = () => {
    ...
Questo è il componente principale che fa la maggior parte del lavoro.
const [ balanceAmount, setBalanceAmount ] = useState("Loading...")
Il saldo dei token dell'indirizzo dell'utente.
const [ proxyAddr, setProxyAddr ] = useState(null)
L'indirizzo di un proxy di proprietà dell'utente.
const [ proxyBalanceAmount, setProxyBalanceAmount ] = useState("Loading...")
Il saldo dei token del proxy.
const [ newProxyAddr, setNewProxyAddr ] = useState("")
Questo campo viene utilizzato quando l'utente imposta manualmente l'indirizzo del proxy. Avere la possibilità di impostare manualmente l'indirizzo del proxy consente all'utente di utilizzare un proxy esistente invece di distribuirne uno nuovo ogni volta (e perdere tutti i token posseduti dal vecchio proxy).
const [ txHash, setTxHash ] = useState(null)
L'hash dell'ultima transazione, utilizzato per mostrare un link all'explorer in modo che l'utente possa controllare quella transazione.
  const [ transferToken, setTransferToken ] = useState("")
  const [ transferAmount, setTransferAmount ] = useState("")
  const [ transferTo, setTransferTo ] = useState("")
Questi campi sono tutti utilizzati per inviare comandi di trasferimento di token a un contratto ERC-20. Questo potrebbe essere FaucetToken, ma non deve esserlo per forza. La funzione transfer fa parte dello standard ERC-20.
  const balance = useReadContract({
    ...
  })


  const proxyBalance = useReadContract({
    ...
  })
Leggi i due saldi dei token a cui siamo interessati, quanto possiede l'utente e quanto possiede il proxy.
  const nonce = useReadContract({
      address: proxyAddr,
      abi: UserProxy.abi,
      functionName: 'nonce',
      args: [],
  })
Per prevenire attacchi di replay (ad esempio, un venditore che ripete una transazione che gli dà denaro), utilizziamo un nonce (opens in a new tab). Dobbiamo conoscere il valore corrente per aggiungerlo ai dati che firmiamo.
  useEffect(() => {
    if (balance?.status === "success")
      setBalanceAmount(balance.data / 10n**18n)
    else
      setBalanceAmount("Loading...")
  }, [balance])

  useEffect(() => {
    if (proxyBalance?.status === "success")
      setProxyBalanceAmount(proxyBalance.data / 10n**18n)
    else
      setProxyBalanceAmount("Loading...")
  }, [proxyBalance])
Usa useEffect (opens in a new tab) per aggiornare il saldo visualizzato all'utente quando le informazioni lette dalla blockchain cambiano.
  useEffect(() => {
    setTransferToken(faucetAddr)
  }, [faucetAddr])

  useEffect(() => {
    setTransferTo(account.address)
  }, [account.address])
L'impostazione predefinita è trasferire i token FaucetToken all'account dell'utente stesso. Qui impostiamo questi valori quando li riceviamo da Viem.
  const proxyAddressChange = (evt) => setNewProxyAddr(evt.target.value)
  const transferTokenChange = (evt) => setTransferToken(evt.target.value)
  const transferToChange = (evt) => setTransferTo(evt.target.value)
  const transferAmountChange = (evt) => setTransferAmount(evt.target.value)
Gestori di eventi per quando i campi di testo cambiano.
  const deployUserProxy = async () => {
    try {
      const response = await fetch("/server/deploy", {
        method: "POST",
        headers: { "Content-Type": "application/json" },
        body: JSON.stringify({ ownerAddress: account.address })
      })

      const data = await response.json()
      setProxyAddr(data.contractAddress)
    } catch (err) {
      console.error("Error:", err)
    }
  }
Chiedi al server di distribuire un proxy per questo utente.
const signMessage = async(proxyAddr, target, calldata) => {
Firma un messaggio prima di inviarlo al server per inviarlo a UserProxy onchain. Questo è spiegato qui. Dobbiamo firmare un messaggio sia con l'indirizzo di destinazione (l'indirizzo del token che stiamo chiamando) sia con i dati di chiamata da inviare.
    const domain = {
      .
      .
      .
    return {v, r, s}
  }

  const messageUserProxy = async (proxy, target, data, v, r, s) => {
Invia un messaggio firmato a UserProxy, che verificherà la firma e poi lo invierà a target.
    try {
      const response = await fetch("/server/message", {
        method: "POST",
        headers: { "Content-Type": "application/json" },
        body: JSON.stringify({
          proxy, target,  // entrambi gli indirizzi
          data,           // dati di chiamata da inviare alla destinazione
          v, r, s         // firma
        })
      })
      const serverResponse = await response.json()
      setTxHash(serverResponse.txHash)
    } catch (err) {
      console.error("Error:", err)
    }
  }
Invia una richiesta al server e, quando ricevi la risposta, ottieni l'hash della transazione.
  const faucetSimulation = useSimulateContract({
    address: faucetAddr,
    abi: Erc20.abi,
    functionName: 'faucet',
    account: account.address
  })
Simula la chiamata alla funzione faucet. Abilitiamo il pulsante del faucet solo se ha esito positivo.
  const proxyFaucet = async () => {
    const calldata = encodeFunctionData({
      abi: Erc20.abi,
      functionName: 'faucet',
      args: [],
    })

    const {v, r, s} = await signMessage(proxyAddr, calldata)
    messageUserProxy(proxyAddr, faucetAddr, calldata, v, r, s)
  }

  const proxyTransfer = async () => {
    const calldata = encodeFunctionData({
      abi: Erc20.abi,
      functionName: 'transfer',
      args: [transferTo, BigInt(transferAmount) * 10n**18n],
    })

    const {v, r, s} = await signMessage(proxyAddr, transferToken, calldata)
    messageUserProxy(proxyAddr, transferToken, calldata, v, r, s)
  }
Per chiamare una funzione tramite il server e UserProxy, seguiamo tre passaggi:
-
Crea i dati di chiamata da firmare e inviare utilizzando
encodeFunctionData(opens in a new tab). -
Firma il messaggio (indirizzo di destinazione, dati di chiamata e nonce).
-
Invia il messaggio al server.
  return (
    <>
      <div align="left">
         <h2>Token</h2>
         <h4>Token contract address <Address address={faucetAddr} /></h4>
         <hr />
         <h4>Direct access (as <Address address={account?.address} />)</h4>
         Your balance: {balanceAmount}
         <br />
         <button disabled={!faucetSimulation.data}
               onClick={() => writeContract(
                  faucetSimulation.data.request
               )}
         >
         Request more tokens
         </button>
         <hr />
Questa porzione del componente ti consente di utilizzare FaucetToken direttamente dal browser. Il suo scopo principale è facilitare il debug.
         <h4>UserProxy access <Address address={proxyAddr} /></h4>
         <button onClick={deployUserProxy}>
         Deploy UserProxy (slow process)
         </button>
Consenti all'utente di distribuire un nuovo UserProxy.
         <br /><br />
         <input type="text" placeholder="Oppure inserisci un indirizzo proxy esistente" value={newProxyAddr} onChange={proxyAddressChange} />
         <br /><br />
         <button
            onClick={() => setProxyAddr(newProxyAddr)}
            disabled={newProxyAddr.match(/^0x[a-fA-F0-9]{40}$/) === null}
         >
            Set proxy address
         </button>
Consenti agli utenti di fare clic su Set proxy address solo quando inseriscono un indirizzo legittimo. Nota che questo non garantisce che l'indirizzo in questione sia effettivamente un contratto UserProxy. È possibile aggiungere un tale controllo, ma sarà molto più lento (peggiore esperienza utente) e non migliorerà la sicurezza (gli aggressori possono sempre utilizzare il proprio codice per l'interfaccia utente).
         <br /><br />
         { proxyAddr && (
Mostra il resto solo se c'è un indirizzo proxy legittimo.
            <>
               Proxy balance: {proxyBalanceAmount}
               <br />
               Proxy nonce: {nonce?.data?.toString() ?? "Loading..."}
L'utente non ha bisogno di conoscere il nonce; questo è solo a scopo di debug.
               <br />
               <button disabled={!proxyAddr || proxyAddr === "Loading..." || nonce?.status !== 'success'}
                  onClick={proxyFaucet}
               >
                  Request more tokens for proxy
               </button>
Non possiamo simulare una chiamata a faucet() tramite il proxy. Tuttavia, possiamo almeno assicurarci di avere un proxy e che il proxy ci abbia segnalato un nonce.
               <hr />
               <h4>Transfer tokens from proxy</h4>
               <ul>
                  <li> Token to transfer: <input type="text" placeholder="Token to transfer" value={transferToken} onChange={transferTokenChange} /> </li>
                  <li> Recipient address: <input type="text" placeholder="Recipient address" value={transferTo} onChange={transferToChange} /> </li>
                  <li> Amount to transfer: <input type="number" placeholder="Amount to transfer" value={transferAmount} onChange={transferAmountChange} /> </li>
               </ul>
               <button disabled={!proxyAddr || proxyAddr === "Loading..." || nonce?.status !== 'success'}
                  onClick={proxyTransfer}
               >
                  Transfer
               </button>
            </>
         )}
Consenti all'utente di emettere transazioni di trasferimento ERC-20.
         <hr />
         { txHash && (
            <>
               <h4>Last transaction:</h4>
               <a href={`https://eth-sepolia.blockscout.com/tx/${txHash}`} target="_blank">
                 {txHash}
               </a>
            </>
         )}
Se c'è un hash dell'ultima transazione, mostra un link in modo che l'utente possa visualizzarlo in un block explorer.
</div>
    </>
  )
}

export {Token}
Questo è solo codice boilerplate di React.
Vulnerabilità
Il nostro server è vulnerabile agli attacchi denial-of-service. Questo attacco è spiegato nell'articolo precedente della serie.
Inoltre, stiamo incoraggiando un cattivo comportamento da parte dell'utente. Questo è ciò che chiediamo all'utente di firmare:
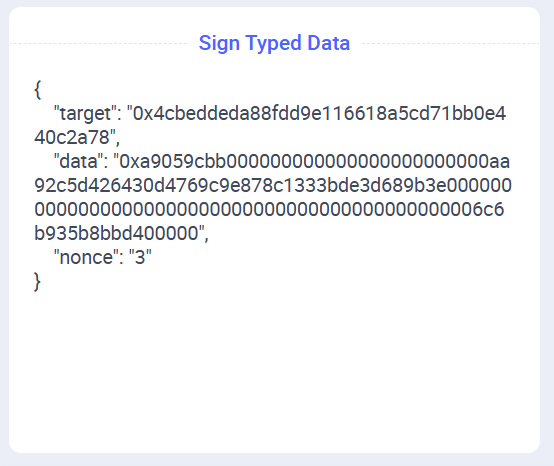
Noi sappiamo che questo è un trasferimento ERC-20 legittimo per il token, l'importo e l'indirizzo di destinazione che l'utente desidera trasferire. Ma la maggior parte degli utenti non sa come interpretare i dati di chiamata e non ha idea di cosa stia firmando. Questa è una cattiva progettazione, per due motivi:
- Alcuni utenti non ci utilizzeranno perché non si fidano dei dati che diciamo loro di firmare.
- Altri utenti si fideranno di noi e impareranno che dovrebbero semplicemente firmare i dati di chiamata senza capire cosa siano. Ciò significa che se Adam Attacker riesce a reindirizzarli al suo sito web, può far loro firmare una transazione che gli concede tutti gli USDC (o DAI, o qualsiasi altro ERC-20) posseduti dall'utente.
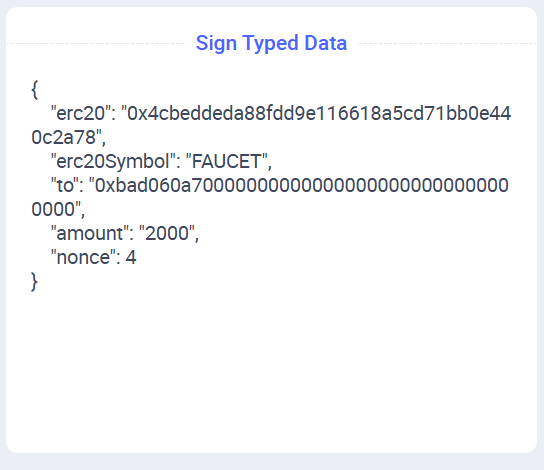
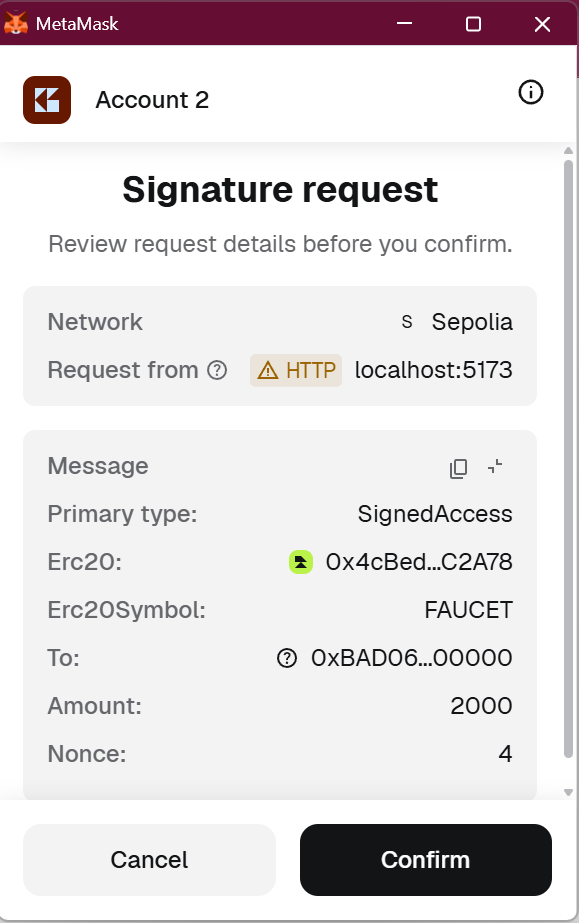
La soluzione è avere funzioni separate in UserProxy per le funzioni comunemente utilizzate, come il trasferimento. In questo modo gli utenti possono firmare qualcosa che capiscono.
Nota: Sebbene gli utenti possano utilizzare qualsiasi portafoglio desiderino, è altamente raccomandato che le applicazioni che utilizzano EIP-712 li incoraggino a utilizzare un portafoglio che mostri l'intero dato della firma (opens in a new tab). Alcuni portafogli troncano l'indirizzo, il che è insicuro. Un utente malintenzionato può creare un indirizzo che ha gli stessi caratteri iniziali e finali, ma differisce nel mezzo.
Conclusione
Oltre alle vulnerabilità di cui sopra, la soluzione in questo tutorial presenta diversi inconvenienti che Ethereum può aiutarci ad affrontare.
- Resistenza alla censura. Attualmente, gli utenti possono utilizzare il tuo server, un server concorrente configurato da qualcun altro, o connettersi direttamente a Ethereum, il che comporta costi di gas. L'utilizzo di ERC-4337 (opens in a new tab) consente agli utenti di offrire la propria transazione a un ampio pool di server, riducendo la probabilità che le loro transazioni vengano censurate.
- Asset di proprietà dell'EOA. Come notato sopra, EIP-7702 (opens in a new tab) può essere utilizzato per gestire asset già di proprietà di un indirizzo EOA. Questo ha le sue difficoltà, ma a volte è necessario.
Spero di pubblicare tutorial sull'aggiunta di queste funzionalità nel prossimo futuro.