Hello World Smart Contract for Beginners - Fullstack
This guide is for you if you are new to blockchain development and don't know where to start or how to deploy and interact with smart contracts. We will walk through creating and deploying a simple, smart contract on the Goerli test network using MetaMask (opens in a new tab), Solidity (opens in a new tab), Hardhat (opens in a new tab), and Alchemy (opens in a new tab).
You'll need an Alchemy account to complete this tutorial. Sign up for a free account (opens in a new tab).
If you have questions at any point, feel free to reach out in the Alchemy Discord (opens in a new tab)!
Part 1 - Create and Deploy your Smart Contract using Hardhat
Connect to the Ethereum network
Ethereum zincirine istek göndermenin birçok yolu vardır. For simplicity, we'll use a free account on Alchemy, a blockchain developer platform and API that allows us to communicate with the Ethereum chain without running a node ourselves. Alchemy also has developer tools for monitoring and analytics; we'll take advantage of these in this tutorial to understand what's going on under the hood in our smart contract deployment.
Create your app and API key
Once you've created an Alchemy account, you can generate an API key by creating an app. This will allow you to make requests to the Goerli testnet. If you're not familiar with testnets you can read Alchemy's guide to choosing a network (opens in a new tab).
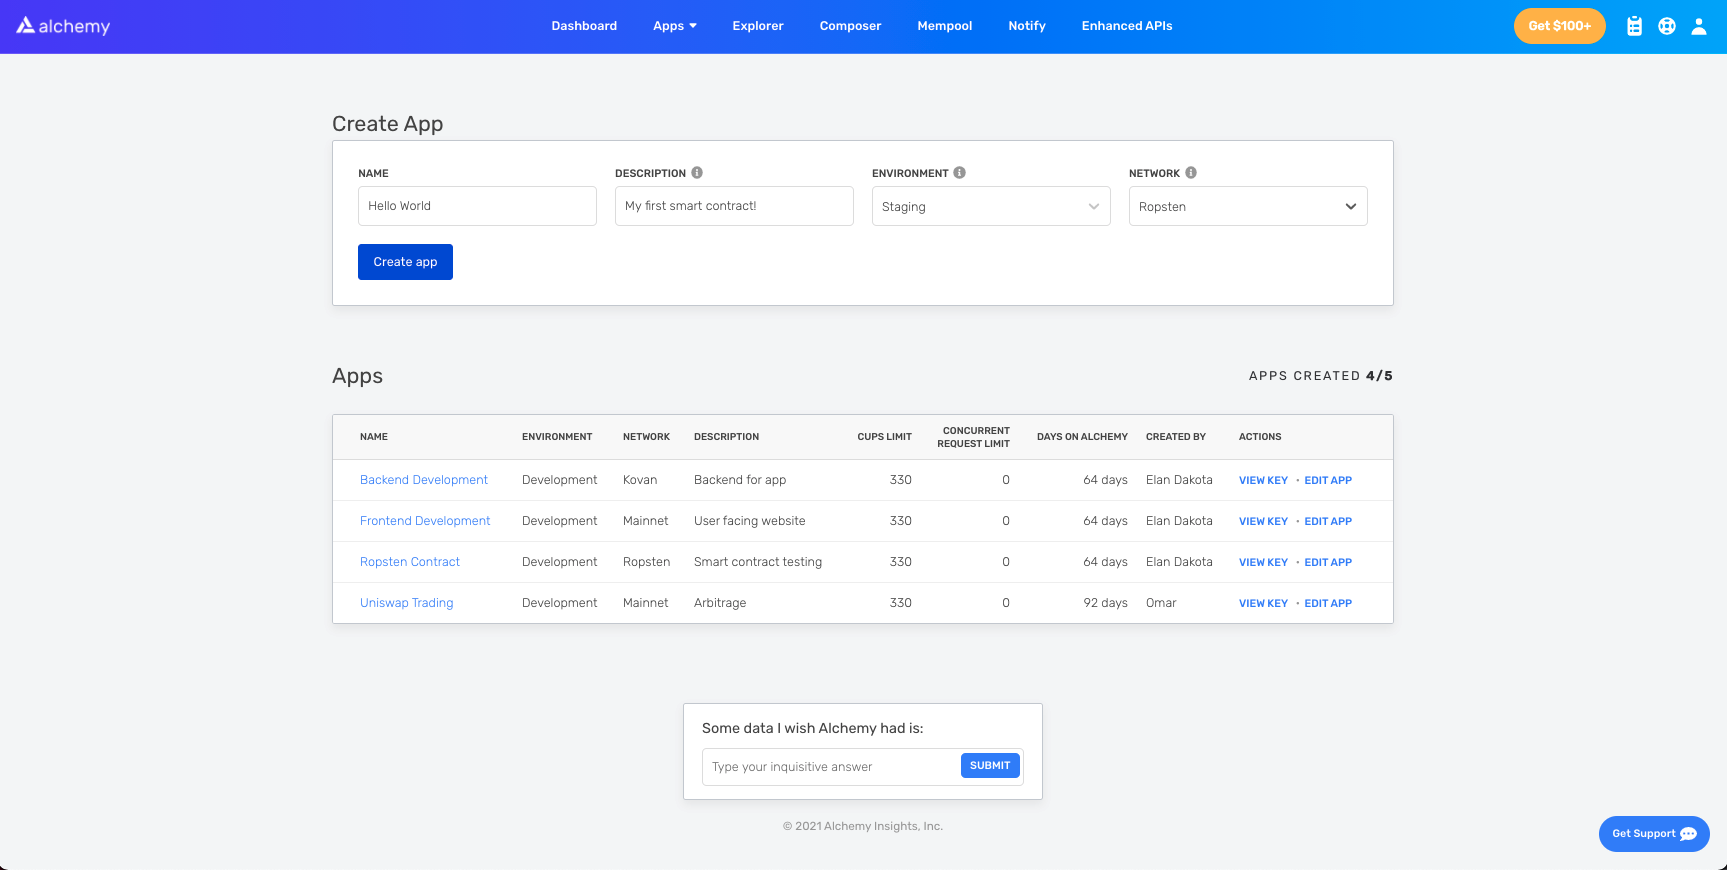
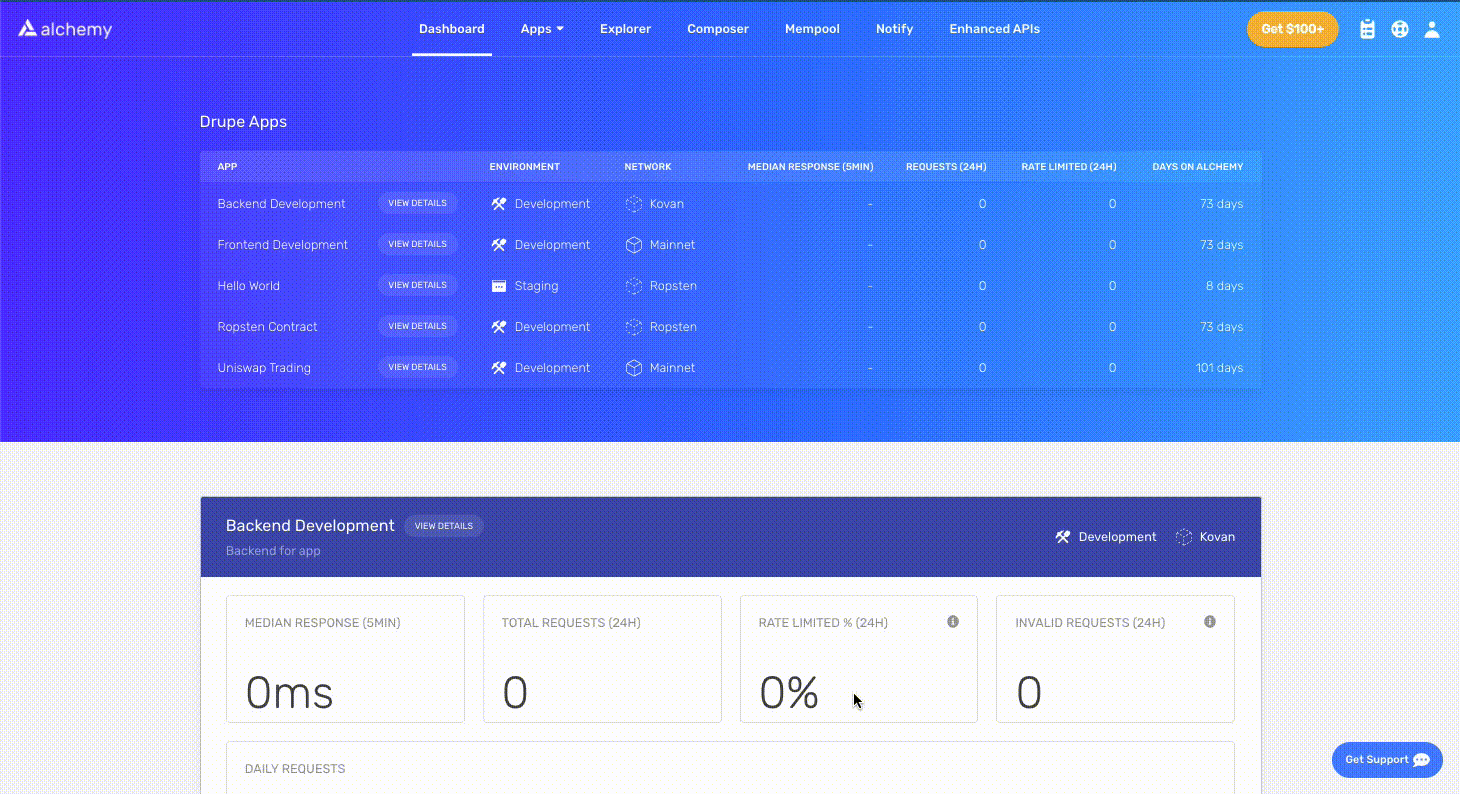
On the Alchemy dashboard, find the Apps dropdown in the navigation bar and click Create App.
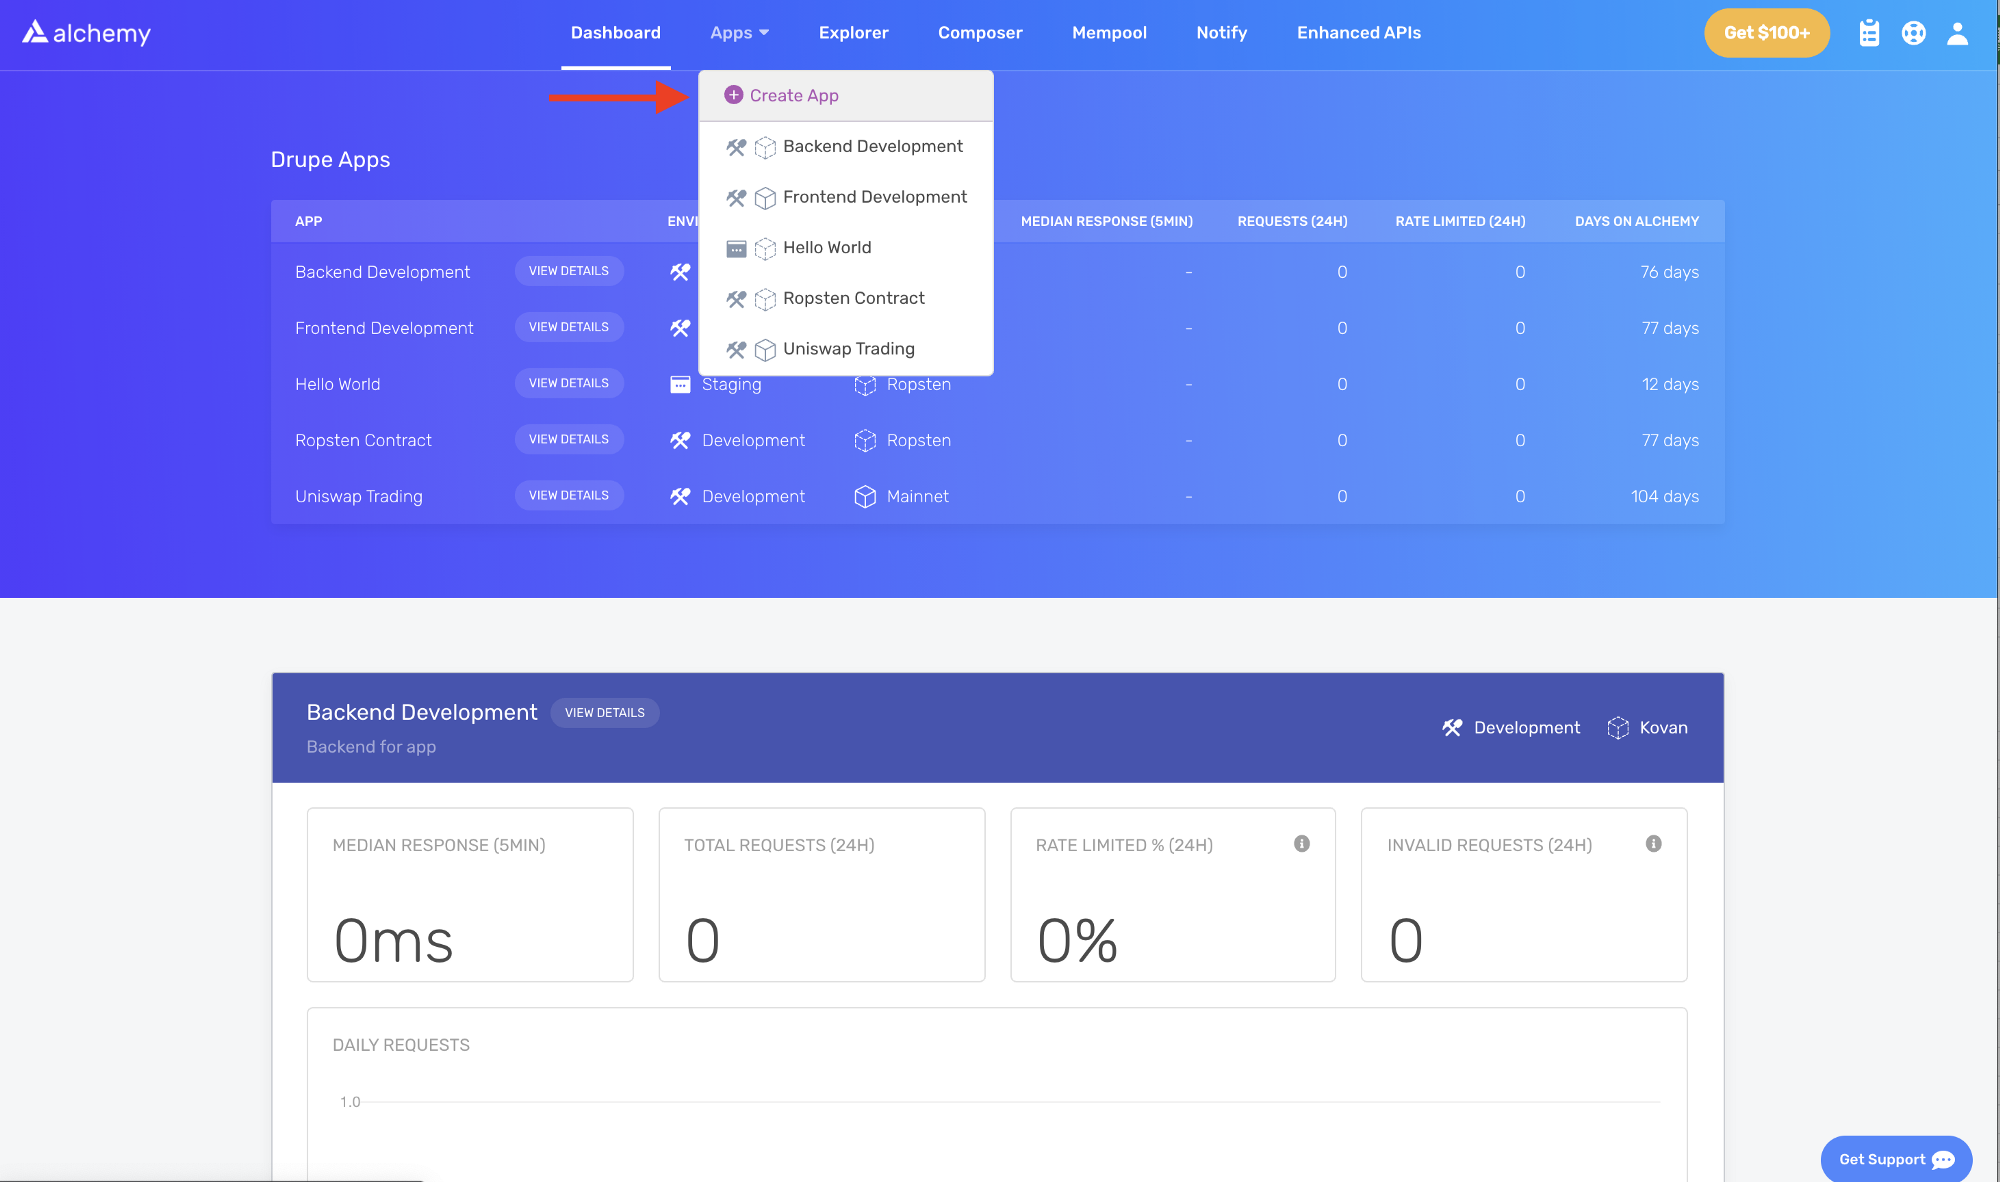
Give your app the name 'Hello World' and write a short description. Select Staging as your environment and Goerli as your network.
Note: be sure to select Goerli, or this tutorial won't work.
Click Create app. Your app will appear in the table below.
Create an Ethereum account
You need an Ethereum account to send and receive transactions. We'll use MetaMask, a virtual wallet in the browser that lets users manage their Ethereum account address.
MetaMask'ı buradan (opens in a new tab) ücretsiz indirip bir hesap oluşturabilirsiniz. When you are creating an account, or if you already have an account, make sure to switch over to the “Goerli Test Network” in the upper right (so that we’re not dealing with real money).
Adım 4: Bir Musluktan ether ekleyin
To deploy your smart contract to the test network, you'll need some fake ETH. To get ETH on the Goerli network, go to a Goerli faucet and enter your Goerli account address. Note that Goerli faucets can be a bit unreliable recently - see the test networks page for a list of options to try:
Note: due to network congestion, this might take a while. ``
Step 5: Check your Balance
To double-check the ETH is in your wallet, let’s make an eth_getBalance (opens in a new tab) request using Alchemy’s composer tool (opens in a new tab). Bu, cüzdanımızdaki ETH miktarını döndürür. To learn more check out Alchemy's short tutorial on how to use the composer tool (opens in a new tab).
Enter you input your MetaMask account address and click Send Request. You will see a response that looks like the code snippet below.
1{ "jsonrpc": "2.0", "id": 0, "result": "0x2B5E3AF16B1880000" }Note: This result is in wei, not ETH. Wei is used as the smallest denomination of ether.
Vay be! Tüm sahte paramız yerli yerinde.
Step 6: Initialize our project
First, we'll need to create a folder for our project. Navigate to your command line and input the following.
1mkdir hello-world2cd hello-worldArtık proje klasörümüzün içinde olduğumuza göre projeyi başlatmak için npm init komutunu kullanacağız.
If you don’t have npm installed yet, follow these instructions to install Node.js and npm (opens in a new tab).
For the purpose of this tutorial, it doesn't matter how you answer the initialization questions. Here is how we did it for reference:
1package name: (hello-world)2version: (1.0.0)3description: hello world smart contract4entry point: (index.js)5test command:6git repository:7keywords:8author:9license: (ISC)1011About to write to /Users/.../.../.../hello-world/package.json:1213{14 "name": "hello-world",15 "version": "1.0.0",16 "description": "hello world smart contract",17 "main": "index.js",18 "scripts": {19 "test": "echo \"Error: no test specified\" && exit 1"20 },21 "author": "",22 "license": "ISC"23}Tümünü gösterpackage.json dosyasını onaylayın ve artık hazırız!
Step 7: Download Hardhat
Hardhat, Ethereum yazılımınızı derlemek, dağıtmak, test etmek ve hatalarını ayıklamak için bir geliştirme ortamıdır. Bu geliştiricilere canlı zincirde dağıtmadan önce akıllı sözleşmelerini ve merkeziyetsiz uygulamalarını geliştirirken yardımcı olur.
hello-world projemizin içinde şunu çalıştırın:
1npm install --save-dev hardhatKurulum talimatları (opens in a new tab) hakkında daha fazla ayrıntı için bu sayfaya göz atın.
Step 8: Create Hardhat project
Inside our hello-world project folder, run:
1npx hardhatDaha sonra bir karşılama mesajı ve ne yapmak istediğinizi seçme seçeneği görmelisiniz. "create an empty hardhat.config.js"yi (boş bir hardhat.config.js oluştur) seçin:
1888 888 888 888 8882888 888 888 888 8883888 888 888 888 88848888888888 8888b. 888d888 .d88888 88888b. 8888b. 8888885888 888 "88b 888P" d88" 888 888 "88b "88b 8886888 888 .d888888 888 888 888 888 888 .d888888 8887888 888 888 888 888 Y88b 888 888 888 888 888 Y88b.8888 888 "Y888888 888 "Y88888 888 888 "Y888888 "Y888910👷 Welcome to Hardhat v2.0.11 👷1112What do you want to do? …13Create a sample project14❯ Create an empty hardhat.config.js15QuitTümünü gösterThis will generate a hardhat.config.js file in the project. We'll use this later in the tutorial to specify the setup for our project.
Step 9: Add project folders
To keep the project organized, let's create two new folders. In the command line, navigate to the root directory of your hello-world project and type:
1mkdir contracts2mkdir scriptscontracts/, merhaba dünya akıllı sözleşme kodu dosyamızı tutacağımız yerdirscripts/, sözleşmemizi dağıtmak ve onunla etkileşim kurmak için komut dosyalarını tutacağımız yerdir
Step 10: Write our contract
You might be asking yourself, when are we going to write code? It's time!
Open up the hello-world project in your favorite editor. Smart contracts most commonly are written in Solidity, which we will use to write our smart contract.
- Navigate to the
contractsfolder and create a new file calledHelloWorld.sol - Below is a sample Hello World smart contract that we will be using for this tutorial. Copy the contents below into the
HelloWorld.solfile.
Note: Be sure to read the comments to understand what this contract does.
1// Specifies the version of Solidity, using semantic versioning.2// Learn more: https://solidity.readthedocs.io/en/v0.5.10/layout-of-source-files.html#pragma3pragma solidity >=0.7.3;45// Defines a contract named `HelloWorld`.6// A contract is a collection of functions and data (its state). Once deployed, a contract resides at a specific address on the Ethereum blockchain. Learn more: https://solidity.readthedocs.io/en/v0.5.10/structure-of-a-contract.html7contract HelloWorld {89 //Emitted when update function is called10 //Smart contract events are a way for your contract to communicate that something happened on the blockchain to your app front-end, which can be 'listening' for certain events and take action when they happen.11 event UpdatedMessages(string oldStr, string newStr);1213 // Declares a state variable `message` of type `string`.14 // State variables are variables whose values are permanently stored in contract storage. The keyword `public` makes variables accessible from outside a contract and creates a function that other contracts or clients can call to access the value.15 string public message;1617 // Similar to many class-based object-oriented languages, a constructor is a special function that is only executed upon contract creation.18 // Constructors are used to initialize the contract's data. Learn more:https://solidity.readthedocs.io/en/v0.5.10/contracts.html#constructors19 constructor(string memory initMessage) {2021 // Accepts a string argument `initMessage` and sets the value into the contract's `message` storage variable).22 message = initMessage;23 }2425 // A public function that accepts a string argument and updates the `message` storage variable.26 function update(string memory newMessage) public {27 string memory oldMsg = message;28 message = newMessage;29 emit UpdatedMessages(oldMsg, newMessage);30 }31}Tümünü gösterThis is a basic smart contract that stores a message upon creation. It can be updated by calling the update function.
Step 11: Connect MetaMask & Alchemy to your project
Bir MetaMask cüzdanı ve Alchemy hesabı oluşturduk ve akıllı sözleşmemizi yazdık, şimdi bu üçünü birbirine bağlama zamanı.
Every transaction sent from your wallet requires a signature using your unique private key. To provide our program with this permission, we can safely store our private key in an environment file. We will also store an API key for Alchemy here.
To learn more about sending transactions, check out this tutorial (opens in a new tab) on sending transactions using web3.
İlk önce dotenv paketini proje dizininize kurun:
1npm install dotenv --saveThen, create a .env file in the root directory of the project. Add your MetaMask private key and HTTP Alchemy API URL to it.
Your environment file must be named .env or it won't be recognized as an environment file.
Do not name it process.env or .env-custom or anything else.
- Follow these instructions (opens in a new tab) to export your private key
- HTTP Alchemy API URL'sini almak için aşağıya bakın
.env dosyanız şu şekilde görünmelidir:
1API_URL = "https://eth-goerli.alchemyapi.io/v2/your-api-key"2PRIVATE_KEY = "your-metamask-private-key"Bunları gerçekten kodumuza bağlamak için 13. adımda hardhat.config.js dosyamızdaki bu değişkenlere başvuracağız.
Adım 12: Ethers.js'i Yükleyin
Ethers.js is a library that makes it easier to interact and make requests to Ethereum by wrapping standard JSON-RPC methods (opens in a new tab) with more user friendly methods.
Hardhat allows us to integrate plugins (opens in a new tab) for additional tooling and extended functionality. We’ll be taking advantage of the Ethers plugin (opens in a new tab) for contract deployment.
Proje klasörünüzde şunu yazın:
npm install --save-dev @nomiclabs/hardhat-ethers "ethers@^5.0.0"Step 13: Update hardhat.config.js
Şimdiye kadar birkaç bağımlılık ve eklenti ekledik, şimdi projemizin hepsini tanıması için hardhat.config.js dosyasını güncellememiz gerekiyor.
hardhat.config.js dosyanızı aşağıdaki gibi görünecek şekilde güncelleyin:
1/**2 * @type import('hardhat/config').HardhatUserConfig3 */45require("dotenv").config()6require("@nomiclabs/hardhat-ethers")78const { API_URL, PRIVATE_KEY } = process.env910module.exports = {11 solidity: "0.7.3",12 defaultNetwork: "goerli",13 networks: {14 hardhat: {},15 goerli: {16 url: API_URL,17 accounts: [`0x${PRIVATE_KEY}`],18 },19 },20}Tümünü gösterStep 14: Compile our contract
Şimdiye kadar yaptığımız her şeyin çalıştığından emin olmak için sözleşmemizi derleyelim. compile görevi, yerleşik hardhat görevlerinden biridir.
Komut satırından şunu yürütün:
npx hardhat compileYou might get a warning about SPDX license identifier not provided in source file, but no need to worry about that — hopefully everything else looks good! Sorun yaşarsanız Alchemy Discord (opens in a new tab) üzerinden her zaman mesaj atabilirsiniz.
Step 15: Write our deploy script
Artık sözleşmemiz yazıldığına ve yapılandırma dosyamız kullanıma hazır olduğuna göre, sözleşme dağıtım komut dosyanızı yazmanın zamanı geldi.
scripts/ klasörüne gidin ve deploy.js adında yeni bir dosya oluşturup içine aşağıdaki içeriği ekleyin:
1async function main() {2 const HelloWorld = await ethers.getContractFactory("HelloWorld")34 // Start deployment, returning a promise that resolves to a contract object5 const hello_world = await HelloWorld.deploy("Hello World!")6 console.log("Contract deployed to address:", hello_world.address)7}89main()10 .then(() => process.exit(0))11 .catch((error) => {12 console.error(error)13 process.exit(1)14 })Tümünü gösterHardhat, Sözleşmeler öğreticisinde (opens in a new tab) bu kod satırlarının her birinin ne işe yaradığını harika bir şekilde açıklıyor, biz de buraya onların açıklamalarını aldık.
1const HelloWorld = await ethers.getContractFactory("HelloWorld")A ContractFactory in ethers.js is an abstraction used to deploy new smart contracts, so HelloWorld here is a factory (opens in a new tab) for instances of our hello world contract. When using the hardhat-ethers plugin ContractFactory and Contract, instances are connected to the first signer (owner) by default.
1const hello_world = await HelloWorld.deploy()Calling deploy() on a ContractFactory will start the deployment, and return a Promise that resolves to a Contract object. Bu, akıllı sözleşme fonksiyonlarımızın her biri için bir yöntemi olan nesnedir.
Adım 16: Sözleşmemizi dağıtın
Sonunda akıllı sözleşmemizi uygulamaya hazırız! Komut satırına gidin ve şunu çalıştırın:
npx hardhat run scripts/deploy.js --network goerliDaha sonra şöyle bir şey görmelisiniz:
Sözleşme şu adrese dağıtıldı: 0x6cd7d44516a20882cEa2DE9f205bF401c0d23570Please save this address. We will be using it later in the tutorial.
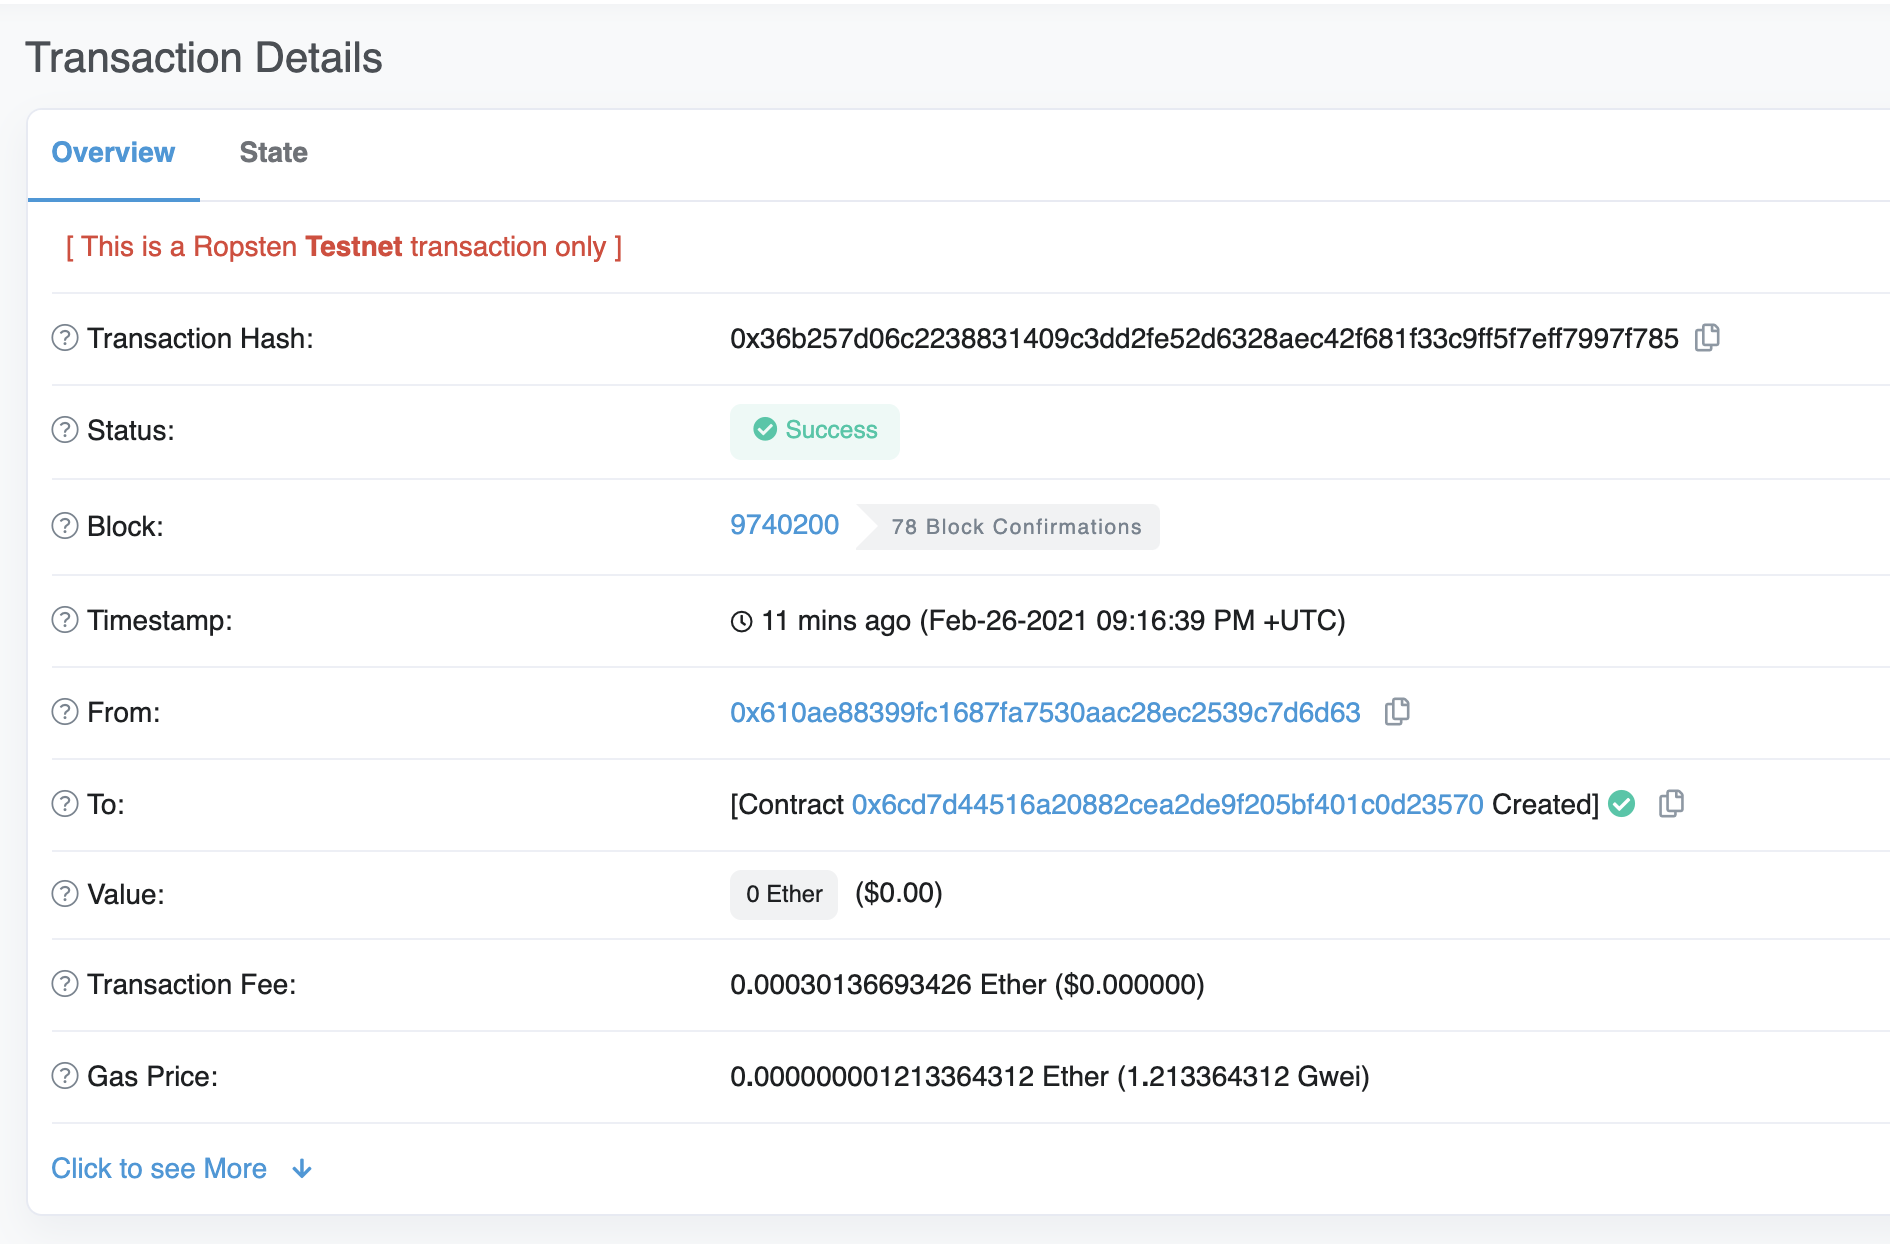
If we go to the Goerli etherscan (opens in a new tab) and search for our contract address we should able to see that it has been deployed successfully. İşlem şunun gibi gözükecektir:
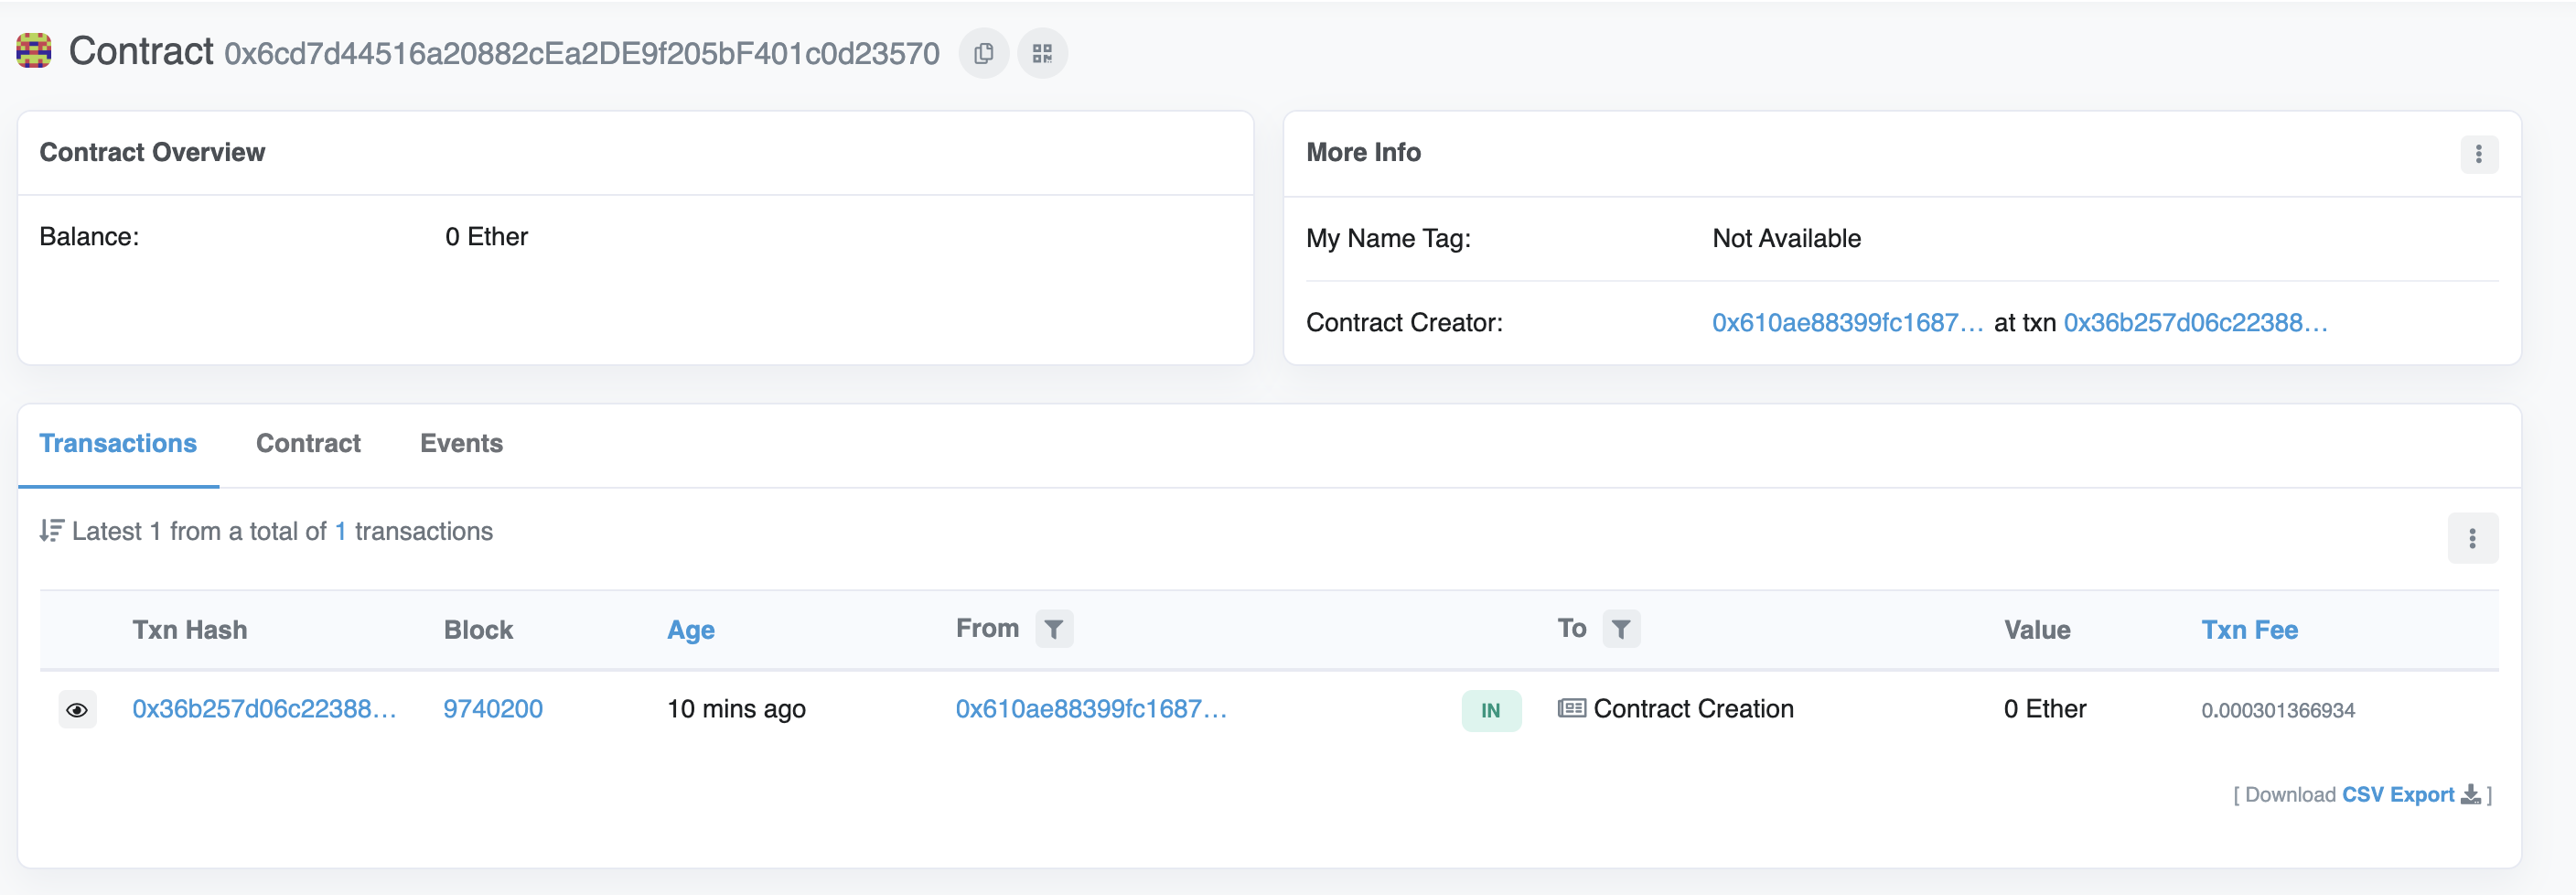
The From address should match your MetaMask account address and the To address will say Contract Creation. If we click into the transaction we’ll see our contract address in the To field.
Tebrikler! You just deployed a smart contract to an Ethereum testnet.
To understand what’s going on under the hood, let’s navigate to the Explorer tab in our Alchemy dashboard (opens in a new tab). If you have multiple Alchemy apps make sure to filter by app and select Hello World.
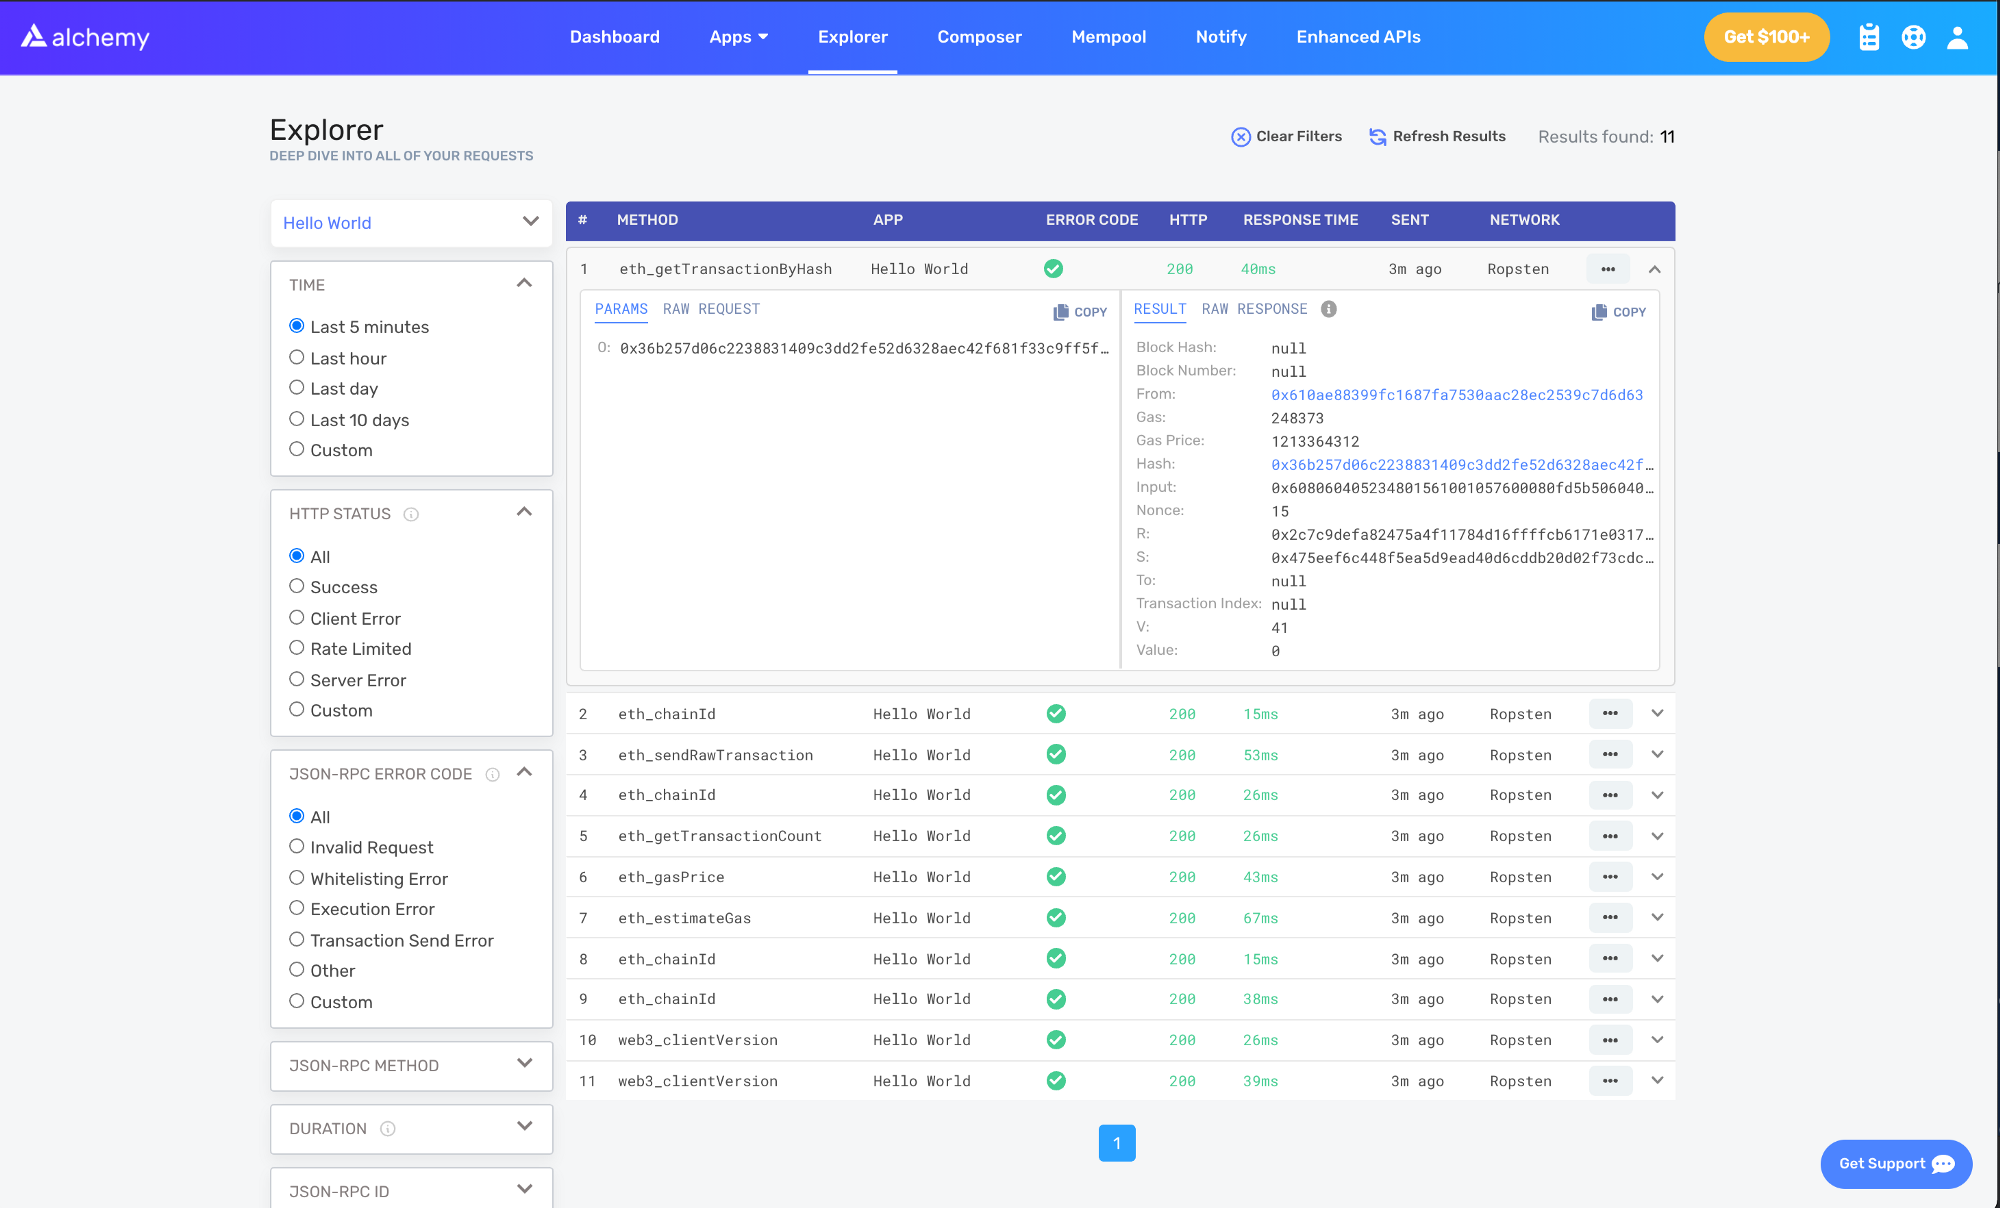
Here you’ll see a handful of JSON-RPC methods that Hardhat/Ethers made under the hood for us when we called the .deploy() function. Two important methods here are eth_sendRawTransaction (opens in a new tab), which is the request to write our contract onto the Goerli chain, and eth_getTransactionByHash (opens in a new tab), which is a request to read information about our transaction given the hash. To learn more about sending transactions, check out our tutorial on sending transactions using Web3.
Part 2: Interact with your Smart Contract
Now that we've successfully deployed a smart contract to the Goerli network let's learn how to interact with it.
Create a interact.js file
This is the file where we'll write our interaction script. We'll be using the Ethers.js library that you previously installed in Part 1.
Inside the scripts/folder, create a new file named interact.js add the following code:
1// interact.js23const API_KEY = process.env.API_KEY4const PRIVATE_KEY = process.env.PRIVATE_KEY5const CONTRACT_ADDRESS = process.env.CONTRACT_ADDRESSUpdate your .env file
We will be using new environment variables, so we need to define them in the .envfile that we created earlier.
We'll need to add a definition for our Alchemy API_KEY and the CONTRACT_ADDRESS where your smart contract was deployed.
Your .env file should look something like this:
# .envAPI_URL = "https://eth-goerli.alchemyapi.io/v2/<your-api-key>"API_KEY = "<your-api-key>"PRIVATE_KEY = "<your-metamask-private-key>"CONTRACT_ADDRESS = "0x<your contract address>"Grab your contract ABI
Our contract is the interface to interact with our smart contract. Hardhat automatically generates an ABI and saves it in HelloWorld.json. To use the ABI, we'll need to parse out the contents by adding the following lines of code to our interact.js file:
1// interact.js2const contract = require("../artifacts/contracts/HelloWorld.sol/HelloWorld.json")ABI'yi görmek isterseniz konsolunuza yazdırabilirsiniz:
1console.log(JSON.stringify(contract.abi))To see your ABI printed to the console, navigate to your terminal and run:
npx hardhat run scripts/interact.jsCreate an instance of your contract
To interact with our contract, we need to create a contract instance in our code. To do so with Ethers.js, we'll need to work with three concepts:
- Provider - a node provider that gives you read and write access to the blockchain
- Signer - represents an Ethereum account that can sign transactions
- Contract - an Ethers.js object representing a specific contract deployed onchain
We'll use the contract ABI from the previous step to create our instance of the contract:
1// interact.js23// Provider4const alchemyProvider = new ethers.providers.AlchemyProvider(5 (network = "goerli"),6 API_KEY7)89// Signer10const signer = new ethers.Wallet(PRIVATE_KEY, alchemyProvider)1112// Contract13const helloWorldContract = new ethers.Contract(14 CONTRACT_ADDRESS,15 contract.abi,16 signer17)Tümünü gösterLearn more about Providers, Signers, and Contracts in the ethers.js documentation (opens in a new tab).
Read the init message
Remember when we deployed our contract with the initMessage = "Hello world!"? We are now going to read that message stored in our smart contract and print it to the console.
In JavaScript, asynchronous functions get used when interacting with networks. To learn more about asynchronous functions, read this medium article (opens in a new tab).
Use the code below to call the message function in our smart contract and read the init message:
1// interact.js23// ...45async function main() {6 const message = await helloWorldContract.message()7 console.log("The message is: " + message)8}9main()Tümünü gösterAfter running the file using npx hardhat run scripts/interact.js in the terminal we should see this response:
1The message is: Hello world!Tebrikler! You've just successfully read smart contract data from the Ethereum blockchain, way to go!
Update the message
Instead of just reading the message, we can also update the message saved in our smart contract using the update function! Pretty cool, right?
To update the message, we can directly call the update function on our instantiated Contract object:
1// interact.js23// ...45async function main() {6 const message = await helloWorldContract.message()7 console.log("The message is: " + message)89 console.log("Updating the message...")10 const tx = await helloWorldContract.update("This is the new message.")11 await tx.wait()12}13main()Tümünü gösterNote that on line 11, we make a call to .wait() on the returned transaction object. This ensures that our script waits for the transaction to get mined on the blockchain before exiting the function. If the .wait() call isn't included, the script may not see the updated message value in the contract.
Read the new message
You should be able to repeat the previous step to read the updated message value. Take a moment and see if you can make the changes necessary to print out that new value!
If you need a hint, here's what your interact.js file should look like at this point:
1// interact.js23const API_KEY = process.env.API_KEY4const PRIVATE_KEY = process.env.PRIVATE_KEY5const CONTRACT_ADDRESS = process.env.CONTRACT_ADDRESS67const contract = require("../artifacts/contracts/HelloWorld.sol/HelloWorld.json")89// provider - Alchemy10const alchemyProvider = new ethers.providers.AlchemyProvider(11 (network = "goerli"),12 API_KEY13)1415// signer - you16const signer = new ethers.Wallet(PRIVATE_KEY, alchemyProvider)1718// contract instance19const helloWorldContract = new ethers.Contract(20 CONTRACT_ADDRESS,21 contract.abi,22 signer23)2425async function main() {26 const message = await helloWorldContract.message()27 console.log("The message is: " + message)2829 console.log("Updating the message...")30 const tx = await helloWorldContract.update("this is the new message")31 await tx.wait()3233 const newMessage = await helloWorldContract.message()34 console.log("The new message is: " + newMessage)35}3637main()Tümünü gösterNow just run the script and you should be able to see the old message, the updating status, and the new message printed out to your terminal!
npx hardhat run scripts/interact.js --network goerli
1The message is: Hello World!2Updating the message...3The new message is: This is the new message.While running that script, you may notice that the Updating the message... step takes a while to load before the new message loads. That is due to the mining process; if you are curious about tracking transactions while they are being mined, visit the Alchemy mempool (opens in a new tab) to see the status of a transaction. If the transaction is dropped, it's also helpful to check Goerli Etherscan (opens in a new tab) and search for your transaction hash.
Part 3: Publish your Smart Contract to Etherscan
You did all the hard work of bringing your smart contract to life; now it's time to share it with the world!
By verifying your smart contract on Etherscan, anyone can view your source code and interact with your smart contract. Let's get started!
Step 1: Generate an API Key on your Etherscan account
An Etherscan API Key is necessary to verify that you own the smart contract you are trying to publish.
If you don't have an Etherscan account already, sign up for an account (opens in a new tab).
Once logged in, find your username in the navigation bar, hover over it and select the My profile button.
On your profile page, you should see a side navigation bar. From the side navigation bar, select API Keys. Next, press the "Add" button to create a new API key, name your app hello-worldand press the Create New API Key button.
Your new API key should appear in the API key table. Copy the API key to your clipboard.
Next, we need to add the Etherscan API key to our .env file.
After adding it, your .envfile should look like this:
1API_URL = "https://eth-goerli.alchemyapi.io/v2/your-api-key"2PUBLIC_KEY = "your-public-account-address"3PRIVATE_KEY = "your-private-account-address"4CONTRACT_ADDRESS = "your-contract-address"5ETHERSCAN_API_KEY = "your-etherscan-key"Hardhat-deployed smart contracts
Install hardhat-etherscan
Publishing your contract to Etherscan using Hardhat is straightforward. You will first need to install the hardhat-etherscan plugin to get started. hardhat-etherscan will automatically verify the smart contract's source code and ABI on Etherscan. To add this, in the hello-world directory run:
1npm install --save-dev @nomiclabs/hardhat-etherscanOnce installed, include the following statement at the top of your hardhat.config.js, and add the Etherscan config options:
1// hardhat.config.js23require("dotenv").config()4require("@nomiclabs/hardhat-ethers")5require("@nomiclabs/hardhat-etherscan")67const { API_URL, PRIVATE_KEY, ETHERSCAN_API_KEY } = process.env89module.exports = {10 solidity: "0.7.3",11 defaultNetwork: "goerli",12 networks: {13 hardhat: {},14 goerli: {15 url: API_URL,16 accounts: [`0x${PRIVATE_KEY}`],17 },18 },19 etherscan: {20 // Your API key for Etherscan21 // Obtain one at https://etherscan.io/22 apiKey: ETHERSCAN_API_KEY,23 },24}Tümünü gösterVerify your smart contract on Etherscan
Ensure all files are saved and all .env variables are correctly configured.
Run the verify task, passing the contract address, and the network to where it's deployed:
1npx hardhat verify --network goerli DEPLOYED_CONTRACT_ADDRESS 'Hello World!'Make sure that DEPLOYED_CONTRACT_ADDRESS is the address of your deployed smart contract on the Goerli test network. Also, the final argument ('Hello World!') must be the same string value used during the deploy step in part 1.
If all goes well, you will see the following message in your terminal:
1Successfully submitted source code for contract2contracts/HelloWorld.sol:HelloWorld at 0xdeployed-contract-address3for verification on Etherscan. Waiting for verification result...456Successfully verified contract HelloWorld on Etherscan.7https://goerli.etherscan.io/address/<contract-address>#contractsTebrikler! Your smart contract code is on Etherscan!
Check out your smart contract on Etherscan!
When you navigate to the link provided in your terminal, you should be able to see your smart contract code and ABI published on Etherscan!
Wahooo - you did it champ! Now anyone can call or write to your smart contract! We can't wait to see what you build next!
Part 4 - Integrating your smart contract with the frontend
By the end of this tutorial, you'll know how to:
- Connect a MetaMask wallet to your dapp
- Read data from your smart contract using the Alchemy Web3 (opens in a new tab) API
- Sign Ethereum transactions using MetaMask
For this dapp, we'll be using React (opens in a new tab) as our frontend framework; however, it's important to note that we won't be spending much time breaking down its fundamentals, as we'll mostly be focusing on bringing Web3 functionality to our project.
As a prerequisite, you should have a beginner-level understanding of React. If not, we recommend completing the official Intro to React tutorial (opens in a new tab).
Başlangıç dosyalarını klonlayın
First, go to the hello-world-part-four GitHub repository (opens in a new tab) to get the starter files for this project and clone this repository to your local machine.
Open the cloned repository locally. Notice that it contains two folders: starter-files and completed.
starter-files- we will be working in this directory, we will connect the UI to your Ethereum wallet and the smart contract we published to Etherscan in Part 3.completedcontains the entire completed tutorial and should only be used as a reference if you get stuck.
Next, open your copy of starter-files to your favorite code editor, and then navigate into the src folder.
Yazacağımız tüm kodlar src klasörünün altında yer alacaktır. We'll be editing the HelloWorld.js component and the util/interact.js JavaScript files to give our project Web3 functionality.
Check out the starter files
Before we start coding, let's explore what is provided to us in the starter files.
React projenizi çalıştırın
Tarayıcımızda React projesini çalıştırarak başlayalım. React'in güzelliği, projemizi tarayıcımızda çalıştırdıktan sonra, kaydettiğimiz tüm değişikliklerin tarayıcımızda canlı olarak güncellenmesidir.
To get the project running, navigate to the root directory of the starter-files folder, and the run npm install in your terminal to install the dependencies of the project:
cd starter-filesnpm installBunların kurulumu tamamlandıktan sonra terminalinizde npm start komutunu çalıştırın:
npm startDoing so should open http://localhost:3000/ (opens in a new tab) in your browser, where you'll see the frontend for our project. It should consist of one field (a place to update the message stored in your smart contract), a "Connect Wallet" button, and an "Update" button.
If you try clicking either button, you'll notice that they don't work—that's because we still need to program their functionality.
The HelloWorld.js component
Let's go back into the src folder in our editor and open the HelloWorld.js file. Üzerinde çalışacağımız birincil React bileşeni olduğu için bu dosyadaki her şeyi anlamamız çok önemlidir.
At the top of this file, you'll notice we have several import statements that are necessary to get our project running, including the React library, useEffect and useState hooks, some items from the ./util/interact.js (we'll describe them in more details soon!), and the Alchemy logo.
1// HelloWorld.js23import React from "react"4import { useEffect, useState } from "react"5import {6 helloWorldContract,7 connectWallet,8 updateMessage,9 loadCurrentMessage,10 getCurrentWalletConnected,11} from "./util/interact.js"1213import alchemylogo from "./alchemylogo.svg"Tümünü gösterNext, we have our state variables that we will update after specific events.
1// HelloWorld.js23//State variables4const [walletAddress, setWallet] = useState("")5const [status, setStatus] = useState("")6const [message, setMessage] = useState("No connection to the network.")7const [newMessage, setNewMessage] = useState("")Here's what each of the variables represents:
walletAddress- kullanıcının cüzdan adresini saklayan bir dizedirstatus- a string that stores a helpful message that guides the user on how to interact with the dappmessage- a string that stores the current message in the smart contractnewMessage- a string that stores the new message that will be written to the smart contract
After the state variables, you'll see five un-implemented functions: useEffect ,addSmartContractListener, addWalletListener , connectWalletPressed, and onUpdatePressed. We'll explain what they do below:
1// HelloWorld.js23//called only once4useEffect(async () => {5 //TODO: implement6}, [])78function addSmartContractListener() {9 //TODO: implement10}1112function addWalletListener() {13 //TODO: implement14}1516const connectWalletPressed = async () => {17 //TODO: implement18}1920const onUpdatePressed = async () => {21 //TODO: implement22}Tümünü gösteruseEffect(opens in a new tab)- this is a React hook that is called after your component is rendered. Because it has an empty array[]prop passed into it (see line 4), it will only be called on the component's first render. Here we'll load the current message stored in our smart contract, call our smart contract and wallet listeners, and update our UI to reflect whether a wallet is already connected.addSmartContractListener- this function sets up a listener that will watch for our HelloWorld contract'sUpdatedMessagesevent and update our UI when the message is changed in our smart contract.addWalletListener- this function sets up a listener that detects changes in the user's MetaMask wallet state, such as when the user disconnects their wallet or switches addresses.connectWalletPressed- this function will be called to connect the user's MetaMask wallet to our dapp.onUpdatePressed- this function will be called when the user wants to update the message stored in the smart contract.
Bu dosyanın sonuna doğru, bileşenimizin kullanıcı arayüzü bulunuyor.
1// HelloWorld.js23//the UI of our component4return (5 <div id="container">6 <img id="logo" src={alchemylogo}></img>7 <button id="walletButton" onClick={connectWalletPressed}>8 {walletAddress.length > 0 ? (9 "Connected: " +10 String(walletAddress).substring(0, 6) +11 "..." +12 String(walletAddress).substring(38)13 ) : (14 <span>Connect Wallet</span>15 )}16 </button>1718 <h2 style={{ paddingTop: "50px" }}>Current Message:</h2>19 <p>{message}</p>2021 <h2 style={{ paddingTop: "18px" }}>New Message:</h2>2223 <div>24 <input25 type="text"26 placeholder="Update the message in your smart contract."27 onChange={(e) => setNewMessage(e.target.value)}28 value={newMessage}29 />30 <p id="status">{status}</p>3132 <button id="publishButton" onClick={onUpdatePressed}>33 Update34 </button>35</div>36 37</div>38)Tümünü gösterIf you scan this code carefully, you'll notice where we use our various state variables in our UI:
- On lines 6-12, if the user's wallet is connected (i.e.,
walletAddress.length > 0), we display a truncated version of the userwalletAddressin the button with ID "walletButton;" otherwise it simply says "Connect Wallet." - On line 17, we display the current message stored in the smart contract, which is captured in the
messagestring. - On lines 23-26, we use a controlled component (opens in a new tab) to update our
newMessagestate variable when the input in the text field changes.
In addition to our state variables, you'll also see that connectWalletPressed and onUpdatePressed functions are called when the buttons with IDs publishButton and walletButton are clicked respectively.
Finally, let's address where is this HelloWorld.js component added.
If you go to the App.js file, which is the main component in React that acts as a container for all other components, you'll see that our HelloWorld.js component is injected on line 7.
Last but not least, let's check out one more file provided for you, the interact.js file.
The interact.js file
Because we want to prescribe to the M-V-C (opens in a new tab) paradigm, we'll want a separate file that contains all our functions to manage the logic, data, and rules of our dapp, and then be able to export those functions to our frontend (our HelloWorld.js component).
👆🏽This is the exact purpose of our interact.js file!
Navigate to the util folder in your src directory, and you'll notice we've included a file called interact.js that will contain all of our smart contract interaction and wallet functions and variables.
1// interact.js23//export const helloWorldContract;45export const loadCurrentMessage = async () => {}67export const connectWallet = async () => {}89const getCurrentWalletConnected = async () => {}1011export const updateMessage = async (message) => {}Tümünü gösterYou'll notice at the top of the file that we've commented out the helloWorldContract object. Later in this tutorial, we will uncomment this object and instantiate our smart contract in this variable, which we will then export into our HelloWorld.js component.
The four unimplemented functions after our helloWorldContract object do the following:
loadCurrentMessage- this function handles the logic of loading the current message stored in the smart contract. It will make a read call to the Hello World smart contract using the Alchemy Web3 API (opens in a new tab).connectWallet- this function will connect the user's MetaMask to our dapp.getCurrentWalletConnected- this function will check if an Ethereum account is already connected to our dapp on page load and update our UI accordingly.updateMessage- this function will update the message stored in the smart contract. It will make a write call to the Hello World smart contract, so the user's MetaMask wallet will have to sign an Ethereum transaction to update the message.
Now that we understand what we're working with, let's figure out how to read from our smart contract!
Step 3: Read from your smart contract
To read from your smart contract, you'll need to successfully set up:
- An API connection to the Ethereum chain
- A loaded instance of your smart contract
- A function to call to your smart contract function
- A listener to watch for updates when the data you're reading from the smart contract changes
This may sounds like a lot of steps, but don't worry! We'll walk you through how to do each of them step-by-step! :)
Establish an API connection to the Ethereum chain
So remember how in Part 2 of this tutorial, we used our Alchemy Web3 key to read from our smart contract (opens in a new tab)? You'll also need an Alchemy Web3 key in your dapp to read from the chain.
If you don't have it already, first install Alchemy Web3 (opens in a new tab) by navigating to the root directory of your starter-files and running the following in your terminal:
1npm install @alch/alchemy-web3Alchemy Web3 (opens in a new tab), Web3.js (opens in a new tab) için bir sarmalayıcıdır ve bir web3 geliştiricisi olarak hayatınızı kolaylaştırmak için gelişmiş API yöntemleri ve diğer önemli avantajları sağlar. Uygulamanızda hemen kullanmaya başlayabilmeniz için minimum yapılandırma gerektirecek şekilde tasarlanmıştır!
Then, install the dotenv (opens in a new tab) package in your project directory, so we have a secure place to store our API key after we fetch it.
1npm install dotenv --saveFor our dapp, we'll be using our Websockets API key instead of our HTTP API key, as it will allow us to set up a listener that detects when the message stored in the smart contract changes.
Once you have your API key, create a .env file in your root directory and add your Alchemy Websockets url to it. Afterwards, your .env file should look like so:
1REACT_APP_ALCHEMY_KEY = wss://eth-goerli.ws.alchemyapi.io/v2/<key>Now, we're ready to set up our Alchemy Web3 endpoint in our dapp! Let's go back to our interact.js, which is nested inside our util folder and add the following code at the top of the file:
1// interact.js23require("dotenv").config()4const alchemyKey = process.env.REACT_APP_ALCHEMY_KEY5const { createAlchemyWeb3 } = require("@alch/alchemy-web3")6const web3 = createAlchemyWeb3(alchemyKey)78//export const helloWorldContract;Above, we first imported the Alchemy key from our .env file and then passed our alchemyKey to createAlchemyWeb3 to establish our Alchemy Web3 endpoint.
With this endpoint ready, it's time to load our smart contract!
Loading your Hello World smart contract
To load your Hello World smart contract, you'll need its contract address and ABI, both of which can be found on Etherscan if you completed Part 3 of this tutorial.
How to get your contract ABI from Etherscan
If you skipped Part 3 of this tutorial, you can use the HelloWorld contract with address 0x6f3f635A9762B47954229Ea479b4541eAF402A6A (opens in a new tab). Its ABI can be found here (opens in a new tab).
A contract ABI is necessary for specifying which function a contract will invoke as well ensuring that the function will return data in the format you're expecting. Once we've copied our contract ABI, let's save it as a JSON file called contract-abi.json in your src directory.
Your contract-abi.json should be stored in your src folder.
Armed with our contract address, ABI, and Alchemy Web3 endpoint, we can use the contract method (opens in a new tab) to load an instance of our smart contract. Import your contract ABI into the interact.js file and add your contract address.
1// interact.js23const contractABI = require("../contract-abi.json")4const contractAddress = "0x6f3f635A9762B47954229Ea479b4541eAF402A6A"We can now finally uncomment our helloWorldContract variable, and load the smart contract using our AlchemyWeb3 endpoint:
1// interact.js2export const helloWorldContract = new web3.eth.Contract(3 contractABI,4 contractAddress5)To recap, the first 12 lines of your interact.js should now look like this:
1// interact.js23require("dotenv").config()4const alchemyKey = process.env.REACT_APP_ALCHEMY_KEY5const { createAlchemyWeb3 } = require("@alch/alchemy-web3")6const web3 = createAlchemyWeb3(alchemyKey)78const contractABI = require("../contract-abi.json")9const contractAddress = "0x6f3f635A9762B47954229Ea479b4541eAF402A6A"1011export const helloWorldContract = new web3.eth.Contract(12 contractABI,13 contractAddress14)Tümünü gösterNow that we have our contract loaded, we can implement our loadCurrentMessage function!
Implementing loadCurrentMessage in your interact.js file
This function is super simple. We're going make a simple async web3 call to read from our contract. Our function will return the message stored in the smart contract:
Update the loadCurrentMessage in your interact.js file to the following:
1// interact.js23export const loadCurrentMessage = async () => {4 const message = await helloWorldContract.methods.message().call()5 return message6}Since we want to display this smart contract in our UI, let's update the useEffect function in our HelloWorld.js component to the following:
1// HelloWorld.js23//called only once4useEffect(async () => {5 const message = await loadCurrentMessage()6 setMessage(message)7}, [])Note, we only want our loadCurrentMessage to be called once during the component's first render. We'll soon implement addSmartContractListener to automatically update the UI after the message in the smart contract changes.
Before we dive into our listener, let's check out what we have so far! Save your HelloWorld.js and interact.js files, and then go to http://localhost:3000/ (opens in a new tab)
You'll notice that the current message no longer says "No connection to the network." Instead it reflects the message stored in the smart contract. Sick!
Your UI should now reflect the message stored in the smart contract
Now speaking of that listener...
Implement addSmartContractListener
If you think back to the HelloWorld.sol file we wrote in Part 1 of this tutorial series (opens in a new tab), you'll recall that there is a smart contract event called UpdatedMessages that is emitted after our smart contract's update function is invoked (see lines 9 and 27):
1// HelloWorld.sol23// Specifies the version of Solidity, using semantic versioning.4// Learn more: https://solidity.readthedocs.io/en/v0.5.10/layout-of-source-files.html#pragma5pragma solidity ^0.7.3;67// Defines a contract named `HelloWorld`.8// A contract is a collection of functions and data (its state). Once deployed, a contract resides at a specific address on the Ethereum blockchain. Learn more: https://solidity.readthedocs.io/en/v0.5.10/structure-of-a-contract.html9contract HelloWorld {1011 //Emitted when update function is called12 //Smart contract events are a way for your contract to communicate that something happened on the blockchain to your app front-end, which can be 'listening' for certain events and take action when they happen.13 event UpdatedMessages(string oldStr, string newStr);1415 // Declares a state variable `message` of type `string`.16 // State variables are variables whose values are permanently stored in contract storage. The keyword `public` makes variables accessible from outside a contract and creates a function that other contracts or clients can call to access the value.17 string public message;1819 // Similar to many class-based object-oriented languages, a constructor is a special function that is only executed upon contract creation.20 // Constructors are used to initialize the contract's data. Learn more:https://solidity.readthedocs.io/en/v0.5.10/contracts.html#constructors21 constructor(string memory initMessage) {2223 // Accepts a string argument `initMessage` and sets the value into the contract's `message` storage variable).24 message = initMessage;25 }2627 // A public function that accepts a string argument and updates the `message` storage variable.28 function update(string memory newMessage) public {29 string memory oldMsg = message;30 message = newMessage;31 emit UpdatedMessages(oldMsg, newMessage);32 }33}Tümünü gösterSmart contract events are a way for your contract to communicate that something happened (i.e., there was an event) on the blockchain to your front-end application, which can be 'listening' for specific events and take action when they happen.
The addSmartContractListener function is going to specifically listen for our Hello World smart contract's UpdatedMessages event, and update our UI to display the new message.
Modify addSmartContractListener to the following:
1// HelloWorld.js23function addSmartContractListener() {4 helloWorldContract.events.UpdatedMessages({}, (error, data) => {5 if (error) {6 setStatus("😥 " + error.message)7 } else {8 setMessage(data.returnValues[1])9 setNewMessage("")10 setStatus("🎉 Your message has been updated!")11 }12 })13}Tümünü gösterLet's break down what happens when the listener detects an event:
- If an error occurs when the event is emitted, it will be reflected in the UI via our
statusstate variable. - Otherwise, we will use the
dataobject returned. Thedata.returnValuesis an array indexed at zero where the first element in the array stores the previous message and second element stores the updated one. Altogether, on a successful event we'll set ourmessagestring to the updated message, clear thenewMessagestring, and update ourstatusstate variable to reflect that a new message has been published on our smart contract.
Finally, let's call our listener in our useEffect function so it is initialized on the HelloWorld.js component's first render. Altogether, your useEffect function should look like this:
1// HelloWorld.js23useEffect(async () => {4 const message = await loadCurrentMessage()5 setMessage(message)6 addSmartContractListener()7}, [])Now that we're able to read from our smart contract, it would be great to figure out how to write to it too! However, to write to our dapp, we must first have an Ethereum wallet connected to it.
So, next we'll tackle setting up our Ethereum wallet (MetaMask) and then connecting it to our dapp!
Step 4: Set up your Ethereum wallet
To write anything to the Ethereum chain, users must sign transactions using their virtual wallet's private keys. For this tutorial, we’ll use MetaMask (opens in a new tab), a virtual wallet in the browser used to manage your Ethereum account address, as it makes this transaction signing super easy for the end-user.
Ethereum'daki işlemlerin nasıl çalıştığı hakkında daha fazla bilgi edinmek istiyorsanız, Ethereum Vakfı'nın bu sayfasına göz atın.
MetaMask'ı indirin
MetaMask'ı buradan (opens in a new tab) ücretsiz indirip bir hesap oluşturabilirsiniz. When you are creating an account, or if you already have an account, make sure to switch over to the “Goerli Test Network” in the upper right (so that we’re not dealing with real money).
Add ether from a Faucet
To sign a transaction on the Ethereum blockchain, we’ll need some fake Eth. To get Eth you can go to the FaucETH (opens in a new tab) and enter your Goerli account address, click “Request funds”, then select “Ethereum Testnet Goerli” in the dropdown and finally click “Request funds” button again. Kısa bir süre sonra MetaMask hesabınızda Eth'i görmelisiniz!
Check your Balance
Bakiyemizin orada olup olmadığını iki kez kontrol etmek için Alchemy’nin composer aracını (opens in a new tab) kullanarak bir eth_getBalance (opens in a new tab) isteği yapalım. Bu, cüzdanımızdaki Eth miktarını döndürür. MetaMask hesap adresinizi girdikten ve "Send Request"e tıkladıktan sonra aşağıdaki gibi bir yanıt görmelisiniz:
1{"jsonrpc": "2.0", "id": 0, "result": "0xde0b6b3a7640000"}NOT: Bu sonuç eth cinsinden değil wei cinsindendir. Wei, ether'ın en küçük birimi olarak kullanılır. Wei'den eth'e dönüşüm: 1 eth = 10¹⁸ wei. Yani 0xde0b6b3a7640000'ı ondalık sayıya dönüştürürsek 1*10¹⁸ elde ederiz, bu da 1 eth'e eşittir.
Vay be! Tüm sahte paramız yerinde! 🤑
Step 5: Connect MetaMask to your UI
Artık MetaMask cüzdanımız kurulduğuna göre, merkeziyetsiz uygulamamızı ona bağlayalım!
The connectWallet function
In our interact.jsfile, let's implement the connectWallet function, which we can then call in our HelloWorld.js component.
Let's modify connectWallet to the following:
1// interact.js23export const connectWallet = async () => {4 if (window.ethereum) {5 try {6 const addressArray = await window.ethereum.request({7 method: "eth_requestAccounts",8 })9 const obj = {10 status: "👆🏽 Write a message in the text-field above.",11 address: addressArray[0],12 }13 return obj14 } catch (err) {15 return {16 address: "",17 status: "😥 " + err.message,18 }19 }20 } else {21 return {22 address: "",23 status: (24 <span>25 <p>26 {" "}27 🦊 <a target="_blank" href={`https://metamask.io/download`}>28 You must install MetaMask, a virtual Ethereum wallet, in your29 browser.30 </a>31 </p>32 </span>33 ),34 }35 }36}Tümünü gösterSo what does this giant block of code do exactly?
Well, first, it checks if it window.ethereum is enabled in your browser.
window.ethereum, MetaMask ve diğer cüzdan sağlayıcıları tarafından eklenen ve web sitelerinin kullanıcıların Ethereum hesaplarını talep etmesine olanak tanıyan küresel bir API'dir. If approved, it can read data from the blockchains the user is connected to, and suggest that the user sign messages and transactions . Daha fazla bilgi için MetaMask belgelerine (opens in a new tab) göz atın!
Eğer window.ethereum mevcut değilse, bu MetaMask'in kurulu olmadığı anlamına gelir. Bu, döndürülen address'in boş bir dize olduğu ve status JSX nesnesinin kullanıcının MetaMask'i yüklemesi gerektiğini ilettiği bir JSON nesnesinin döndürülmesiyle sonuçlanır.
Eğer window.ethereum mevcut ise, o zaman işler ilginçleşir.
Bir try/catch döngüsü kullanarak, window.ethereum.request({ method: \"eth_requestAccounts\" }); (opens in a new tab) çağrısı yaparak MetaMask'e bağlanmaya çalışacağız. Bu fonksiyonun çağrılması, tarayıcıda MetaMask'i açar ve bu sayede kullanıcıdan cüzdanını merkeziyetsiz uygulamanıza bağlaması istenir.
- If the user chooses to connect,
method: "eth_requestAccounts"will return an array that contains all of the user's account addresses that connected to the dapp. Sonuç olarak,connectWalletfonksiyonumuz bu dizideki ilkaddress'i (bkz. satır 9) ve kullanıcıyı akıllı sözleşmeye bir mesaj yazmaya yönlendiren birstatusmesajını içeren bir JSON nesnesi döndürecektir. - Kullanıcı bağlantıyı reddederse JSON nesnesi, döndürülen
addressiçin boş bir dize ve kullanıcının bağlantıyı reddettiğini yansıtan birstatusmesajı içerir.
Now that we've written this connectWallet function, the next step is to call it to our HelloWorld.jscomponent.
Add the connectWallet function to your HelloWorld.js UI Component
Navigate to the connectWalletPressed function in HelloWorld.js, and update it to the following:
1// HelloWorld.js23const connectWalletPressed = async () => {4 const walletResponse = await connectWallet()5 setStatus(walletResponse.status)6 setWallet(walletResponse.address)7}Notice how most of our functionality is abstracted away from our HelloWorld.js component from the interact.js file? Bu, M-V-C paradigmasına uymamız içindir!
connectWalletPressed içinde, içe aktarılan connectWallet fonksiyonumuza bir await çağrısı yaparız ve yanıtını kullanarak status ve walletAddress değişkenlerimizi durum kancaları aracılığıyla güncelleriz.
Now, let's save both files (HelloWorld.js and interact.js) and test out our UI so far.
Open your browser on the http://localhost:3000/ (opens in a new tab) page, and press the "Connect Wallet" button on the top right of the page.
MetaMask yüklüyse, cüzdanınızı merkeziyetsiz uygulamanıza bağlamanız istenecektir. Bağlanmak için daveti kabul edin.
You should see that the wallet button now reflects that your address is connected! Yasssss 🔥
Şimdi, sayfayı yenilemeyi deneyin... bu garip. Cüzdan düğmemiz zaten bağlı olmasına rağmen MetaMask'i bağlamamızı istiyor...
However, have no fear! We easily can address that (get it?) by implementing getCurrentWalletConnected, which will check if an address is already connected to our dapp and update our UI accordingly!
The getCurrentWalletConnected function
Update your getCurrentWalletConnected function in the interact.js file to the following:
1// interact.js23export const getCurrentWalletConnected = async () => {4 if (window.ethereum) {5 try {6 const addressArray = await window.ethereum.request({7 method: "eth_accounts",8 })9 if (addressArray.length > 0) {10 return {11 address: addressArray[0],12 status: "👆🏽 Write a message in the text-field above.",13 }14 } else {15 return {16 address: "",17 status: "🦊 Connect to MetaMask using the top right button.",18 }19 }20 } catch (err) {21 return {22 address: "",23 status: "😥 " + err.message,24 }25 }26 } else {27 return {28 address: "",29 status: (30 <span>31 <p>32 {" "}33 🦊 <a target="_blank" href={`https://metamask.io/download`}>34 You must install MetaMask, a virtual Ethereum wallet, in your35 browser.36 </a>37 </p>38 </span>39 ),40 }41 }42}Tümünü gösterThis code is very similar to the connectWallet function we just wrote in the previous step.
Temel fark, kullanıcının cüzdanını bağlaması için MetaMask'i açan eth_requestAccounts yöntemini çağırmak yerine, burada yalnızca merkeziyetsiz uygulamamıza bağlı olan MetaMask adreslerini içeren bir dizi döndüren eth_accounts yöntemini çağırıyoruz.
To see this function in action, let's call it in our useEffect function of our HelloWorld.js component:
1// HelloWorld.js23useEffect(async () => {4 const message = await loadCurrentMessage()5 setMessage(message)6 addSmartContractListener()78 const { address, status } = await getCurrentWalletConnected()9 setWallet(address)10 setStatus(status)11}, [])Tümünü gösterDikkat edin, getCurrentWalletConnected çağrımızın yanıtını walletAddress ve status durum değişkenlerimizi güncellemek için kullanıyoruz.
Now that you've added this code, let's try refreshing our browser window.
Niceeeee! Düğme, bağlı olduğunuzu söylemeli ve yeniledikten sonra bile bağlı cüzdanınızın adresinin bir önizlemesini göstermelidir!
Implement addWalletListener
Merkeziyetsiz uygulama cüzdanı kurulumumuzun son adımı, örneğin kullanıcı bağlantısını keserek veya hesap değiştirerek cüzdanımızın durumunu değiştirdiğinde kullanıcı arayüzümüzün güncellenmesi için cüzdan dinleyicisini uygulamaktır.
In your HelloWorld.js file, modify your addWalletListener function as the following:
1// HelloWorld.js23function addWalletListener() {4 if (window.ethereum) {5 window.ethereum.on("accountsChanged", (accounts) => {6 if (accounts.length > 0) {7 setWallet(accounts[0])8 setStatus("👆🏽 Write a message in the text-field above.")9 } else {10 setWallet("")11 setStatus("🦊 Connect to MetaMask using the top right button.")12 }13 })14 } else {15 setStatus(16 <p>17 {" "}18 🦊 <a target="_blank" href={`https://metamask.io/download`}>19 You must install MetaMask, a virtual Ethereum wallet, in your browser.20 </a>21 </p>22 )23 }24}Tümünü gösterI bet you don't even need our help to understand what's going on here at this point, but for thoroughness purposes, let's quickly break it down:
- İlk olarak fonksiyonumuz
window.ethereum'un etkin olup olmadığını kontrol eder (yani MetaMask'in kurulu olup olmadığını).- Etkin değilse,
statusdurum değişkenimizi, kullanıcıyı MetaMask'i yüklemeye yönlendiren bir JSX dizesine ayarlarız. - Etkinleştirilmişse, kullanıcının merkeziyetsiz uygulamaya ek bir hesap bağlaması, hesapları değiştirmesi veya bir hesabın bağlantısını kesmesi gibi MetaMask cüzdanındaki durum değişikliklerini dinleyen
window.ethereum.on(\"accountsChanged\")dinleyicisini 3. satırda kurarız. Bağlı en az bir hesap varsa,walletAddressdurum değişkeni, dinleyici tarafından döndürülenaccountsdizisindeki ilk hesap olarak güncellenir. Aksi takdirde,walletAddressboş bir dize olarak ayarlanır.
- Etkin değilse,
Last but not least, we must call it in our useEffect function:
1// HelloWorld.js23useEffect(async () => {4 const message = await loadCurrentMessage()5 setMessage(message)6 addSmartContractListener()78 const { address, status } = await getCurrentWalletConnected()9 setWallet(address)10 setStatus(status)1112 addWalletListener()13}, [])Tümünü gösterİşte bu kadar! We've successfully completed programming all of our wallet functionality! Now onto our last task: updating the message stored in our smart contract!
Step 6: Implement the updateMessage function
Alrighty fam, we've arrived at the home stretch! In the updateMessage of your interact.js file, we're going to do the following:
- Make sure the message we wish to publish in our smart contact is valid
- Sign our transaction using MetaMask
- Call this function from our
HelloWorld.jsfrontend component
This won't take very long; let's finish this dapp!
Giriş hata yönetimi
Naturally, it makes sense to have some sort of input error handling at the start of the function.
We'll want our function to return early if there is no MetaMask extension installed, there is no wallet connected (i.e., the address passed in is an empty string), or the message is an empty string. Let's add the following error handling to updateMessage:
1// interact.js23export const updateMessage = async (address, message) => {4 if (!window.ethereum || address === null) {5 return {6 status:7 "💡 Connect your MetaMask wallet to update the message on the blockchain.",8 }9 }1011 if (message.trim() === "") {12 return {13 status: "❌ Your message cannot be an empty string.",14 }15 }16}Tümünü gösterNow that it have proper input error handling, it's time to sign the transaction via MetaMask!
Signing our transaction
If you're already comfortable with traditional web3 Ethereum transactions, the code we write next will be very familiar. Below your input error handling code, add the following to updateMessage:
1// interact.js23//set up transaction parameters4const transactionParameters = {5 to: contractAddress, // Required except during contract publications.6 from: address, // must match user's active address.7 data: helloWorldContract.methods.update(message).encodeABI(),8}910//sign the transaction11try {12 const txHash = await window.ethereum.request({13 method: "eth_sendTransaction",14 params: [transactionParameters],15 })16 return {17 status: (18 <span>19 ✅{" "}20 <a target="_blank" href={`https://goerli.etherscan.io/tx/${txHash}`}>21 View the status of your transaction on Etherscan!22 </a>23 <br />24 ℹ️ Once the transaction is verified by the network, the message will be25 updated automatically.26 </span>27 ),28 }29} catch (error) {30 return {31 status: "😥 " + error.message,32 }33}Tümünü gösterLet's breakdown what's happening. First, we set up our transactions parameters, where:
toalıcı adresini belirtir (akıllı sözleşmemiz)fromspecifies the signer of the transaction, theaddressvariable we passed into our functiondatacontains the call to our Hello World smart contract'supdatemethod, receiving ourmessagestring variable as input
Then, we make an await call, window.ethereum.request, where we ask MetaMask to sign the transaction. Notice, on lines 11 and 12, we're specifying our eth method, eth_sendTransactionand passing in our transactionParameters.
Bu noktada, MetaMask tarayıcıda açılır ve kullanıcıdan işlemi imzalamasını veya reddetmesini ister.
- If the transaction is successful, the function will return a JSON object where the
statusJSX string prompts the user to check out Etherscan for more information about their transaction. - If the transaction fails, the function will return a JSON object where the
statusstring relays the error message.
Altogether, our updateMessage function should look like this:
1// interact.js23export const updateMessage = async (address, message) => {4 //input error handling5 if (!window.ethereum || address === null) {6 return {7 status:8 "💡 Connect your MetaMask wallet to update the message on the blockchain.",9 }10 }1112 if (message.trim() === "") {13 return {14 status: "❌ Your message cannot be an empty string.",15 }16 }1718 //set up transaction parameters19 const transactionParameters = {20 to: contractAddress, // Required except during contract publications.21 from: address, // must match user's active address.22 data: helloWorldContract.methods.update(message).encodeABI(),23 }2425 //sign the transaction26 try {27 const txHash = await window.ethereum.request({28 method: "eth_sendTransaction",29 params: [transactionParameters],30 })31 return {32 status: (33 <span>34 ✅{" "}35 <a target="_blank" href={`https://goerli.etherscan.io/tx/${txHash}`}>36 View the status of your transaction on Etherscan!37 </a>38 <br />39 ℹ️ Once the transaction is verified by the network, the message will40 be updated automatically.41 </span>42 ),43 }44 } catch (error) {45 return {46 status: "😥 " + error.message,47 }48 }49}Tümünü gösterLast but not least, we need to connect our updateMessage function to our HelloWorld.js component.
Connect updateMessage to the HelloWorld.js frontend
Our onUpdatePressed function should make an await call to the imported updateMessage function and modify the status state variable to reflect whether our transaction succeeded or failed:
1// HelloWorld.js23const onUpdatePressed = async () => {4 const { status } = await updateMessage(walletAddress, newMessage)5 setStatus(status)6}It's super clean and simple. And guess what... YOUR DAPP IS COMPLETE!!!
Go ahead and test out the Update button!
Make your own custom dapp
Wooooo, you made it to the end of the tutorial! To recap, you learned how to:
- Connect a MetaMask wallet to your dapp project
- Read data from your smart contract using the Alchemy Web3 (opens in a new tab) API
- Sign Ethereum transactions using MetaMask
Now you're fully equipped to apply the skills from this tutorial to build out your own custom dapp project! As always, if you have any questions, don't hesitate to reach out to us for help in the Alchemy Discord (opens in a new tab). 🧙♂️
Once you complete this tutorial, let us know how your experience was or if you have any feedback by tagging us on Twitter @alchemyplatform (opens in a new tab)!
Sayfanın son güncellenmesi: 26 Şubat 2026


