Hello World Smart Vertrag für Anfänger - Fullstack
Dieser Leitfaden ist für dich, wenn du neu in der Blockchain-Entwicklung bist und nicht weißt, wo du anfangen sollst oder wie du Smart Contracts bereitstellst und mit ihnen interagierst. Wir werden das Erstellen und Bereitstellen eines einfachen Smart Contracts im Goerli-Testnetz unter Verwendung von MetaMask (opens in a new tab), Solidity (opens in a new tab), Hardhat (opens in a new tab) und Alchemy (opens in a new tab) durchgehen.
Du benötigst ein Alchemy-Konto, um dieses Tutorial abzuschließen. Melde dich für ein kostenloses Konto an (opens in a new tab).
Wenn du an irgendeinem Punkt Fragen hast, kannst du dich gerne im Alchemy Discord (opens in a new tab) melden!
Teil 1 – Erstellen und Bereitstellen Ihres Smart Contracts mit Hardhat
Mit dem Ethereum-Netzwerk verbinden
Es gibt viele Möglichkeiten, Anfragen an die Ethereum-Chain zu stellen. Der Einfachheit halber verwenden wir ein kostenloses Konto bei Alchemy, einer Blockchain-Entwicklerplattform und API, die es uns ermöglicht, mit der Ethereum-Chain zu kommunizieren, ohne selbst einen Knoten betreiben zu müssen. Alchemy verfügt auch über Entwicklertools für Überwachung und Analysen; wir werden diese in diesem Tutorial nutzen, um zu verstehen, was bei unserer Smart-Contract-Bereitstellung im Hintergrund passiert.
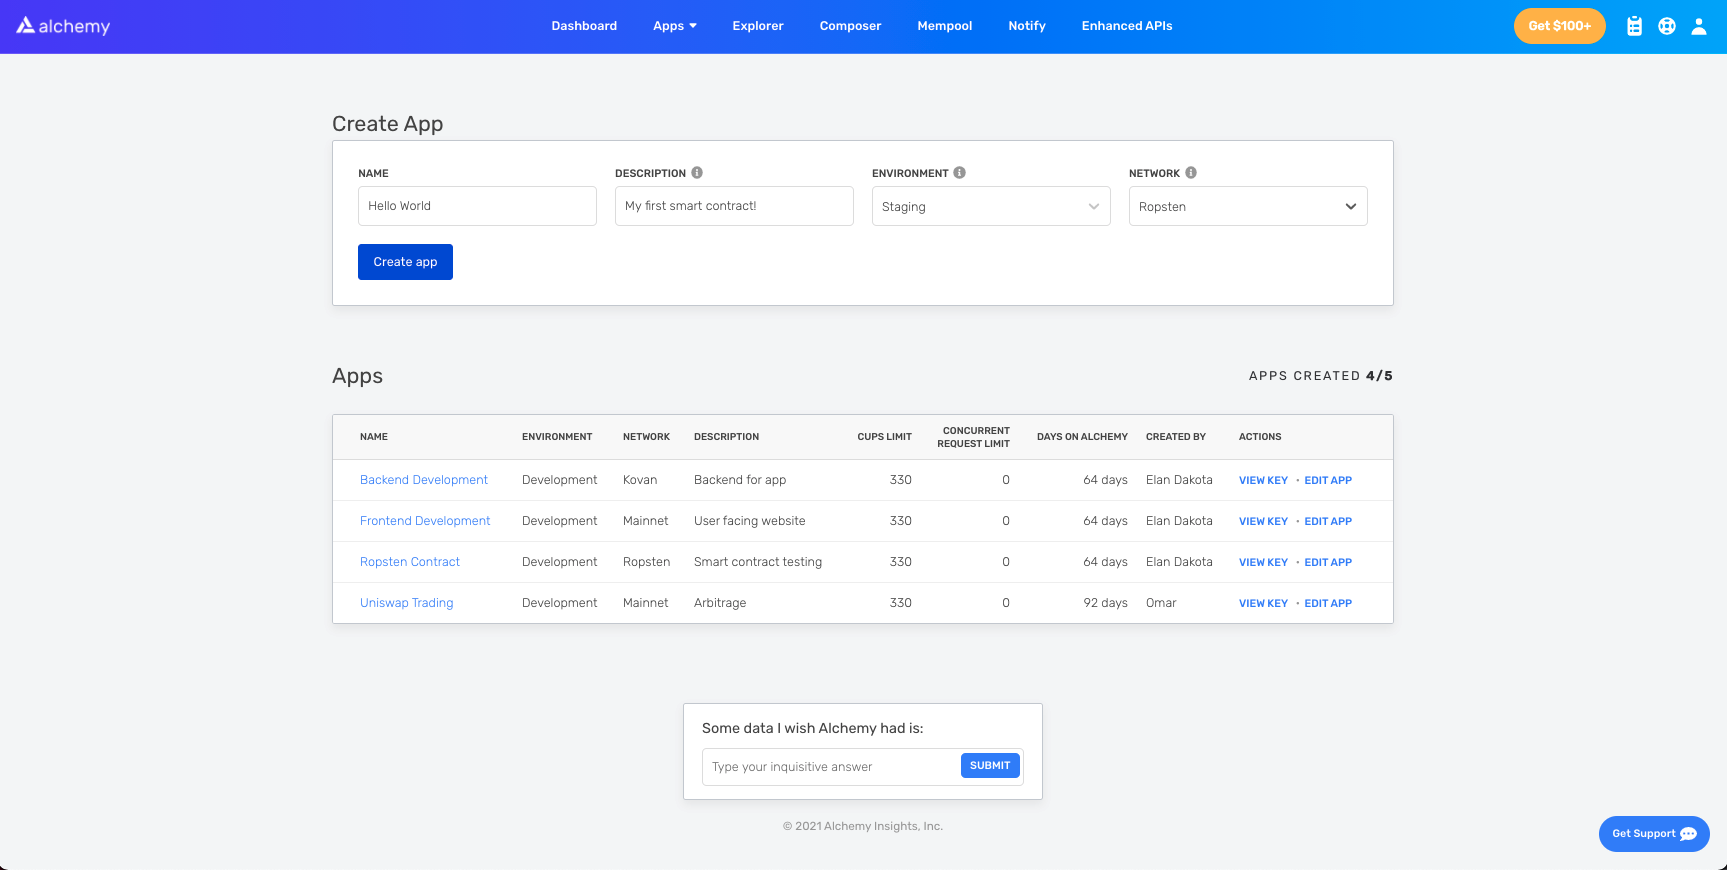
Erstellen Sie Ihre App und Ihren API-Schlüssel
Sobald Sie ein Alchemy-Konto erstellt haben, können Sie einen API-Schlüssel generieren, indem Sie eine App erstellen. Dies ermöglicht es Ihnen, Anfragen an das Goerli-Testnetz zu stellen. Wenn Sie nicht mit Testnetzen vertraut sind, können Sie Alchemys Leitfaden zur Auswahl eines Netzwerks lesen (opens in a new tab).
Suchen Sie im Alchemy-Dashboard das Dropdown-Menü Apps in der Navigationsleiste und klicken Sie auf Create App.
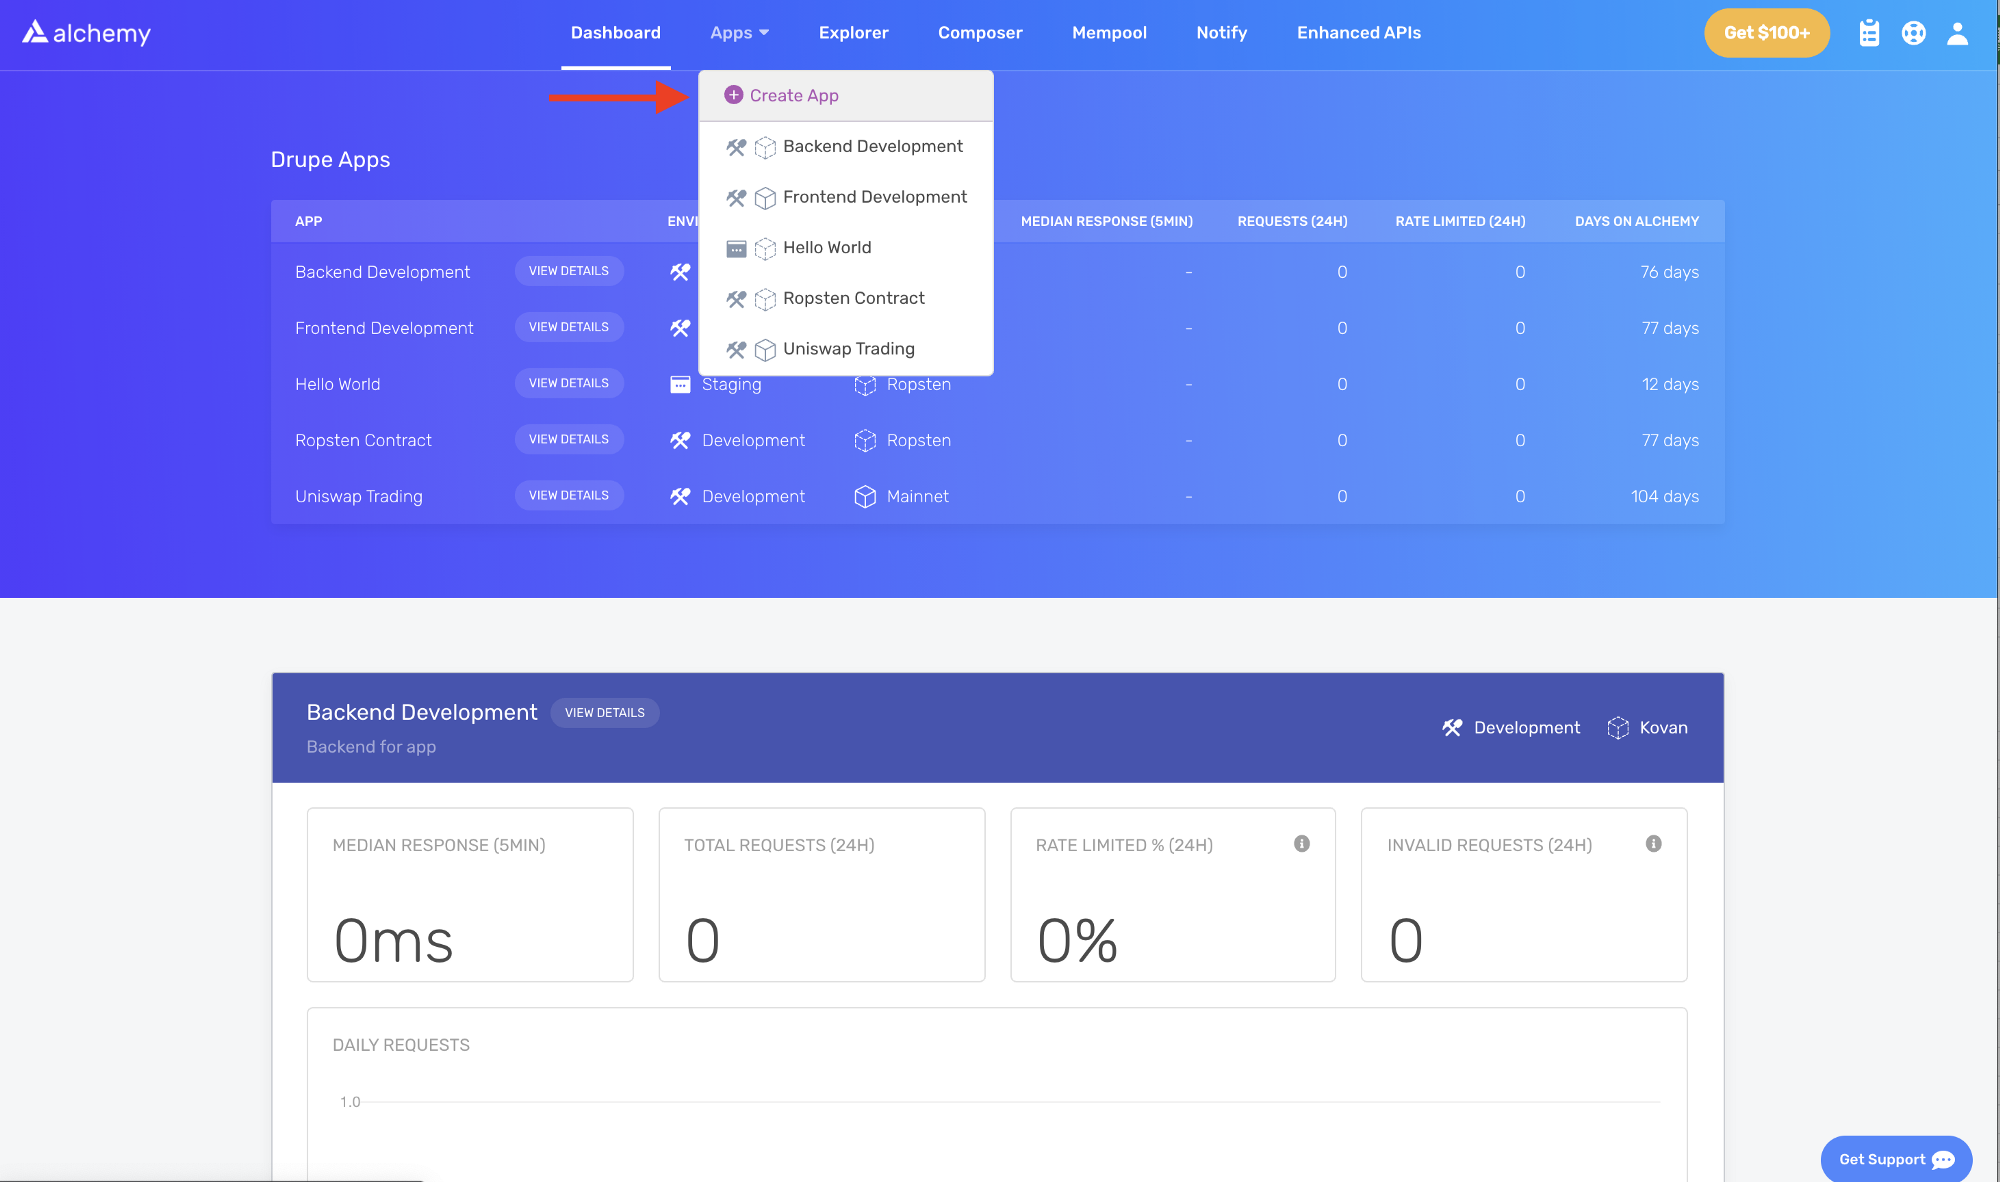
Geben Sie Ihrer App den Namen „Hello World“ und schreiben Sie eine kurze Beschreibung. Wählen Sie Staging als Ihre Umgebung und Goerli als Ihr Netzwerk.
Hinweis: Stellen Sie sicher, dass Sie Goerli auswählen, da dieses Tutorial sonst nicht funktioniert.
Klicken Sie auf Create app. Ihre App wird in der Tabelle unten angezeigt.
Erstellen Sie ein Ethereum-Konto
Sie benötigen ein Ethereum-Konto, um Transaktionen zu senden und zu empfangen. Wir verwenden MetaMask, eine virtuelle Wallet im Browser, mit der Benutzer ihre Ethereum-Konto-Adresse verwalten können.
Sie können hier (opens in a new tab) kostenlos MetaMask herunterladen und ein Konto erstellen. Wenn Sie ein Konto erstellen oder bereits eines haben, stellen Sie sicher, dass Sie oben rechts zum „Goerli Test Network“ wechseln (damit wir nicht mit echtem Geld hantieren).
Schritt 4: Ether von einem Faucet hinzufügen
Um Ihren Smart Contract im Testnetz bereitzustellen, benötigen Sie etwas falsches ETH. Um ETH im Goerli-Netzwerk zu erhalten, gehen Sie zu einem Goerli-Faucet und geben Sie Ihre Goerli-Konto-Adresse ein. Beachten Sie, dass Goerli-Faucets in letzter Zeit etwas unzuverlässig sein können – auf der Testnetz-Seite finden Sie eine Liste mit Optionen zum Ausprobieren:
Hinweis: Aufgrund von Netzwerküberlastung kann dies eine Weile dauern. ``
Schritt 5: Ihr Guthaben überprüfen
Um sicherzugehen, dass sich die ETH in Ihrer Wallet befinden, stellen wir eine eth_getBalance (opens in a new tab)-Anfrage über Alchemys Sandbox-Tool (opens in a new tab). Dies gibt die Menge an ETH in unserer Wallet zurück. Um mehr zu erfahren, sehen Sie sich Alchemys kurzes Tutorial zur Verwendung des Composer-Tools (opens in a new tab) an.
Geben Sie Ihre MetaMask-Konto-Adresse ein und klicken Sie auf Send Request. Sie werden eine Antwort sehen, die wie das folgende Code-Snippet aussieht.
{ "jsonrpc": "2.0", "id": 0, "result": "0x2B5E3AF16B1880000" }
Hinweis: Dieses Ergebnis ist in Wei, nicht in ETH. Wei wird als die kleinste Stückelung von Ether verwendet.
Puh! Unser falsches Geld ist komplett da.
Schritt 6: Unser Projekt initialisieren
Zuerst müssen wir einen Ordner für unser Projekt erstellen. Navigieren Sie zu Ihrer Kommandozeile und geben Sie Folgendes ein.
mkdir hello-world
cd hello-world
Da wir uns nun in unserem Projektordner befinden, verwenden wir npm init, um das Projekt zu initialisieren.
Wenn Sie npm noch nicht installiert haben, folgen Sie den Node.js-Installationsanweisungen (opens in a new tab), um Node.js und npm zu installieren.
Für die Zwecke dieses Tutorials spielt es keine Rolle, wie Sie die Initialisierungsfragen beantworten. Hier sehen Sie als Referenz, wie wir es gemacht haben:
package name: (hello-world)
version: (1.0.0)
description: hello world smart contract
entry point: (index.js)
test command:
git repository:
keywords:
author:
license: (ISC)

About to write to /Users/.../.../.../hello-world/package.json:

{
   "name": "hello-world",
   "version": "1.0.0",
   "description": "hello world smart contract",
   "main": "index.js",
   "scripts": {
      "test": "echo \"Error: no test specified\" && exit 1"
   },
   "author": "",
   "license": "ISC"
}
Bestätigen Sie die package.json und wir können loslegen!
Schritt 7: Hardhat herunterladen
Hardhat ist eine Entwicklungsumgebung zum Kompilieren, Bereitstellen, Testen und Debuggen Ihrer Ethereum-Software. Es hilft Entwicklern beim lokalen Erstellen von Smart Contracts und Dezentralen Anwendungen (Dapps), bevor diese auf der Live-Chain bereitgestellt werden.
Führen Sie in unserem hello-world-Projekt Folgendes aus:
npm install --save-dev hardhat
Auf dieser Seite finden Sie weitere Details zu den Installationsanweisungen (opens in a new tab).
Schritt 8: Hardhat-Projekt erstellen
Führen Sie in unserem hello-world-Projektordner Folgendes aus:
npx hardhat
Sie sollten dann eine Willkommensnachricht und die Option sehen, auszuwählen, was Sie tun möchten. Wählen Sie „create an empty hardhat.config.js“:
888 888 888 888 888
888 888 888 888 888
888 888 888 888 888
8888888888 8888b. 888d888 .d88888 88888b. 8888b. 888888
888 888 "88b 888P" d88" 888 888 "88b "88b 888
888 888 .d888888 888 888 888 888 888 .d888888 888
888 888 888 888 888 Y88b 888 888 888 888 888 Y88b.
888 888 "Y888888 888 "Y88888 888 888 "Y888888 "Y888
👷 Welcome to Hardhat v2.0.11 👷
What do you want to do? …
Create a sample project
❯ Create an empty hardhat.config.js
Quit
Dadurch wird eine hardhat.config.js-Datei im Projekt generiert. Wir werden diese später im Tutorial verwenden, um das Setup für unser Projekt festzulegen.
Schritt 9: Projektordner hinzufügen
Um das Projekt übersichtlich zu halten, erstellen wir zwei neue Ordner. Navigieren Sie in der Kommandozeile zum Stammverzeichnis Ihres hello-world-Projekts und geben Sie Folgendes ein:
mkdir contracts
mkdir scripts
- In
contracts/bewahren wir die Code-Datei unseres Hello-World-Smart-Contracts auf - In
scripts/bewahren wir Skripte auf, um unseren Vertrag bereitzustellen und mit ihm zu interagieren
Schritt 10: Unseren Vertrag schreiben
Sie fragen sich vielleicht, wann wir endlich Code schreiben werden? Es ist soweit!
Öffnen Sie das Hello-World-Projekt in Ihrem bevorzugten Editor. Smart Contracts werden am häufigsten in Solidity geschrieben, was wir auch verwenden werden, um unseren Smart Contract zu schreiben.
- Navigieren Sie zum Ordner
contractsund erstellen Sie eine neue Datei namensHelloWorld.sol - Unten finden Sie einen beispielhaften Hello-World-Smart-Contract, den wir für dieses Tutorial verwenden werden. Kopieren Sie den folgenden Inhalt in die Datei
HelloWorld.sol.
Hinweis: Lesen Sie unbedingt die Kommentare, um zu verstehen, was dieser Vertrag tut.
// Gibt die Solidity-Version unter Verwendung der semantischen Versionierung an.
// Mehr erfahren: https://solidity.readthedocs.io/en/v0.5.10/layout-of-source-files.html#pragma
pragma solidity >=0.7.3;

// Definiert einen Vertrag namens `HelloWorld`.
// Ein Vertrag ist eine Sammlung von Funktionen und Daten (seinem Zustand). Sobald er bereitgestellt ist, befindet sich ein Vertrag an einer bestimmten Adresse auf der Ethereum-Blockchain. Mehr erfahren: https://solidity.readthedocs.io/en/v0.5.10/structure-of-a-contract.html
contract HelloWorld {

   // Wird ausgegeben, wenn die Update-Funktion aufgerufen wird
   // Smart-Contract-Ereignisse sind eine Möglichkeit für Ihren Vertrag, dem Frontend Ihrer App mitzuteilen, dass etwas auf der Blockchain passiert ist. Das Frontend kann auf bestimmte Ereignisse „hören“ und entsprechend reagieren.
   event UpdatedMessages(string oldStr, string newStr);

   // Deklariert eine Zustandsvariable `message` vom Typ `string`.
   // Zustandsvariablen sind Variablen, deren Werte dauerhaft im Vertragsspeicher gespeichert werden. Das Schlüsselwort `public` macht Variablen von außerhalb eines Vertrags zugänglich und erstellt eine Funktion, die andere Verträge oder Clients aufrufen können, um auf den Wert zuzugreifen.
   string public message;

   // Ähnlich wie in vielen klassenbasierten objektorientierten Sprachen ist ein Konstruktor eine spezielle Funktion, die nur bei der Vertragserstellung ausgeführt wird.
   // Konstruktoren werden verwendet, um die Daten des Vertrags zu initialisieren. Mehr erfahren: https://solidity.readthedocs.io/en/v0.5.10/contracts.html#constructors
   constructor(string memory initMessage) {

      // Akzeptiert ein String-Argument `initMessage` und setzt den Wert in die Speichervariable `message` des Vertrags.
      message = initMessage;
   }

   // Eine öffentliche Funktion, die ein String-Argument akzeptiert und die Speichervariable `message` aktualisiert.
   function update(string memory newMessage) public {
      string memory oldMsg = message;
      message = newMessage;
      emit UpdatedMessages(oldMsg, newMessage);
   }
}
Dies ist ein einfacher Smart Contract, der bei der Erstellung eine Nachricht speichert. Er kann durch Aufrufen der Funktion update aktualisiert werden.
Schritt 11: MetaMask & Alchemy mit Ihrem Projekt verbinden
Wir haben eine MetaMask-Wallet und ein Alchemy-Konto erstellt sowie unseren Smart Contract geschrieben. Nun ist es an der Zeit, diese drei miteinander zu verbinden.
Jede von Ihrer Wallet gesendete Transaktion erfordert eine Signatur mit Ihrem eindeutigen privaten Schlüssel. Um unserem Programm diese Berechtigung zu erteilen, können wir unseren privaten Schlüssel sicher in einer Umgebungsdatei speichern. Wir werden hier auch einen API-Schlüssel für Alchemy speichern.
Um mehr über das Senden von Transaktionen zu erfahren, sehen Sie sich dieses Tutorial zum Senden von Transaktionen mit Web3 an.
Installieren Sie zunächst das dotenv-Paket in Ihrem Projektverzeichnis:
npm install dotenv --save
Erstellen Sie dann eine .env-Datei im Stammverzeichnis des Projekts. Fügen Sie Ihren privaten MetaMask-Schlüssel und die HTTP-Alchemy-API-URL hinzu.
Ihre Umgebungsdatei muss .env heißen, da sie sonst nicht als Umgebungsdatei erkannt wird.
Nennen Sie sie nicht process.env oder .env-custom oder irgendwie anders.
- Folgen Sie dieser Anleitung (opens in a new tab), um Ihren privaten Schlüssel zu exportieren
- Siehe unten, um die HTTP-Alchemy-API-URL zu erhalten
Ihre .env sollte so aussehen:
API_URL = "https://eth-goerli.alchemyapi.io/v2/your-api-key"
PRIVATE_KEY = "your-metamask-private-key"
Um diese tatsächlich mit unserem Code zu verbinden, werden wir in Schritt 13 in unserer Datei hardhat.config.js auf diese Variablen verweisen.
Schritt 12: Ethers.js installieren
Ethers.js ist eine Bibliothek, die die Interaktion und das Stellen von Anfragen an Ethereum erleichtert, indem sie Standard-JSON-RPC-Methoden in benutzerfreundlichere Methoden verpackt.
Hardhat ermöglicht es uns, Plugins (opens in a new tab) für zusätzliche Tools und erweiterte Funktionen zu integrieren. Wir werden das Ethers-Plugin (opens in a new tab) für die Vertragsbereitstellung nutzen.
Geben Sie in Ihrem Projektverzeichnis Folgendes ein:
npm install --save-dev @nomiclabs/hardhat-ethers "ethers@^5.0.0"
Schritt 13: hardhat.config.js aktualisieren
Wir haben bisher mehrere Abhängigkeiten und Plugins hinzugefügt. Nun müssen wir hardhat.config.js aktualisieren, damit unser Projekt von all diesen weiß.
Aktualisieren Sie Ihre hardhat.config.js, sodass sie wie folgt aussieht:
/**
 * @type import('hardhat/config').HardhatUserConfig
 */

require("dotenv").config()
require("@nomiclabs/hardhat-ethers")

const { API_URL, PRIVATE_KEY } = process.env

module.exports = {
  solidity: "0.7.3",
  defaultNetwork: "goerli",
  networks: {
    hardhat: {},
    goerli: {
      url: API_URL,
      accounts: [`0x${PRIVATE_KEY}`],
    },
  },
}
Schritt 14: Unseren Vertrag kompilieren
Um sicherzustellen, dass bisher alles funktioniert, lassen Sie uns unseren Vertrag kompilieren. Die Aufgabe compile ist eine der integrierten Hardhat-Aufgaben.
Führen Sie über die Kommandozeile Folgendes aus:
npx hardhat compile
Sie erhalten möglicherweise eine Warnung bezüglich SPDX license identifier not provided in source file, aber darüber müssen Sie sich keine Sorgen machen – hoffentlich sieht alles andere gut aus! Wenn nicht, können Sie jederzeit im Alchemy-Discord (opens in a new tab) nachfragen.
Schritt 15: Unser Bereitstellungsskript schreiben
Da unser Vertrag nun geschrieben ist und unsere Konfigurationsdatei einsatzbereit ist, ist es an der Zeit, unser Vertragsbereitstellungsskript zu schreiben.
Navigieren Sie zum Ordner scripts/ und erstellen Sie eine neue Datei namens deploy.js, der Sie folgenden Inhalt hinzufügen:
async function main() {
  const HelloWorld = await ethers.getContractFactory("HelloWorld")

  // Bereitstellung starten, gibt ein Promise zurück, das zu einem Vertragsobjekt aufgelöst wird
  const hello_world = await HelloWorld.deploy("Hello World!")
  console.log("Contract deployed to address:", hello_world.address)
}

main()
  .then(() => process.exit(0))
  .catch((error) => {
    console.error(error)
    process.exit(1)
  })
Hardhat leistet hervorragende Arbeit bei der Erklärung, was jede dieser Codezeilen in ihrem Vertrags-Tutorial (opens in a new tab) bewirkt; wir haben ihre Erklärungen hier übernommen.
const HelloWorld = await ethers.getContractFactory("HelloWorld")
Eine ContractFactory in ethers.js ist eine Abstraktion, die verwendet wird, um neue Smart Contracts bereitzustellen. HelloWorld ist hier also eine Fabrik (Factory) (opens in a new tab) für Instanzen unseres Hello-World-Vertrags. Bei Verwendung des hardhat-ethers-Plugins ContractFactory und Contract werden Instanzen standardmäßig mit dem ersten Unterzeichner (Eigentümer) verbunden.
const hello_world = await HelloWorld.deploy()
Der Aufruf von deploy() auf einer ContractFactory startet die Bereitstellung und gibt ein Promise zurück, das in ein Contract-Objekt aufgelöst wird. Dies ist das Objekt, das eine Methode für jede unserer Smart-Contract-Funktionen hat.
Schritt 16: Unseren Vertrag bereitstellen
Wir sind endlich bereit, unseren Smart Contract bereitzustellen! Navigieren Sie zur Kommandozeile und führen Sie Folgendes aus:
npx hardhat run scripts/deploy.js --network goerli
Sie sollten dann in etwa Folgendes sehen:
Contract deployed to address: 0x6cd7d44516a20882cEa2DE9f205bF401c0d23570
Bitte speichern Sie diese Adresse. Wir werden sie später im Tutorial verwenden.
Wenn wir zum Goerli-Etherscan (opens in a new tab) gehen und nach unserer Vertragsadresse suchen, sollten wir sehen können, dass er erfolgreich bereitgestellt wurde. Die Transaktion wird in etwa so aussehen:
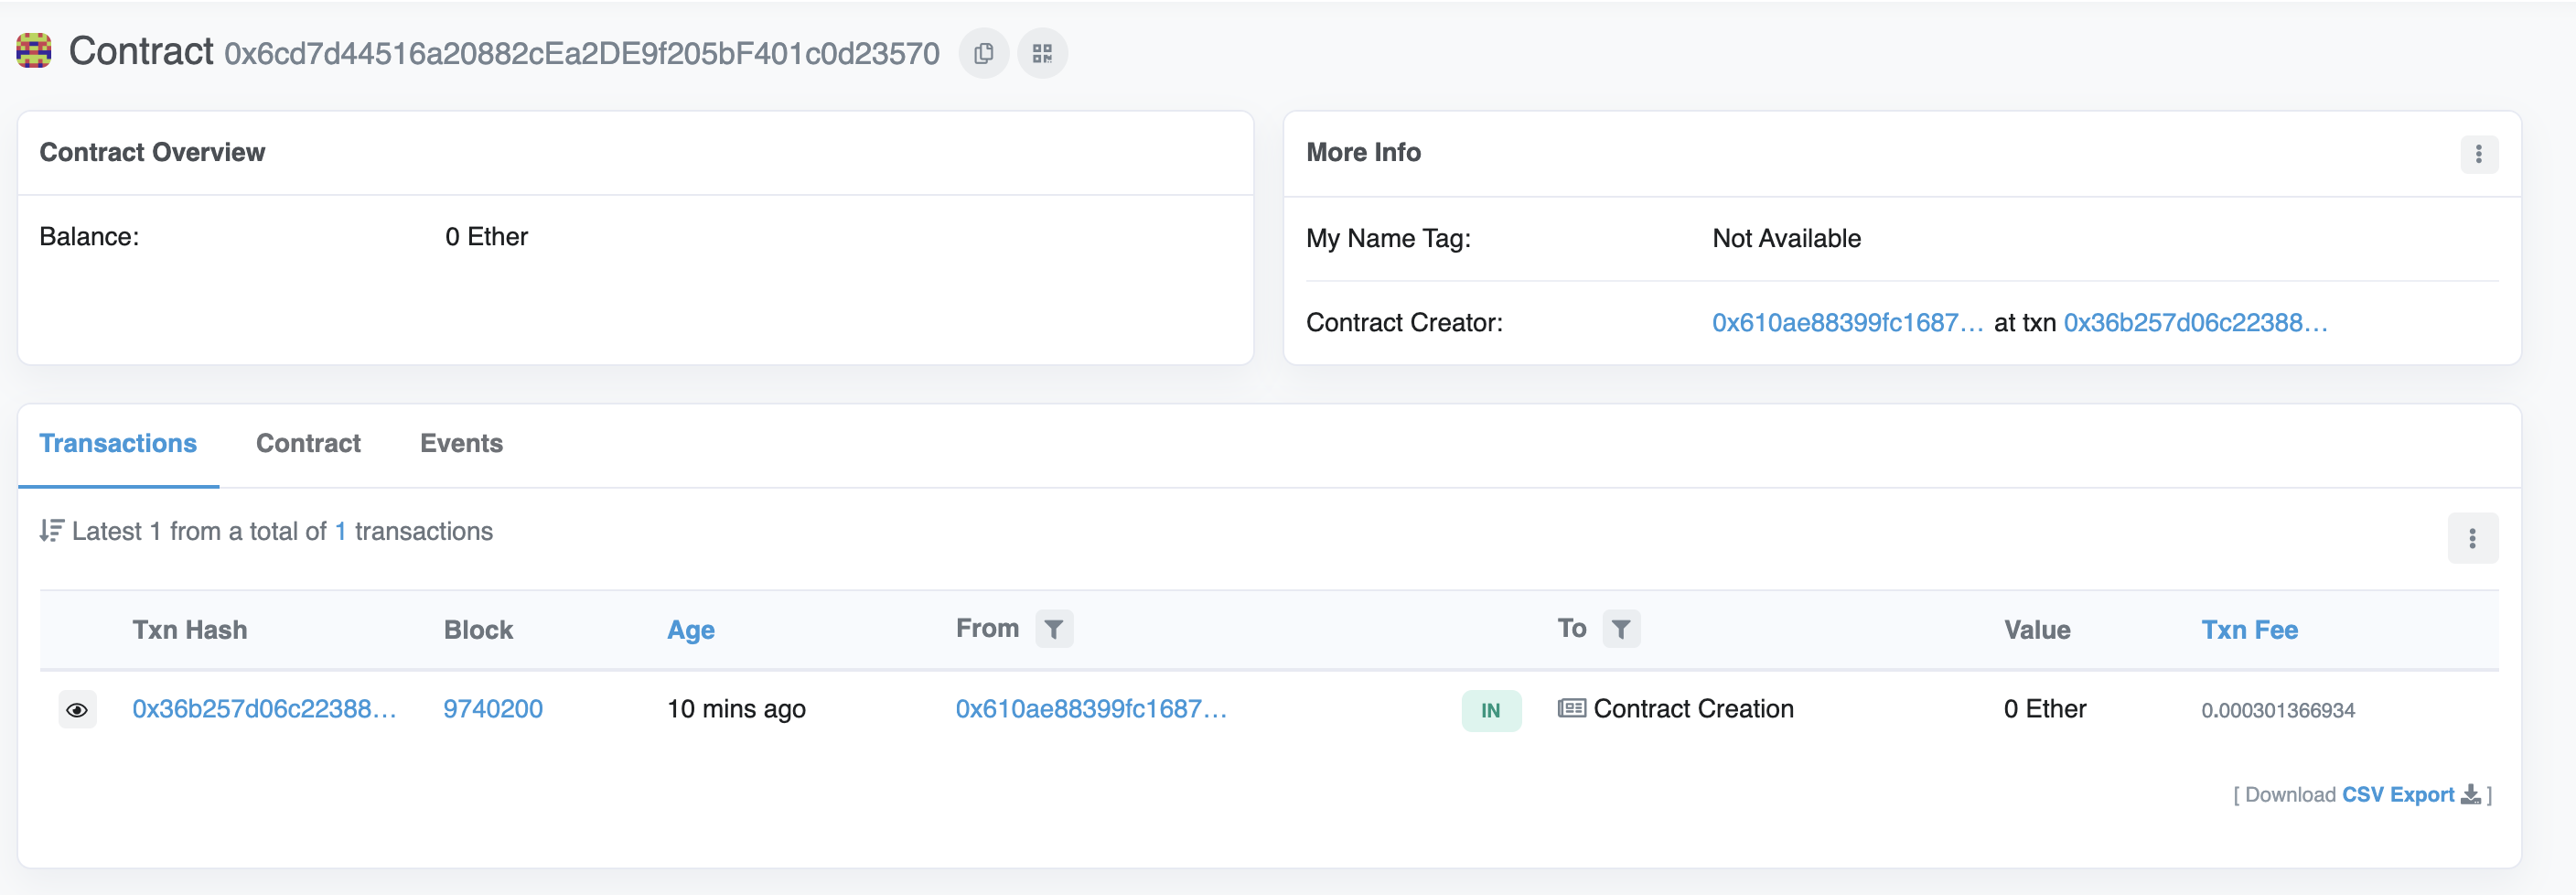
Die From-Adresse sollte mit Ihrer MetaMask-Konto-Adresse übereinstimmen und bei der To-Adresse wird Contract Creation stehen. Wenn wir in die Transaktion klicken, sehen wir unsere Vertragsadresse im Feld To.
![]()
Glückwunsch! Sie haben gerade einen Smart Contract in einem Ethereum-Testnetz bereitgestellt.
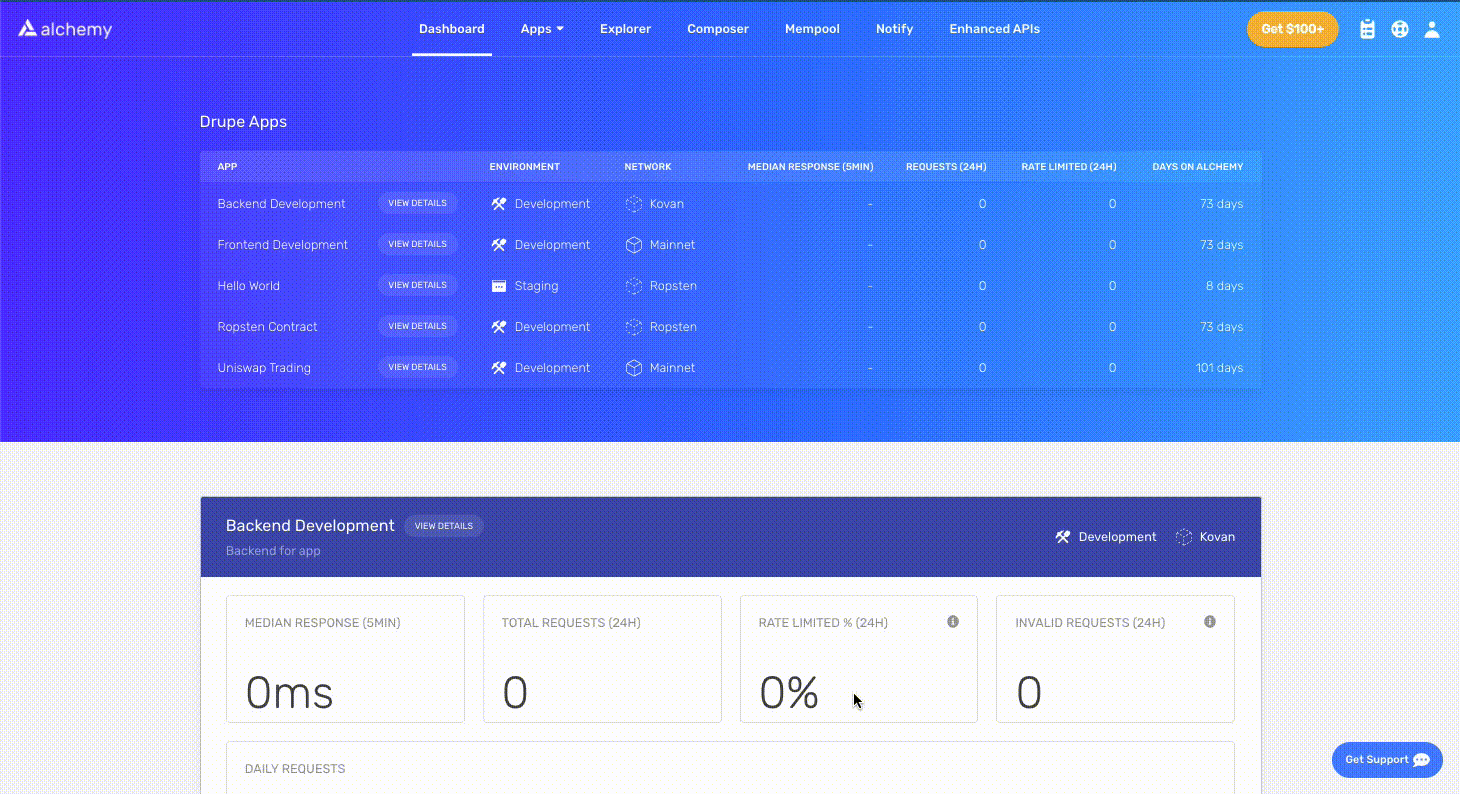
Um zu verstehen, was im Hintergrund passiert, navigieren wir zum Explorer-Tab in unserem Alchemy-Dashboard (opens in a new tab). Wenn Sie mehrere Alchemy-Apps haben, stellen Sie sicher, dass Sie nach App filtern und Hello World auswählen.
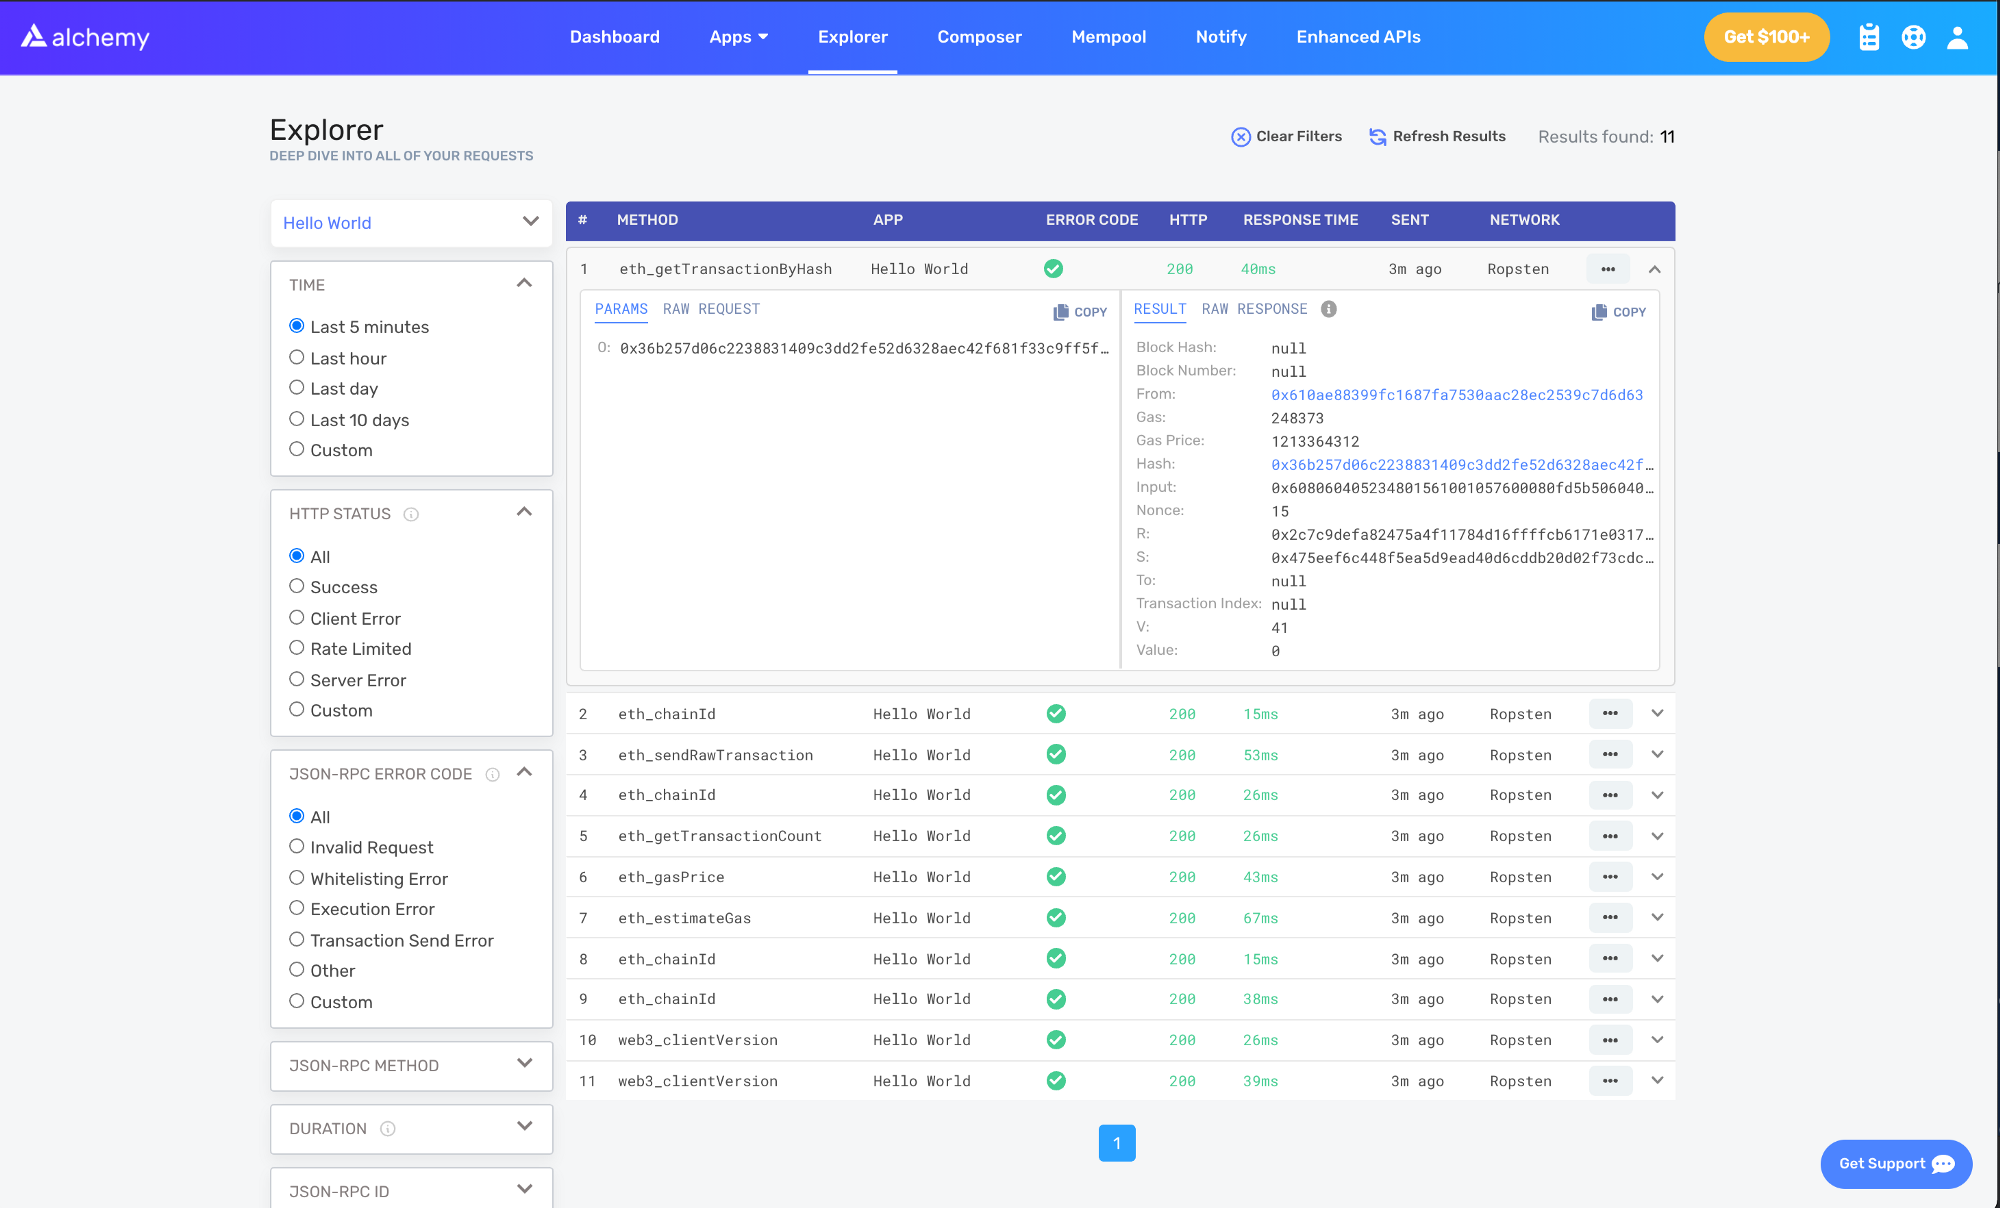
Hier sehen Sie eine Handvoll JSON-RPC-Methoden, die Hardhat/Ethers im Hintergrund für uns ausgeführt haben, als wir die Funktion .deploy() aufgerufen haben. Zwei wichtige Methoden hierbei sind eth_sendRawTransaction (opens in a new tab), was die Anfrage ist, unseren Vertrag auf die Goerli-Chain zu schreiben, und eth_getTransactionByHash (opens in a new tab), was eine Anfrage ist, um Informationen über unsere Transaktion anhand des Hashes zu lesen. Um mehr über das Senden von Transaktionen zu erfahren, sehen Sie sich unser Tutorial zum Senden von Transaktionen mit Web3 an.
Teil 2: Interaktion mit Ihrem Smart Contract
Nachdem wir nun erfolgreich einen Smart Contract im Goerli-Netzwerk bereitgestellt haben, wollen wir lernen, wie wir mit ihm interagieren können.
Erstellen einer interact.js-Datei
Dies ist die Datei, in der wir unser Interaktionsskript schreiben werden. Wir verwenden die Ethers.js-Bibliothek, die Sie zuvor in Teil 1 installiert haben.
Erstellen Sie im Ordner scripts/ eine neue Datei namens interact.js und fügen Sie den folgenden Code hinzu:
// interact.js

const API_KEY = process.env.API_KEY
const PRIVATE_KEY = process.env.PRIVATE_KEY
const CONTRACT_ADDRESS = process.env.CONTRACT_ADDRESS
Aktualisieren Ihrer .env-Datei
Wir werden neue Umgebungsvariablen verwenden, daher müssen wir sie in der .env-Datei definieren, die wir zuvor erstellt haben.
Wir müssen eine Definition für unseren Alchemy-API_KEY und die CONTRACT_ADDRESS hinzufügen, unter der Ihr Smart Contract bereitgestellt wurde.
Ihre .env-Datei sollte in etwa so aussehen:
# .env

API_URL = "https://eth-goerli.alchemyapi.io/v2/<your-api-key>"
API_KEY = "<your-api-key>"
PRIVATE_KEY = "<your-metamask-private-key>"
CONTRACT_ADDRESS = "0x<your contract address>"
Abrufen der ABI Ihres Vertrags
Die unseres Vertrags ist die Schnittstelle zur Interaktion mit unserem Smart Contract. Hardhat generiert automatisch eine ABI und speichert sie in HelloWorld.json. Um die ABI zu verwenden, müssen wir den Inhalt parsen, indem wir die folgenden Codezeilen zu unserer interact.js-Datei hinzufügen:
// interact.js
const contract = require("../artifacts/contracts/HelloWorld.sol/HelloWorld.json")
Wenn Sie die ABI sehen möchten, können Sie sie in Ihrer Konsole ausgeben:
console.log(JSON.stringify(contract.abi))
Um Ihre ABI in der Konsole ausgeben zu lassen, navigieren Sie zu Ihrem Terminal und führen Sie Folgendes aus:
npx hardhat run scripts/interact.js
Erstellen einer Instanz Ihres Vertrags
Um mit unserem Vertrag zu interagieren, müssen wir eine Vertragsinstanz in unserem Code erstellen. Um dies mit Ethers.js zu tun, müssen wir mit drei Konzepten arbeiten:
- Provider - ein Knoten-Anbieter, der Ihnen Lese- und Schreibzugriff auf die Blockchain gibt
- Signer - repräsentiert ein Ethereum-Konto, das Transaktionen signieren kann
- Contract - ein Ethers.js-Objekt, das einen bestimmten, onchain bereitgestellten Vertrag repräsentiert
Wir verwenden die Vertrags-ABI aus dem vorherigen Schritt, um unsere Instanz des Vertrags zu erstellen:
// interact.js

// Provider
const alchemyProvider = new ethers.providers.AlchemyProvider(
  (network = "goerli"),
  API_KEY
)

// Signer
const signer = new ethers.Wallet(PRIVATE_KEY, alchemyProvider)

// Contract
const helloWorldContract = new ethers.Contract(
  CONTRACT_ADDRESS,
  contract.abi,
  signer
)
Erfahren Sie mehr über Provider, Signer und Contracts in der ethers.js-Dokumentation (opens in a new tab).
Lesen der init-Nachricht
Erinnern Sie sich, als wir unseren Vertrag mit der initMessage = "Hello world!" bereitgestellt haben? Wir werden nun diese in unserem Smart Contract gespeicherte Nachricht lesen und in der Konsole ausgeben.
In JavaScript werden asynchrone Funktionen verwendet, wenn mit Netzwerken interagiert wird. Um mehr über asynchrone Funktionen zu erfahren, lesen Sie diesen Medium-Artikel (opens in a new tab).
Verwenden Sie den folgenden Code, um die Funktion message in unserem Smart Contract aufzurufen und die init-Nachricht zu lesen:
// interact.js

// ...

async function main() {
  const message = await helloWorldContract.message()
  console.log("The message is: " + message)
}
main()
Nachdem wir die Datei mit npx hardhat run scripts/interact.js im Terminal ausgeführt haben, sollten wir diese Antwort sehen:
The message is: Hello world!
Glückwunsch! Sie haben gerade erfolgreich Smart Contract-Daten aus der Ethereum-Blockchain gelesen, weiter so!
Aktualisieren der Nachricht
Anstatt die Nachricht nur zu lesen, können wir die in unserem Smart Contract gespeicherte Nachricht auch mit der Funktion update aktualisieren! Ziemlich cool, oder?
Um die Nachricht zu aktualisieren, können wir die Funktion update direkt auf unserem instanziierten Contract-Objekt aufrufen:
// interact.js

// ...

async function main() {
  const message = await helloWorldContract.message()
  console.log("The message is: " + message)

  console.log("Updating the message...")
  const tx = await helloWorldContract.update("This is the new message.")
  await tx.wait()
}
main()
Beachten Sie, dass wir in Zeile 11 einen Aufruf von .wait() auf dem zurückgegebenen Transaktionsobjekt durchführen. Dies stellt sicher, dass unser Skript darauf wartet, dass die Transaktion auf der Blockchain gemint wird, bevor die Funktion beendet wird. Wenn der Aufruf von .wait() nicht enthalten ist, sieht das Skript möglicherweise nicht den aktualisierten Wert von message im Vertrag.
Lesen der neuen Nachricht
Sie sollten in der Lage sein, den vorherigen Schritt zu wiederholen, um den aktualisierten Wert von message zu lesen. Nehmen Sie sich einen Moment Zeit und prüfen Sie, ob Sie die notwendigen Änderungen vornehmen können, um diesen neuen Wert auszugeben!
Wenn Sie einen Hinweis benötigen, sehen Sie hier, wie Ihre interact.js-Datei an diesem Punkt aussehen sollte:
// interact.js

const API_KEY = process.env.API_KEY
const PRIVATE_KEY = process.env.PRIVATE_KEY
const CONTRACT_ADDRESS = process.env.CONTRACT_ADDRESS

const contract = require("../artifacts/contracts/HelloWorld.sol/HelloWorld.json")

// Provider - Alchemy
const alchemyProvider = new ethers.providers.AlchemyProvider(
  (network = "goerli"),
  API_KEY
)

// Signer - Sie
const signer = new ethers.Wallet(PRIVATE_KEY, alchemyProvider)

// Vertragsinstanz
const helloWorldContract = new ethers.Contract(
  CONTRACT_ADDRESS,
  contract.abi,
  signer
)

async function main() {
  const message = await helloWorldContract.message()
  console.log("The message is: " + message)

  console.log("Updating the message...")
  const tx = await helloWorldContract.update("this is the new message")
  await tx.wait()

  const newMessage = await helloWorldContract.message()
  console.log("The new message is: " + newMessage)
}

main()
Führen Sie nun einfach das Skript aus und Sie sollten die alte Nachricht, den Aktualisierungsstatus und die neue Nachricht in Ihrem Terminal ausgegeben sehen!
npx hardhat run scripts/interact.js --network goerli
The message is: Hello World!
Updating the message...
The new message is: This is the new message.
Während Sie dieses Skript ausführen, werden Sie vielleicht bemerken, dass der Schritt Updating the message... eine Weile zum Laden braucht, bevor die neue Nachricht geladen wird. Das liegt am Mining-Prozess; wenn Sie neugierig sind und Transaktionen verfolgen möchten, während sie gemint werden, besuchen Sie den Alchemy-Mempool (opens in a new tab), um den Status einer Transaktion zu sehen. Wenn die Transaktion verworfen wird, ist es auch hilfreich, Goerli Etherscan (opens in a new tab) zu überprüfen und nach Ihrem Transaktions-Hash zu suchen.
Teil 3: Veröffentliche deinen Smart Contract auf Etherscan
Du hast die ganze harte Arbeit geleistet, um deinen Smart Contract zum Leben zu erwecken; jetzt ist es an der Zeit, ihn mit der Welt zu teilen!
Indem du deinen Smart Contract auf Etherscan verifizierst, kann jeder deinen Quellcode einsehen und mit deinem Smart Contract interagieren. Lass uns loslegen!
Schritt 1: Generiere einen API-Schlüssel in deinem Etherscan-Konto
Ein Etherscan-API-Schlüssel ist erforderlich, um zu verifizieren, dass du der Eigentümer des Smart Contracts bist, den du veröffentlichen möchtest.
Wenn du noch kein Etherscan-Konto hast, registriere dich für ein Konto (opens in a new tab).
Sobald du eingeloggt bist, suche deinen Benutzernamen in der Navigationsleiste, fahre mit der Maus darüber und wähle die Schaltfläche My profile (Mein Profil).
Auf deiner Profilseite solltest du eine seitliche Navigationsleiste sehen. Wähle in der seitlichen Navigationsleiste API Keys aus. Klicke als Nächstes auf die Schaltfläche „Add“ (Hinzufügen), um einen neuen API-Schlüssel zu erstellen, nenne deine App hello-world und klicke auf die Schaltfläche Create New API Key (Neuen API-Schlüssel erstellen).
Dein neuer API-Schlüssel sollte in der Tabelle der API-Schlüssel erscheinen. Kopiere den API-Schlüssel in deine Zwischenablage.
Als Nächstes müssen wir den Etherscan-API-Schlüssel zu unserer Datei .env hinzufügen.
Nach dem Hinzufügen sollte deine Datei .env wie folgt aussehen:
API_URL = "https://eth-goerli.alchemyapi.io/v2/your-api-key"
PUBLIC_KEY = "your-public-account-address"
PRIVATE_KEY = "your-private-account-address"
CONTRACT_ADDRESS = "your-contract-address"
ETHERSCAN_API_KEY = "your-etherscan-key"
Mit Hardhat bereitgestellte Smart Contracts
Installiere hardhat-etherscan
Das Veröffentlichen deines Vertrags auf Etherscan mit Hardhat ist unkompliziert. Du musst zunächst das Plugin hardhat-etherscan installieren, um loszulegen. hardhat-etherscan wird den Quellcode und die ABI des Smart Contracts automatisch auf Etherscan verifizieren. Um dies hinzuzufügen, führe im Verzeichnis hello-world Folgendes aus:
npm install --save-dev @nomiclabs/hardhat-etherscan
Sobald es installiert ist, füge die folgende Anweisung oben in deiner hardhat.config.js ein und füge die Etherscan-Konfigurationsoptionen hinzu:
// hardhat.config.js

require("dotenv").config()
require("@nomiclabs/hardhat-ethers")
require("@nomiclabs/hardhat-etherscan")

const { API_URL, PRIVATE_KEY, ETHERSCAN_API_KEY } = process.env

module.exports = {
  solidity: "0.7.3",
  defaultNetwork: "goerli",
  networks: {
    hardhat: {},
    goerli: {
      url: API_URL,
      accounts: [`0x${PRIVATE_KEY}`],
    },
  },
  etherscan: {
    // Ihr API-Schlüssel für Etherscan
    // Erhalten Sie einen unter https://etherscan.io/
    apiKey: ETHERSCAN_API_KEY,
  },
}
Verifiziere deinen Smart Contract auf Etherscan
Stelle sicher, dass alle Dateien gespeichert sind und alle Variablen in .env korrekt konfiguriert sind.
Führe den Task verify aus und übergib die Vertragsadresse sowie das Netzwerk, in dem er bereitgestellt wurde:
npx hardhat verify --network goerli DEPLOYED_CONTRACT_ADDRESS 'Hello World!'
Stelle sicher, dass DEPLOYED_CONTRACT_ADDRESS die Adresse deines bereitgestellten Smart Contracts im Goerli-Testnetz ist. Außerdem muss das letzte Argument ('Hello World!') derselbe String-Wert sein, der während des Bereitstellungsschritts in Teil 1 verwendet wurde.
Wenn alles gut geht, wirst du die folgende Nachricht in deinem Terminal sehen:
Successfully submitted source code for contract
contracts/HelloWorld.sol:HelloWorld at 0xdeployed-contract-address
for verification on Etherscan. Waiting for verification result...


Successfully verified contract HelloWorld on Etherscan.
https://goerli.etherscan.io/address/<contract-address>#contracts
Glückwunsch! Der Code deines Smart Contracts ist auf Etherscan!
Sieh dir deinen Smart Contract auf Etherscan an!
Wenn du zu dem in deinem Terminal angegebenen Link navigierst, solltest du den Code deines Smart Contracts und die ABI sehen können, die auf Etherscan veröffentlicht wurden!
Wahooo – du hast es geschafft, Champion! Jetzt kann jeder deinen Smart Contract aufrufen oder in ihn schreiben! Wir können es kaum erwarten zu sehen, was du als Nächstes baust!
Teil 4 – Integration Ihres Smart Contracts mit dem Frontend
Am Ende dieses Tutorials werden Sie wissen, wie man:
- Eine MetaMask-Wallet mit Ihrer Dezentralen Anwendung (Dapp) verbindet
- Daten aus Ihrem Smart Contract über die Alchemy Web3 (opens in a new tab)-API liest
- Ethereum-Transaktionen mit MetaMask signiert
Für diese Dapp verwenden wir React (opens in a new tab) als unser Frontend-Framework. Es ist jedoch wichtig zu beachten, dass wir nicht viel Zeit darauf verwenden werden, die Grundlagen davon zu erklären, da wir uns hauptsächlich darauf konzentrieren, Web3-Funktionalität in unser Projekt zu bringen.
Als Voraussetzung sollten Sie ein grundlegendes Verständnis von React haben. Falls nicht, empfehlen wir, das offizielle Intro to React-Tutorial (opens in a new tab) zu absolvieren.
Klonen der Startdateien
Gehen Sie zunächst zum hello-world-part-four GitHub-Repository (opens in a new tab), um die Startdateien für dieses Projekt zu erhalten, und klonen Sie dieses Repository auf Ihren lokalen Rechner.
Öffnen Sie das geklonte Repository lokal. Beachten Sie, dass es zwei Ordner enthält: starter-files und completed.
starter-files– Wir werden in diesem Verzeichnis arbeiten. Wir werden die Benutzeroberfläche (UI) mit Ihrer Ethereum-Wallet und dem Smart Contract verbinden, den wir in Teil 3 auf Etherscan veröffentlicht haben.completedenthält das gesamte abgeschlossene Tutorial und sollte nur als Referenz verwendet werden, falls Sie nicht weiterkommen.
Öffnen Sie als Nächstes Ihre Kopie von starter-files in Ihrem bevorzugten Code-Editor und navigieren Sie dann in den Ordner src.
Der gesamte Code, den wir schreiben werden, befindet sich im Ordner src. Wir werden die Komponente HelloWorld.js und die JavaScript-Dateien util/interact.js bearbeiten, um unserem Projekt Web3-Funktionalität zu verleihen.
Sehen Sie sich die Startdateien an
Bevor wir mit dem Programmieren beginnen, wollen wir untersuchen, was uns in den Startdateien zur Verfügung gestellt wird.
Bringen Sie Ihr React-Projekt zum Laufen
Beginnen wir damit, das React-Projekt in unserem Browser auszuführen. Das Schöne an React ist, dass alle Änderungen, die wir speichern, live in unserem Browser aktualisiert werden, sobald unser Projekt im Browser läuft.
Um das Projekt zum Laufen zu bringen, navigieren Sie in das Stammverzeichnis des Ordners starter-files und führen Sie npm install in Ihrem Terminal aus, um die Abhängigkeiten des Projekts zu installieren:
cd starter-files
npm install
Sobald die Installation abgeschlossen ist, führen Sie npm start in Ihrem Terminal aus:
npm start
Dadurch sollte sich http://localhost:3000/ (opens in a new tab) in Ihrem Browser öffnen, wo Sie das Frontend für unser Projekt sehen. Es sollte aus einem Feld (einem Ort zum Aktualisieren der in Ihrem Smart Contract gespeicherten Nachricht), einer Schaltfläche „Connect Wallet“ und einer Schaltfläche „Update“ bestehen.
Wenn Sie versuchen, auf eine der Schaltflächen zu klicken, werden Sie feststellen, dass sie nicht funktionieren – das liegt daran, dass wir ihre Funktionalität erst noch programmieren müssen.
Die Komponente HelloWorld.js
Gehen wir in unserem Editor zurück in den Ordner src und öffnen die Datei HelloWorld.js. Es ist extrem wichtig, dass wir alles in dieser Datei verstehen, da es die primäre React-Komponente ist, an der wir arbeiten werden.
Oben in dieser Datei werden Sie feststellen, dass wir mehrere Importanweisungen haben, die notwendig sind, um unser Projekt zum Laufen zu bringen, einschließlich der React-Bibliothek, der Hooks useEffect und useState, einiger Elemente aus der ./util/interact.js (wir werden sie bald genauer beschreiben!) und des Alchemy-Logos.
// HelloWorld.js

import React from "react"
import { useEffect, useState } from "react"
import {
  helloWorldContract,
  connectWallet,
  updateMessage,
  loadCurrentMessage,
  getCurrentWalletConnected,
} from "./util/interact.js"

import alchemylogo from "./alchemylogo.svg"
Als Nächstes haben wir unsere Zustandsvariablen, die wir nach bestimmten Ereignissen aktualisieren werden.
// HelloWorld.js

//Zustandsvariablen
const [walletAddress, setWallet] = useState("")
const [status, setStatus] = useState("")
const [message, setMessage] = useState("No connection to the network.")
const [newMessage, setNewMessage] = useState("")
Hier ist, was jede der Variablen darstellt:
walletAddress– ein String, der die Wallet-Adresse des Benutzers speichertstatus– ein String, der eine hilfreiche Nachricht speichert, die den Benutzer bei der Interaktion mit der Dapp anleitetmessage– ein String, der die aktuelle Nachricht im Smart Contract speichertnewMessage– ein String, der die neue Nachricht speichert, die in den Smart Contract geschrieben wird
Nach den Zustandsvariablen sehen Sie fünf nicht implementierte Funktionen: useEffect, addSmartContractListener, addWalletListener, connectWalletPressed und onUpdatePressed. Wir erklären im Folgenden, was sie tun:
// HelloWorld.js

//wird nur einmal aufgerufen
useEffect(async () => {
  //TODO: implementierenierenierenierenieren
}, [])

function addSmartContractListener() {
  //TODO: implement
}

function addWalletListener() {
  //TODO: implement
}

const connectWalletPressed = async () => {
  //TODO: implement
}

const onUpdatePressed = async () => {
  //TODO: implement
}
useEffect(opens in a new tab) – Dies ist ein React-Hook, der aufgerufen wird, nachdem Ihre Komponente gerendert wurde. Da ihm ein leeres Array[]als Prop übergeben wird (siehe Zeile 4), wird er nur beim ersten Rendern der Komponente aufgerufen. Hier laden wir die aktuelle in unserem Smart Contract gespeicherte Nachricht, rufen unsere Smart Contract- und Wallet-Listener auf und aktualisieren unsere Benutzeroberfläche, um widerzuspiegeln, ob bereits eine Wallet verbunden ist.addSmartContractListener– Diese Funktion richtet einen Listener ein, der auf das EreignisUpdatedMessagesunseres HelloWorld-Vertrags achtet und unsere Benutzeroberfläche aktualisiert, wenn die Nachricht in unserem Smart Contract geändert wird.addWalletListener– Diese Funktion richtet einen Listener ein, der Änderungen im Zustand der MetaMask-Wallet des Benutzers erkennt, z. B. wenn der Benutzer seine Wallet trennt oder die Adresse wechselt.connectWalletPressed– Diese Funktion wird aufgerufen, um die MetaMask-Wallet des Benutzers mit unserer Dapp zu verbinden.onUpdatePressed– Diese Funktion wird aufgerufen, wenn der Benutzer die im Smart Contract gespeicherte Nachricht aktualisieren möchte.
Gegen Ende dieser Datei haben wir die Benutzeroberfläche unserer Komponente.
// HelloWorld.js

//die Benutzeroberfläche unserer Komponente
return (
  <div id="container">
    <img id="logo" src={alchemylogo}></img>
    <button id="walletButton" onClick={connectWalletPressed}>
      {walletAddress.length > 0 ? (
        "Connected: " +
        String(walletAddress).substring(0, 6) +
        "..." +
        String(walletAddress).substring(38)
      ) : (
        <span>Connect Wallet</span>
      )}
    </button>

    <h2 style={{ paddingTop: "50px" }}>Current Message:</h2>
    <p>{message}</p>

    <h2 style={{ paddingTop: "18px" }}>New Message:</h2>

    <div>
      <input
        type="text"
        placeholder="Update the message in your smart contract."
        onChange={(e) => setNewMessage(e.target.value)}
        value={newMessage}
      />
      <p id="status">{status}</p>

      <button id="publishButton" onClick={onUpdatePressed}>
        Update
      </button>

</div>

</div>
)
Wenn Sie diesen Code sorgfältig durchgehen, werden Sie feststellen, wo wir unsere verschiedenen Zustandsvariablen in unserer Benutzeroberfläche verwenden:
- In den Zeilen 6-12 zeigen wir, wenn die Wallet des Benutzers verbunden ist (d. h.
walletAddress.length > 0), eine gekürzte Version derwalletAddressdes Benutzers in der Schaltfläche mit der ID „walletButton“ an; andernfalls steht dort einfach „Connect Wallet“. - In Zeile 17 zeigen wir die aktuelle im Smart Contract gespeicherte Nachricht an, die im String
messageerfasst ist. - In den Zeilen 23-26 verwenden wir eine gesteuerte Komponente (opens in a new tab), um unsere Zustandsvariable
newMessagezu aktualisieren, wenn sich die Eingabe im Textfeld ändert.
Zusätzlich zu unseren Zustandsvariablen werden Sie auch sehen, dass die Funktionen connectWalletPressed und onUpdatePressed aufgerufen werden, wenn auf die Schaltflächen mit den IDs publishButton bzw. walletButton geklickt wird.
Lassen Sie uns abschließend klären, wo diese Komponente HelloWorld.js hinzugefügt wird.
Wenn Sie zur Datei App.js gehen, der Hauptkomponente in React, die als Container für alle anderen Komponenten fungiert, werden Sie sehen, dass unsere Komponente HelloWorld.js in Zeile 7 eingefügt wird.
Zu guter Letzt sehen wir uns noch eine weitere Datei an, die für Sie bereitgestellt wurde: die Datei interact.js.
Die Datei interact.js
Da wir uns an das M-V-C (opens in a new tab)-Paradigma halten wollen, benötigen wir eine separate Datei, die alle unsere Funktionen zur Verwaltung der Logik, Daten und Regeln unserer Dapp enthält, um diese Funktionen dann in unser Frontend (unsere Komponente HelloWorld.js) exportieren zu können.
👆🏽Genau das ist der Zweck unserer Datei interact.js!
Navigieren Sie zum Ordner util in Ihrem Verzeichnis src, und Sie werden feststellen, dass wir eine Datei namens interact.js eingefügt haben, die alle unsere Smart Contract-Interaktionen sowie Wallet-Funktionen und -Variablen enthalten wird.
// interact.js

//export const helloWorldContract;

export const loadCurrentMessage = async () => {}

export const connectWallet = async () => {}

const getCurrentWalletConnected = async () => {}

export const updateMessage = async (message) => {}
Sie werden oben in der Datei bemerken, dass wir das Objekt helloWorldContract auskommentiert haben. Später in diesem Tutorial werden wir dieses Objekt einkommentieren und unseren Smart Contract in dieser Variablen instanziieren, die wir dann in unsere Komponente HelloWorld.js exportieren werden.
Die vier nicht implementierten Funktionen nach unserem Objekt helloWorldContract tun Folgendes:
loadCurrentMessage– Diese Funktion übernimmt die Logik zum Laden der aktuellen im Smart Contract gespeicherten Nachricht. Sie führt einen Lese-Aufruf an den Hello World Smart Contract über die Alchemy Web3-API (opens in a new tab) durch.connectWallet– Diese Funktion verbindet die MetaMask des Benutzers mit unserer Dapp.getCurrentWalletConnected– Diese Funktion prüft beim Laden der Seite, ob bereits ein Ethereum-Konto mit unserer Dapp verbunden ist, und aktualisiert unsere Benutzeroberfläche entsprechend.updateMessage– Diese Funktion aktualisiert die im Smart Contract gespeicherte Nachricht. Sie führt einen Schreib-Aufruf an den Hello World Smart Contract durch, sodass die MetaMask-Wallet des Benutzers eine Ethereum-Transaktion signieren muss, um die Nachricht zu aktualisieren.
Da wir nun verstehen, womit wir arbeiten, lassen Sie uns herausfinden, wie wir aus unserem Smart Contract lesen können!
Schritt 3: Aus Ihrem Smart Contract lesen
Um aus Ihrem Smart Contract zu lesen, müssen Sie Folgendes erfolgreich einrichten:
- Eine API-Verbindung zur Ethereum-Chain
- Eine geladene Instanz Ihres Smart Contracts
- Eine Funktion zum Aufrufen Ihrer Smart Contract-Funktion
- Einen Listener, der auf Aktualisierungen achtet, wenn sich die Daten ändern, die Sie aus dem Smart Contract lesen
Das mag nach vielen Schritten klingen, aber keine Sorge! Wir werden Sie Schritt für Schritt durch jeden einzelnen führen! :)
Eine API-Verbindung zur Ethereum-Chain herstellen
Erinnern Sie sich, wie wir in Teil 2 dieses Tutorials unseren Alchemy Web3-Schlüssel verwendet haben, um aus unserem Smart Contract zu lesen? Sie benötigen auch einen Alchemy Web3-Schlüssel in Ihrer Dezentralen Anwendung (Dapp), um von der Chain zu lesen.
Wenn Sie ihn noch nicht haben, installieren Sie zuerst Alchemy Web3 (opens in a new tab), indem Sie in das Stammverzeichnis Ihrer starter-files navigieren und Folgendes in Ihrem Terminal ausführen:
npm install @alch/alchemy-web3
Alchemy Web3 (opens in a new tab) ist ein Wrapper um Web3.js (opens in a new tab), der erweiterte API-Methoden und andere wichtige Vorteile bietet, um Ihnen das Leben als Web3-Entwickler zu erleichtern. Es ist so konzipiert, dass es nur minimale Konfiguration erfordert, sodass Sie es sofort in Ihrer App verwenden können!
Installieren Sie dann das Paket dotenv (opens in a new tab) in Ihrem Projektverzeichnis, damit wir einen sicheren Ort haben, um unseren API-Schlüssel zu speichern, nachdem wir ihn abgerufen haben.
npm install dotenv --save
Für unsere Dapp werden wir unseren Websockets-API-Schlüssel anstelle unseres HTTP-API-Schlüssels verwenden, da er es uns ermöglicht, einen Listener einzurichten, der erkennt, wenn sich die im Smart Contract gespeicherte Nachricht ändert.
Sobald Sie Ihren API-Schlüssel haben, erstellen Sie eine .env-Datei in Ihrem Stammverzeichnis und fügen Sie Ihre Alchemy-Websockets-URL hinzu. Danach sollte Ihre .env-Datei wie folgt aussehen:
REACT_APP_ALCHEMY_KEY = wss://eth-goerli.ws.alchemyapi.io/v2/<key>
Jetzt sind wir bereit, unseren Alchemy Web3-Endpunkt in unserer Dapp einzurichten! Gehen wir zurück zu unserer interact.js, die sich in unserem Ordner util befindet, und fügen den folgenden Code oben in der Datei hinzu:
// interact.js

require("dotenv").config()
const alchemyKey = process.env.REACT_APP_ALCHEMY_KEY
const { createAlchemyWeb3 } = require("@alch/alchemy-web3")
const web3 = createAlchemyWeb3(alchemyKey)

//export const helloWorldContract;
Oben haben wir zuerst den Alchemy-Schlüssel aus unserer .env-Datei importiert und dann unseren alchemyKey an createAlchemyWeb3 übergeben, um unseren Alchemy Web3-Endpunkt einzurichten.
Mit diesem bereiten Endpunkt ist es an der Zeit, unseren Smart Contract zu laden!
Laden Ihres Hello World Smart Contracts
Um Ihren Hello World Smart Contract zu laden, benötigen Sie dessen Vertragsadresse und ABI. Beides finden Sie auf Etherscan, wenn Sie Teil 3 dieses Tutorials abgeschlossen haben.
So erhalten Sie Ihre Vertrags-ABI von Etherscan
Wenn Sie Teil 3 dieses Tutorials übersprungen haben, können Sie den HelloWorld-Vertrag mit der Adresse 0x6f3f635A9762B47954229Ea479b4541eAF402A6A (opens in a new tab) verwenden. Seine ABI finden Sie hier (opens in a new tab).
Eine Vertrags-ABI ist notwendig, um anzugeben, welche Funktion ein Vertrag aufrufen wird, und um sicherzustellen, dass die Funktion Daten in dem von Ihnen erwarteten Format zurückgibt. Sobald wir unsere Vertrags-ABI kopiert haben, speichern wir sie als JSON-Datei namens contract-abi.json in Ihrem Verzeichnis src.
Ihre contract-abi.json sollte in Ihrem src-Ordner gespeichert werden.
Ausgestattet mit unserer Vertragsadresse, ABI und dem Alchemy Web3-Endpunkt können wir die contract-Methode (opens in a new tab) verwenden, um eine Instanz unseres Smart Contracts zu laden. Importieren Sie Ihre Vertrags-ABI in die Datei interact.js und fügen Sie Ihre Vertragsadresse hinzu.
// interact.js

const contractABI = require("../contract-abi.json")
const contractAddress = "0x6f3f635A9762B47954229Ea479b4541eAF402A6A"
Wir können nun endlich unsere Variable helloWorldContract einkommentieren und den Smart Contract über unseren AlchemyWeb3-Endpunkt laden:
// interact.js
export const helloWorldContract = new web3.eth.Contract(
  contractABI,
  contractAddress
)
Zusammenfassend sollten die ersten 12 Zeilen Ihrer interact.js nun so aussehen:
// interact.js

require("dotenv").config()
const alchemyKey = process.env.REACT_APP_ALCHEMY_KEY
const { createAlchemyWeb3 } = require("@alch/alchemy-web3")
const web3 = createAlchemyWeb3(alchemyKey)

const contractABI = require("../contract-abi.json")
const contractAddress = "0x6f3f635A9762B47954229Ea479b4541eAF402A6A"

export const helloWorldContract = new web3.eth.Contract(
  contractABI,
  contractAddress
)
Da wir nun unseren Vertrag geladen haben, können wir unsere Funktion loadCurrentMessage implementieren!
Implementierung von loadCurrentMessage in Ihrer Datei interact.js
Diese Funktion ist super einfach. Wir werden einen einfachen asynchronen Web3-Aufruf durchführen, um aus unserem Vertrag zu lesen. Unsere Funktion wird die im Smart Contract gespeicherte Nachricht zurückgeben:
Aktualisieren Sie loadCurrentMessage in Ihrer Datei interact.js wie folgt:
// interact.js

export const loadCurrentMessage = async () => {
  const message = await helloWorldContract.methods.message().call()
  return message
}
Da wir diesen Smart Contract in unserer Benutzeroberfläche anzeigen möchten, aktualisieren wir die Funktion useEffect in unserer Komponente HelloWorld.js wie folgt:
// HelloWorld.js

//wird nur einmal aufgerufen
useEffect(async () => {
  const message = await loadCurrentMessage()
  setMessage(message)
}, [])
Beachten Sie, dass wir möchten, dass unsere loadCurrentMessage nur einmal während des ersten Renderns der Komponente aufgerufen wird. Wir werden bald addSmartContractListener implementieren, um die Benutzeroberfläche automatisch zu aktualisieren, nachdem sich die Nachricht im Smart Contract geändert hat.
Bevor wir uns in unseren Listener stürzen, schauen wir uns an, was wir bisher haben! Speichern Sie Ihre Dateien HelloWorld.js und interact.js und gehen Sie dann zu http://localhost:3000/ (opens in a new tab)
Sie werden feststellen, dass die aktuelle Nachricht nicht mehr „No connection to the network.“ lautet. Stattdessen spiegelt sie die im Smart Contract gespeicherte Nachricht wider. Genial!
Ihre Benutzeroberfläche sollte nun die im Smart Contract gespeicherte Nachricht widerspiegeln
Apropos Listener...
Implementierung von addSmartContractListener
Wenn Sie an die Datei HelloWorld.sol zurückdenken, die wir in Teil 1 dieser Tutorial-Reihe geschrieben haben, werden Sie sich erinnern, dass es ein Smart Contract-Ereignis namens UpdatedMessages gibt, das ausgegeben wird, nachdem die Funktion update unseres Smart Contracts aufgerufen wurde (siehe Zeilen 9 und 27):
// HelloWorld.sol

// Gibt die Version von Solidity unter Verwendung der semantischen Versionierung an.
// Mehr erfahren: https://solidity.readthedocs.io/en/v0.5.10/layout-of-source-files.html#pragma
pragma solidity ^0.7.3;

// Definiert einen Vertrag namens `HelloWorld`.
// Ein Vertrag ist eine Sammlung von Funktionen und Daten (seinem Zustand). Sobald er bereitgestellt ist, befindet sich ein Vertrag an einer bestimmten Adresse auf der Ethereum-Blockchain. Mehr erfahren: https://solidity.readthedocs.io/en/v0.5.10/structure-of-a-contract.html
contract HelloWorld {

   //Wird emittiert, wenn die Update-Funktion aufgerufen wird
   //Smart Contract-Ereignisse sind eine Möglichkeit für Ihren Vertrag, Ihrem App-Frontend mitzuteilen, dass etwas auf der Blockchain passiert ist. Das Frontend kann auf bestimmte Ereignisse 'hören' und Maßnahmen ergreifen, wenn sie eintreten.
   event UpdatedMessages(string oldStr, string newStr);

   // Deklariert eine Zustandsvariable `message` vom Typ `string`.
   // Zustandsvariablen sind Variablen, deren Werte dauerhaft im Vertragsspeicher gespeichert werden. Das Schlüsselwort `public` macht Variablen von außerhalb eines Vertrags zugänglich und erstellt eine Funktion, die andere Verträge oder Clients aufrufen können, um auf den Wert zuzugreifen.
   string public message;

   // Ähnlich wie in vielen klassenbasierten objektorientierten Sprachen ist ein Konstruktor eine spezielle Funktion, die nur bei der Vertragserstellung ausgeführt wird.
   // Konstruktoren werden verwendet, um die Daten des Vertrags zu initialisieren. Mehr erfahren: https://solidity.readthedocs.io/en/v0.5.10/contracts.html#constructors
   constructor(string memory initMessage) {

      // Akzeptiert ein String-Argument `initMessage` und setzt den Wert in die Speichervariable `message` des Vertrags ein).
      message = initMessage;
   }

   // Eine öffentliche Funktion, die ein String-Argument akzeptiert und die Speichervariable `message` aktualisiert.
   function update(string memory newMessage) public {
      string memory oldMsg = message;
      message = newMessage;
      emit UpdatedMessages(oldMsg, newMessage);
   }
}
Smart Contract-Ereignisse sind eine Möglichkeit für Ihren Vertrag, Ihrer Frontend-Anwendung mitzuteilen, dass etwas auf der Blockchain passiert ist (d. h. es gab ein Ereignis). Die Anwendung kann auf bestimmte Ereignisse „hören“ und Maßnahmen ergreifen, wenn sie eintreten.
Die Funktion addSmartContractListener wird speziell auf das Ereignis UpdatedMessages unseres Hello World Smart Contracts hören und unsere Benutzeroberfläche aktualisieren, um die neue Nachricht anzuzeigen.
Ändern Sie addSmartContractListener wie folgt:
// HelloWorld.js

function addSmartContractListener() {
  helloWorldContract.events.UpdatedMessages({}, (error, data) => {
    if (error) {
      setStatus("😥 " + error.message)
    } else {
      setMessage(data.returnValues[1])
      setNewMessage("")
      setStatus("🎉 Your message has been updated!")
    }
  })
}
Lassen Sie uns aufschlüsseln, was passiert, wenn der Listener ein Ereignis erkennt:
- Wenn bei der Ausgabe des Ereignisses ein Fehler auftritt, wird dies in der Benutzeroberfläche über unsere Zustandsvariable
statuswidergespiegelt. - Andernfalls verwenden wir das zurückgegebene Objekt
data.data.returnValuesist ein bei null indiziertes Array, bei dem das erste Element im Array die vorherige Nachricht und das zweite Element die aktualisierte Nachricht speichert. Insgesamt setzen wir bei einem erfolgreichen Ereignis unseren Stringmessageauf die aktualisierte Nachricht, leeren den StringnewMessageund aktualisieren unsere Zustandsvariablestatus, um widerzuspiegeln, dass eine neue Nachricht in unserem Smart Contract veröffentlicht wurde.
Lassen Sie uns abschließend unseren Listener in unserer Funktion useEffect aufrufen, damit er beim ersten Rendern der Komponente HelloWorld.js initialisiert wird. Insgesamt sollte Ihre Funktion useEffect so aussehen:
// HelloWorld.js

useEffect(async () => {
  const message = await loadCurrentMessage()
  setMessage(message)
  addSmartContractListener()
}, [])
Da wir nun aus unserem Smart Contract lesen können, wäre es großartig herauszufinden, wie wir auch in ihn schreiben können! Um jedoch in unsere Dapp zu schreiben, muss zunächst eine Ethereum-Wallet damit verbunden sein.
Als Nächstes werden wir also die Einrichtung unserer Ethereum-Wallet (MetaMask) in Angriff nehmen und sie dann mit unserer Dapp verbinden!
Schritt 4: Richten Sie Ihre Ethereum-Wallet ein
Um etwas in die Ethereum-Chain zu schreiben, müssen Benutzer Transaktionen mit den privaten Schlüsseln ihrer virtuellen Wallet signieren. Für dieses Tutorial verwenden wir MetaMask (opens in a new tab), eine virtuelle Wallet im Browser, die zur Verwaltung Ihrer Ethereum-Kontoadresse verwendet wird, da sie das Signieren von Transaktionen für den Endbenutzer super einfach macht.
Wenn Sie mehr darüber verstehen möchten, wie Transaktionen auf Ethereum funktionieren, sehen Sie sich diese Seite der Ethereum Foundation an.
MetaMask herunterladen
Sie können hier (opens in a new tab) kostenlos ein MetaMask-Konto herunterladen und erstellen. Wenn Sie ein Konto erstellen oder bereits eines haben, stellen Sie sicher, dass Sie oben rechts zum „Goerli Test Network“ wechseln (damit wir nicht mit echtem Geld hantieren).
Ether von einem Faucet hinzufügen
Um eine Transaktion auf der Ethereum-Blockchain zu signieren, benötigen wir etwas Fake-ETH. Um ETH zu erhalten, können Sie zum FaucETH (opens in a new tab) gehen und Ihre Goerli-Kontoadresse eingeben, auf „Request funds“ klicken, dann im Dropdown-Menü „Ethereum Testnet Goerli“ auswählen und schließlich erneut auf die Schaltfläche „Request funds“ klicken. Sie sollten kurz darauf ETH in Ihrem MetaMask-Konto sehen!
Überprüfen Sie Ihr Guthaben
Um sicherzugehen, dass unser Guthaben vorhanden ist, stellen wir eine eth_getBalance (opens in a new tab)-Anfrage über das Sandbox-Tool von Alchemy (opens in a new tab). Dies gibt die Menge an ETH in unserer Wallet zurück. Nachdem Sie Ihre MetaMask-Konto-Adresse eingegeben und auf „Send Request“ geklickt haben, sollten Sie eine Antwort wie diese sehen:
{"jsonrpc": "2.0", "id": 0, "result": "0xde0b6b3a7640000"}
HINWEIS: Dieses Ergebnis ist in Wei, nicht in ETH. Wei wird als die kleinste Stückelung von Ether verwendet. Die Umrechnung von Wei in ETH lautet: 1 ETH = 10¹⁸ Wei. Wenn wir also 0xde0b6b3a7640000 in eine Dezimalzahl umwandeln, erhalten wir 1*10¹⁸, was 1 ETH entspricht.
Puh! Unser falsches Geld ist komplett da! 🤑
Schritt 5: Verbinden Sie MetaMask mit Ihrer Benutzeroberfläche
Da unsere MetaMask-Wallet nun eingerichtet ist, verbinden wir unsere Dapp damit!
Die Funktion connectWallet
Lassen Sie uns in unserer Datei interact.js die Funktion connectWallet implementieren, die wir dann in unserer Komponente HelloWorld.js aufrufen können.
Ändern wir connectWallet wie folgt:
// interact.js

export const connectWallet = async () => {
  if (window.ethereum) {
    try {
      const addressArray = await window.ethereum.request({
        method: "eth_requestAccounts",
      })
      const obj = {
        status: "👆🏽 Write a message in the text-field above.",
        address: addressArray[0],
      }
      return obj
    } catch (err) {
      return {
        address: "",
        status: "😥 " + err.message,
      }
    }
  } else {
    return {
      address: "",
      status: (
        <span>
          <p>
            {" "}
            🦊 <a target="_blank" href={`https://metamask.io/download`}>
              You must install MetaMask, a virtual Ethereum wallet, in your
              browser.
            </a>
          </p>
        </span>
      ),
    }
  }
}
Was genau macht dieser riesige Codeblock also?
Nun, zuerst wird geprüft, ob window.ethereum in Ihrem Browser aktiviert ist.
window.ethereum ist eine globale API, die von MetaMask und anderen Wallet-Anbietern injiziert wird und es Websites ermöglicht, die Ethereum-Konten von Benutzern anzufordern. Wenn dies genehmigt wird, kann sie Daten von den Blockchains lesen, mit denen der Benutzer verbunden ist, und vorschlagen, dass der Benutzer Nachrichten und Transaktionen signiert. Weitere Informationen finden Sie in der MetaMask-Dokumentation (opens in a new tab)!
Wenn window.ethereum nicht vorhanden ist, bedeutet das, dass MetaMask nicht installiert ist. Dies führt dazu, dass ein JSON-Objekt zurückgegeben wird, bei dem die zurückgegebene address ein leerer String ist und das JSX-Objekt status übermittelt, dass der Benutzer MetaMask installieren muss.
Wenn window.ethereum nun doch vorhanden ist, wird es interessant.
Mithilfe einer try/catch-Schleife versuchen wir, eine Verbindung zu MetaMask herzustellen, indem wir window.ethereum.request({ method: "eth_requestAccounts" }); (opens in a new tab) aufrufen. Der Aufruf dieser Funktion öffnet MetaMask im Browser, wobei der Benutzer aufgefordert wird, seine Wallet mit Ihrer Dapp zu verbinden.
- Wenn der Benutzer sich für eine Verbindung entscheidet, gibt
method: "eth_requestAccounts"ein Array zurück, das alle Kontoadressen des Benutzers enthält, die mit der Dapp verbunden sind. Insgesamt gibt unsere FunktionconnectWalletein JSON-Objekt zurück, das die ersteaddressin diesem Array (siehe Zeile 9) und einestatus-Nachricht enthält, die den Benutzer auffordert, eine Nachricht in den Smart Contract zu schreiben. - Wenn der Benutzer die Verbindung ablehnt, enthält das JSON-Objekt einen leeren String für die zurückgegebene
addressund einestatus-Nachricht, die widerspiegelt, dass der Benutzer die Verbindung abgelehnt hat.
Nachdem wir nun diese Funktion connectWallet geschrieben haben, besteht der nächste Schritt darin, sie in unserer Komponente HelloWorld.js aufzurufen.
Fügen Sie die Funktion connectWallet zu Ihrer UI-Komponente HelloWorld.js hinzu
Navigieren Sie zur Funktion connectWalletPressed in HelloWorld.js und aktualisieren Sie sie wie folgt:
// HelloWorld.js

const connectWalletPressed = async () => {
  const walletResponse = await connectWallet()
  setStatus(walletResponse.status)
  setWallet(walletResponse.address)
}
Fällt Ihnen auf, wie der Großteil unserer Funktionalität aus der Datei interact.js von unserer Komponente HelloWorld.js abstrahiert ist? Dies geschieht, damit wir das M-V-C-Paradigma einhalten!
In connectWalletPressed machen wir einfach einen await-Aufruf an unsere importierte Funktion connectWallet und aktualisieren anhand ihrer Antwort unsere Variablen status und walletAddress über ihre State-Hooks.
Lassen Sie uns nun beide Dateien (HelloWorld.js und interact.js) speichern und unsere bisherige Benutzeroberfläche testen.
Öffnen Sie Ihren Browser auf der Seite http://localhost:3000/ (opens in a new tab) und drücken Sie oben rechts auf der Seite auf die Schaltfläche „Connect Wallet“.
Wenn Sie MetaMask installiert haben, sollten Sie aufgefordert werden, Ihre Wallet mit Ihrer Dapp zu verbinden. Akzeptieren Sie die Einladung zur Verbindung.
Sie sollten sehen, dass die Wallet-Schaltfläche nun widerspiegelt, dass Ihre Adresse verbunden ist! Jaaaaaa 🔥
Versuchen Sie als Nächstes, die Seite zu aktualisieren... das ist seltsam. Unsere Wallet-Schaltfläche fordert uns auf, MetaMask zu verbinden, obwohl es bereits verbunden ist...
Aber keine Angst! Wir können das leicht beheben, indem wir getCurrentWalletConnected implementieren, was prüft, ob bereits eine Adresse mit unserer Dapp verbunden ist, und unsere Benutzeroberfläche entsprechend aktualisiert!
Die Funktion getCurrentWalletConnected
Aktualisieren Sie Ihre Funktion getCurrentWalletConnected in der Datei interact.js wie folgt:
// interact.js

export const getCurrentWalletConnected = async () => {
  if (window.ethereum) {
    try {
      const addressArray = await window.ethereum.request({
        method: "eth_accounts",
      })
      if (addressArray.length > 0) {
        return {
          address: addressArray[0],
          status: "👆🏽 Write a message in the text-field above.",
        }
      } else {
        return {
          address: "",
          status: "🦊 Connect to MetaMask using the top right button.",
        }
      }
    } catch (err) {
      return {
        address: "",
        status: "😥 " + err.message,
      }
    }
  } else {
    return {
      address: "",
      status: (
        <span>
          <p>
            {" "}
            🦊 <a target="_blank" href={`https://metamask.io/download`}>
              You must install MetaMask, a virtual Ethereum wallet, in your
              browser.
            </a>
          </p>
        </span>
      ),
    }
  }
}
Dieser Code ist der Funktion connectWallet, die wir gerade im vorherigen Schritt geschrieben haben, sehr ähnlich.
Der Hauptunterschied besteht darin, dass wir hier nicht die Methode eth_requestAccounts aufrufen, die MetaMask öffnet, damit der Benutzer seine Wallet verbinden kann, sondern die Methode eth_accounts, die einfach ein Array mit den MetaMask-Adressen zurückgibt, die derzeit mit unserer Dapp verbunden sind.
Um diese Funktion in Aktion zu sehen, rufen wir sie in unserer Funktion useEffect unserer Komponente HelloWorld.js auf:
// HelloWorld.js

useEffect(async () => {
  const message = await loadCurrentMessage()
  setMessage(message)
  addSmartContractListener()

  const { address, status } = await getCurrentWalletConnected()
  setWallet(address)
  setStatus(status)
}, [])
Beachten Sie, dass wir die Antwort unseres Aufrufs an getCurrentWalletConnected verwenden, um unsere Zustandsvariablen walletAddress und status zu aktualisieren.
Nachdem Sie diesen Code hinzugefügt haben, versuchen wir, unser Browserfenster zu aktualisieren.
Sehr schön! Die Schaltfläche sollte anzeigen, dass Sie verbunden sind, und eine Vorschau der Adresse Ihrer verbundenen Wallet anzeigen – selbst nach dem Aktualisieren!
Implementierung von addWalletListener
Der letzte Schritt bei der Einrichtung unserer Dapp-Wallet ist die Implementierung des Wallet-Listeners, damit unsere Benutzeroberfläche aktualisiert wird, wenn sich der Zustand unserer Wallet ändert, z. B. wenn der Benutzer die Verbindung trennt oder das Konto wechselt.
Ändern Sie in Ihrer Datei HelloWorld.js Ihre Funktion addWalletListener wie folgt:
// HelloWorld.js

function addWalletListener() {
  if (window.ethereum) {
    window.ethereum.on("accountsChanged", (accounts) => {
      if (accounts.length > 0) {
        setWallet(accounts[0])
        setStatus("👆🏽 Write a message in the text-field above.")
      } else {
        setWallet("")
        setStatus("🦊 Connect to MetaMask using the top right button.")
      }
    })
  } else {
    setStatus(
      <p>
        {" "}
        🦊 <a target="_blank" href={`https://metamask.io/download`}>
          You must install MetaMask, a virtual Ethereum wallet, in your browser.
        </a>
      </p>
    )
  }
}
Ich wette, Sie brauchen an diesem Punkt nicht einmal unsere Hilfe, um zu verstehen, was hier vor sich geht, aber der Vollständigkeit halber wollen wir es kurz aufschlüsseln:
- Zuerst prüft unsere Funktion, ob
window.ethereumaktiviert ist (d. h. MetaMask ist installiert).- Wenn nicht, setzen wir unsere Zustandsvariable
statuseinfach auf einen JSX-String, der den Benutzer auffordert, MetaMask zu installieren. - Wenn es aktiviert ist, richten wir in Zeile 3 den Listener
window.ethereum.on("accountsChanged")ein, der auf Zustandsänderungen in der MetaMask-Wallet hört. Dazu gehört, wenn der Benutzer ein zusätzliches Konto mit der Dapp verbindet, Konten wechselt oder ein Konto trennt. Wenn mindestens ein Konto verbunden ist, wird die ZustandsvariablewalletAddressals erstes Konto im vom Listener zurückgegebenen Arrayaccountsaktualisiert. Andernfalls wirdwalletAddressals leerer String festgelegt.
- Wenn nicht, setzen wir unsere Zustandsvariable
Zu guter Letzt müssen wir ihn in unserer Funktion useEffect aufrufen:
// HelloWorld.js

useEffect(async () => {
  const message = await loadCurrentMessage()
  setMessage(message)
  addSmartContractListener()

  const { address, status } = await getCurrentWalletConnected()
  setWallet(address)
  setStatus(status)

  addWalletListener()
}, [])
Und das war's! Wir haben die Programmierung unserer gesamten Wallet-Funktionalität erfolgreich abgeschlossen! Nun zu unserer letzten Aufgabe: der Aktualisierung der in unserem Smart Contract gespeicherten Nachricht!
Schritt 6: Implementierung der Funktion updateMessage
Alles klar Leute, wir sind auf der Zielgeraden angekommen! In der updateMessage Ihrer Datei interact.js werden wir Folgendes tun:
- Sicherstellen, dass die Nachricht, die wir in unserem Smart Contract veröffentlichen möchten, gültig ist
- Unsere Transaktion mit MetaMask signieren
- Diese Funktion von unserer Frontend-Komponente
HelloWorld.jsaufrufen
Das wird nicht lange dauern; lassen Sie uns diese Dapp fertigstellen!
Fehlerbehandlung bei der Eingabe
Natürlich ist es sinnvoll, zu Beginn der Funktion eine Art Fehlerbehandlung für die Eingabe zu haben.
Wir möchten, dass unsere Funktion vorzeitig zurückkehrt, wenn keine MetaMask-Erweiterung installiert ist, keine Wallet verbunden ist (d. h. die übergebene address ist ein leerer String) oder die message ein leerer String ist. Fügen wir der updateMessage die folgende Fehlerbehandlung hinzu:
// interact.js

export const updateMessage = async (address, message) => {
  if (!window.ethereum || address === null) {
    return {
      status:
        "💡 Connect your MetaMask wallet to update the message on the blockchain.",
    }
  }

  if (message.trim() === "") {
    return {
      status: "❌ Your message cannot be an empty string.",
    }
  }
}
Da wir nun eine ordnungsgemäße Fehlerbehandlung für die Eingabe haben, ist es an der Zeit, die Transaktion über MetaMask zu signieren!
Signieren unserer Transaktion
Wenn Sie bereits mit traditionellen Web3-Ethereum-Transaktionen vertraut sind, wird Ihnen der Code, den wir als Nächstes schreiben, sehr bekannt vorkommen. Fügen Sie unter Ihrem Code zur Fehlerbehandlung bei der Eingabe Folgendes zu updateMessage hinzu:
// interact.js

//Transaktionsparameter einrichten
const transactionParameters = {
  to: contractAddress, // Erforderlich, außer bei Vertragsveröffentlichungen.
  from: address, // muss mit der aktiven Adresse des Benutzers übereinstimmen.
  data: helloWorldContract.methods.update(message).encodeABI(),
}

//die Transaktion signieren
try {
  const txHash = await window.ethereum.request({
    method: "eth_sendTransaction",
    params: [transactionParameters],
  })
  return {
    status: (
      <span>
        ✅{" "}
        <a target="_blank" href={`https://goerli.etherscan.io/tx/${txHash}`}>
          View the status of your transaction on Etherscan!
        </a>
        <br />
        ℹ️ Once the transaction is verified by the network, the message will be
        updated automatically.
      </span>
    ),
  }
} catch (error) {
  return {
    status: "😥 " + error.message,
  }
}
Lassen Sie uns aufschlüsseln, was passiert. Zuerst richten wir unsere Transaktionsparameter ein, wobei:
todie Empfängeradresse (unseren Smart Contract) angibtfromden Unterzeichner der Transaktion angibt, die Variableaddress, die wir an unsere Funktion übergeben habendataden Aufruf der Methodeupdateunseres Hello World Smart Contracts enthält, die unsere String-Variablemessageals Eingabe erhält
Dann machen wir einen await-Aufruf, window.ethereum.request, bei dem wir MetaMask bitten, die Transaktion zu signieren. Beachten Sie, dass wir in den Zeilen 11 und 12 unsere eth-Methode eth_sendTransaction angeben und unsere transactionParameters übergeben.
An diesem Punkt öffnet sich MetaMask im Browser und fordert den Benutzer auf, die Transaktion zu signieren oder abzulehnen.
- Wenn die Transaktion erfolgreich ist, gibt die Funktion ein JSON-Objekt zurück, bei dem der JSX-String
statusden Benutzer auffordert, Etherscan für weitere Informationen zu seiner Transaktion zu besuchen. - Wenn die Transaktion fehlschlägt, gibt die Funktion ein JSON-Objekt zurück, bei dem der String
statusdie Fehlermeldung übermittelt.
Insgesamt sollte unsere Funktion updateMessage so aussehen:
// interact.js

export const updateMessage = async (address, message) => {
  //Eingabefehlerbehandlung
  if (!window.ethereum || address === null) {
    return {
      status:
        "💡 Connect your MetaMask wallet to update the message on the blockchain.",
    }
  }

  if (message.trim() === "") {
    return {
      status: "❌ Your message cannot be an empty string.",
    }
  }

  //Transaktionsparameter einrichten
  const transactionParameters = {
    to: contractAddress, // Erforderlich, außer bei Vertragsveröffentlichungen.
    from: address, // muss mit der aktiven Adresse des Benutzers übereinstimmen.
    data: helloWorldContract.methods.update(message).encodeABI(),
  }

  //die Transaktion signieren
  try {
    const txHash = await window.ethereum.request({
      method: "eth_sendTransaction",
      params: [transactionParameters],
    })
    return {
      status: (
        <span>
          ✅{" "}
          <a target="_blank" href={`https://goerli.etherscan.io/tx/${txHash}`}>
            View the status of your transaction on Etherscan!
          </a>
          <br />
          ℹ️ Once the transaction is verified by the network, the message will
          be updated automatically.
        </span>
      ),
    }
  } catch (error) {
    return {
      status: "😥 " + error.message,
    }
  }
}
Zu guter Letzt müssen wir unsere Funktion updateMessage mit unserer Komponente HelloWorld.js verbinden.
Verbinden Sie updateMessage mit dem Frontend HelloWorld.js
Unsere Funktion onUpdatePressed sollte einen await-Aufruf an die importierte Funktion updateMessage durchführen und die Zustandsvariable status ändern, um widerzuspiegeln, ob unsere Transaktion erfolgreich war oder fehlgeschlagen ist:
// HelloWorld.js

const onUpdatePressed = async () => {
  const { status } = await updateMessage(walletAddress, newMessage)
  setStatus(status)
}
Es ist super sauber und einfach. Und raten Sie mal... IHRE DAPP IST FERTIG!!!
Probieren Sie die Schaltfläche Update aus!
Erstellen Sie Ihre eigene benutzerdefinierte Dapp
Wuhuuu, Sie haben es bis zum Ende des Tutorials geschafft! Zusammenfassend haben Sie gelernt, wie man:
- Eine MetaMask-Wallet mit Ihrem Dapp-Projekt verbindet
- Daten aus Ihrem Smart Contract über die Alchemy Web3 (opens in a new tab)-API liest
- Ethereum-Transaktionen mit MetaMask signiert
Jetzt sind Sie bestens gerüstet, um die Fähigkeiten aus diesem Tutorial anzuwenden und Ihr eigenes benutzerdefiniertes Dapp-Projekt zu erstellen! Wie immer gilt: Wenn Sie Fragen haben, zögern Sie nicht, uns im Alchemy Discord (opens in a new tab) um Hilfe zu bitten. 🧙♂️
Sobald Sie dieses Tutorial abgeschlossen haben, lassen Sie uns wissen, wie Ihre Erfahrung war oder ob Sie Feedback haben, indem Sie uns auf Twitter unter @alchemyplatform (opens in a new tab) markieren!